
Energy Suspension Polyurethane Bushings On Project CrossTime Miata

Registered
Thread Starter

 53 shares
Energy Suspension Polyurethane Bushings On Project CrossTime Miata
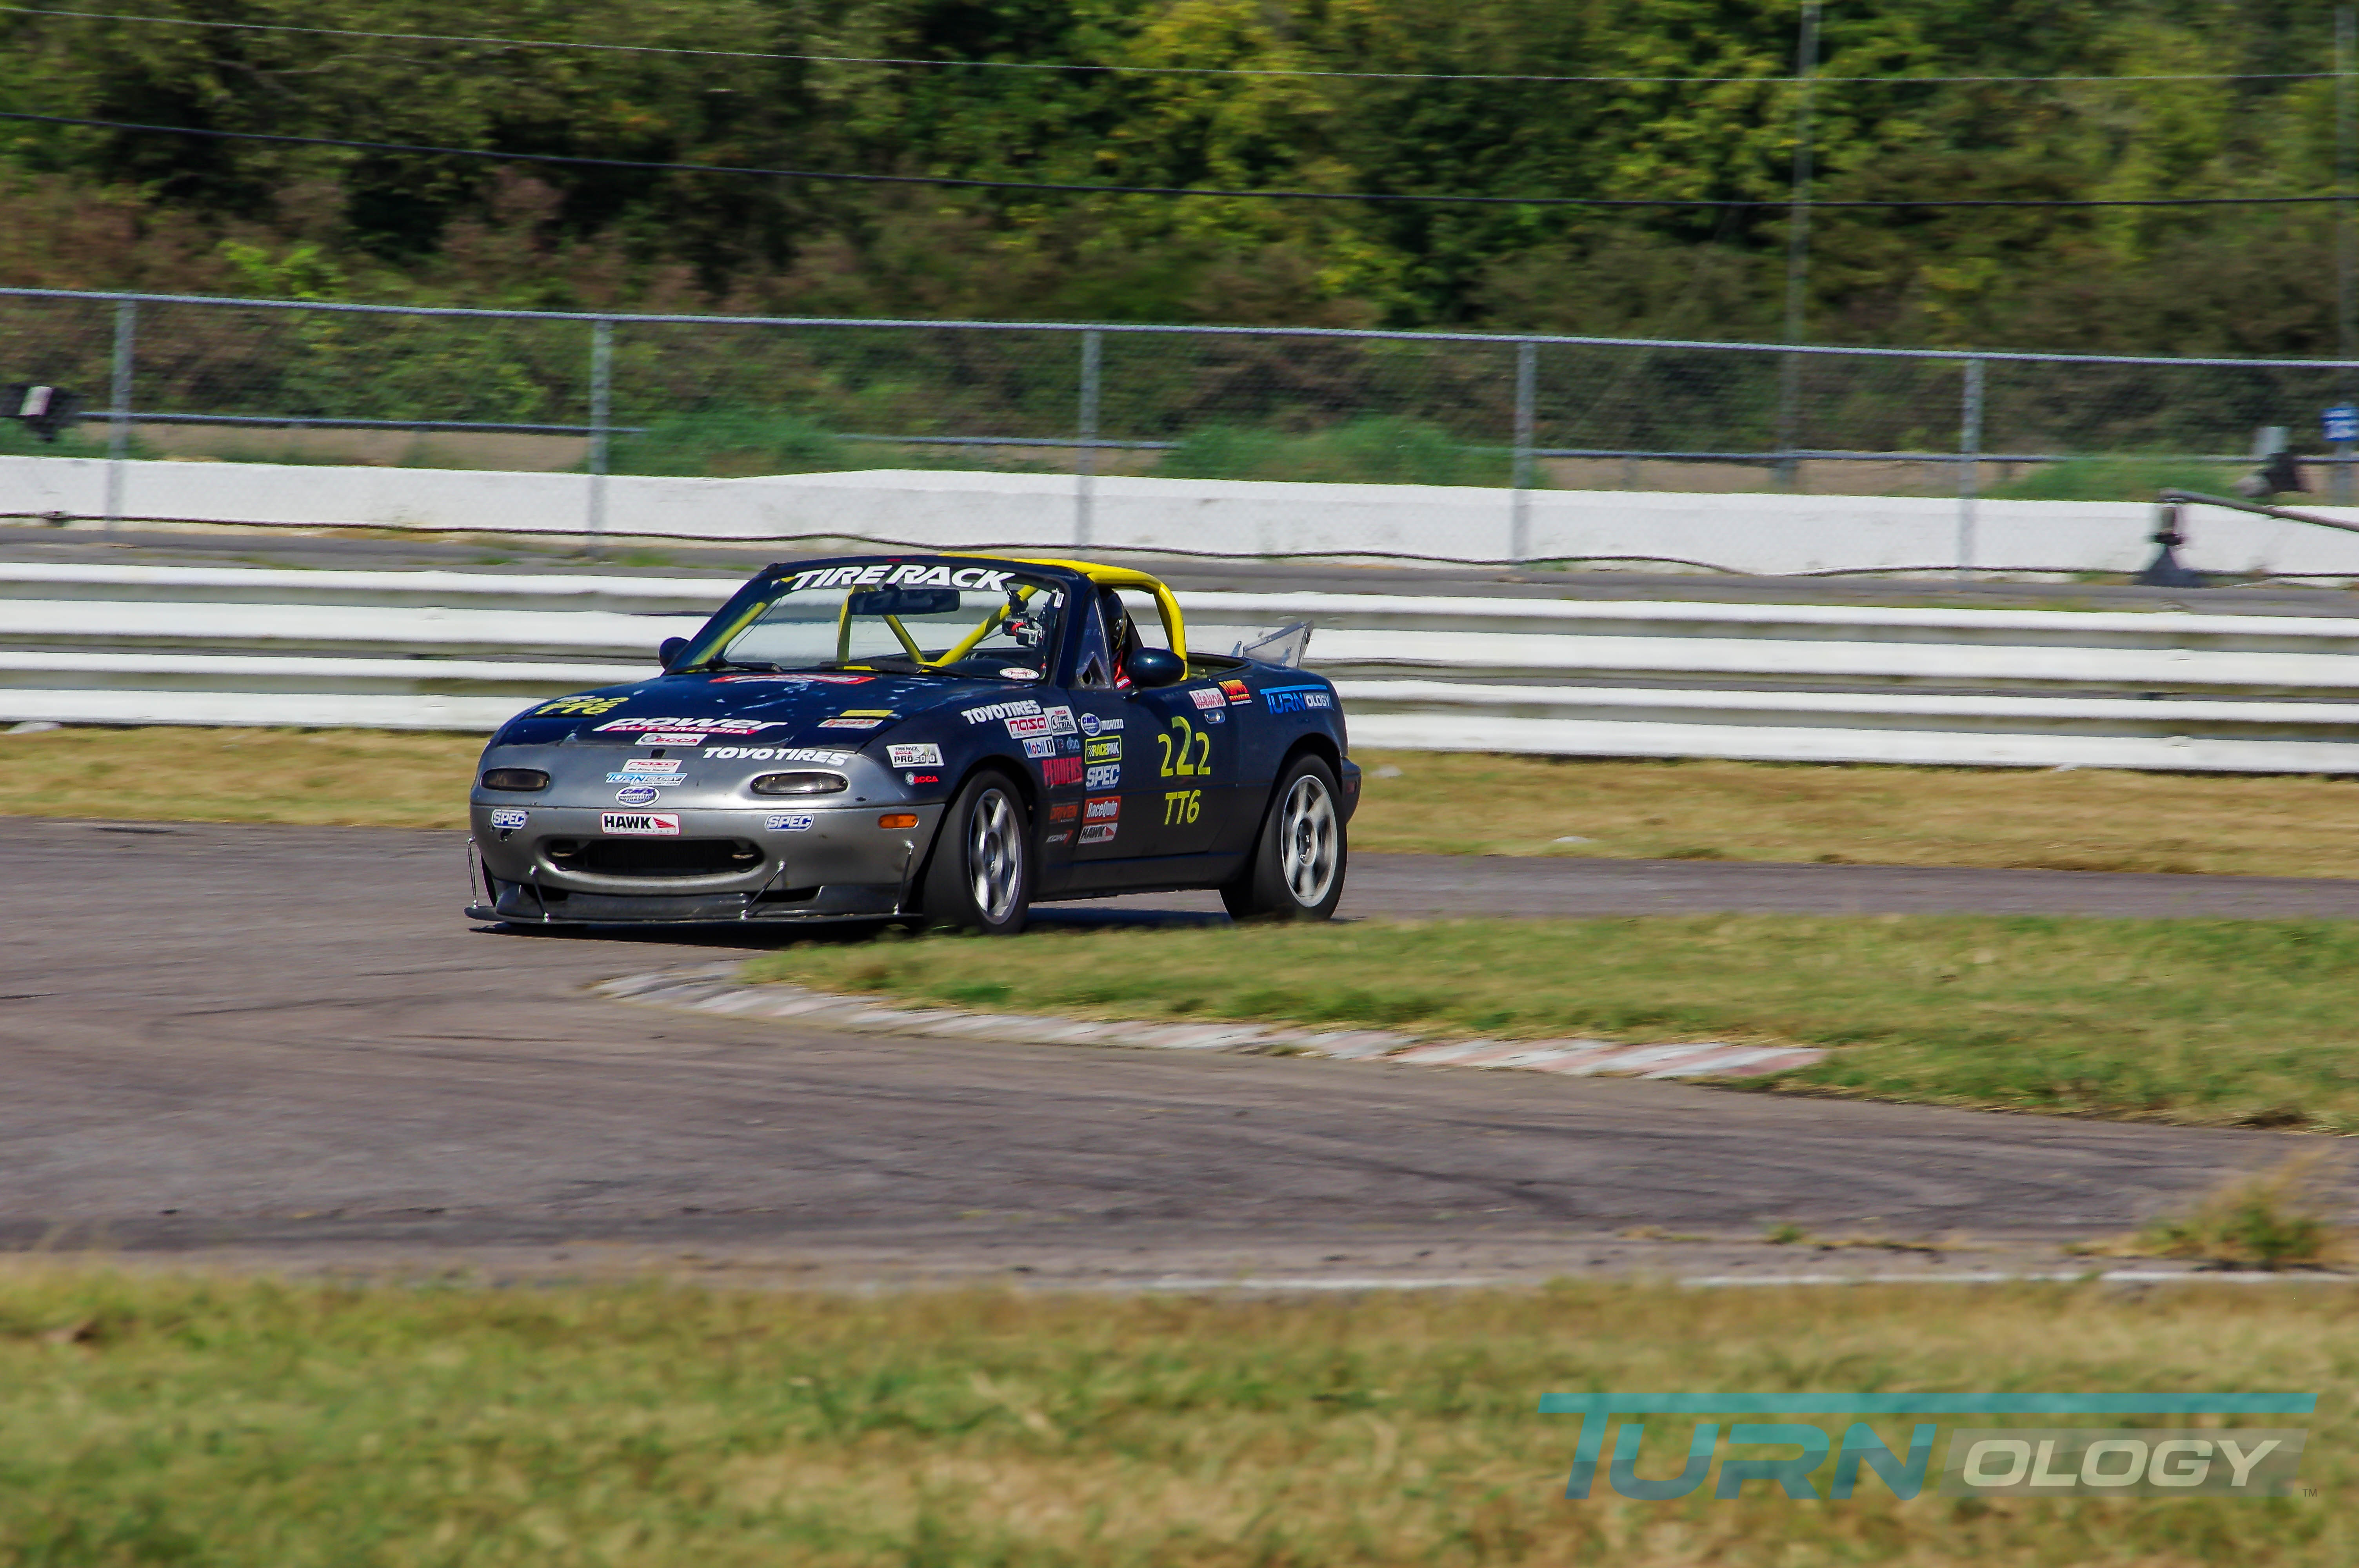
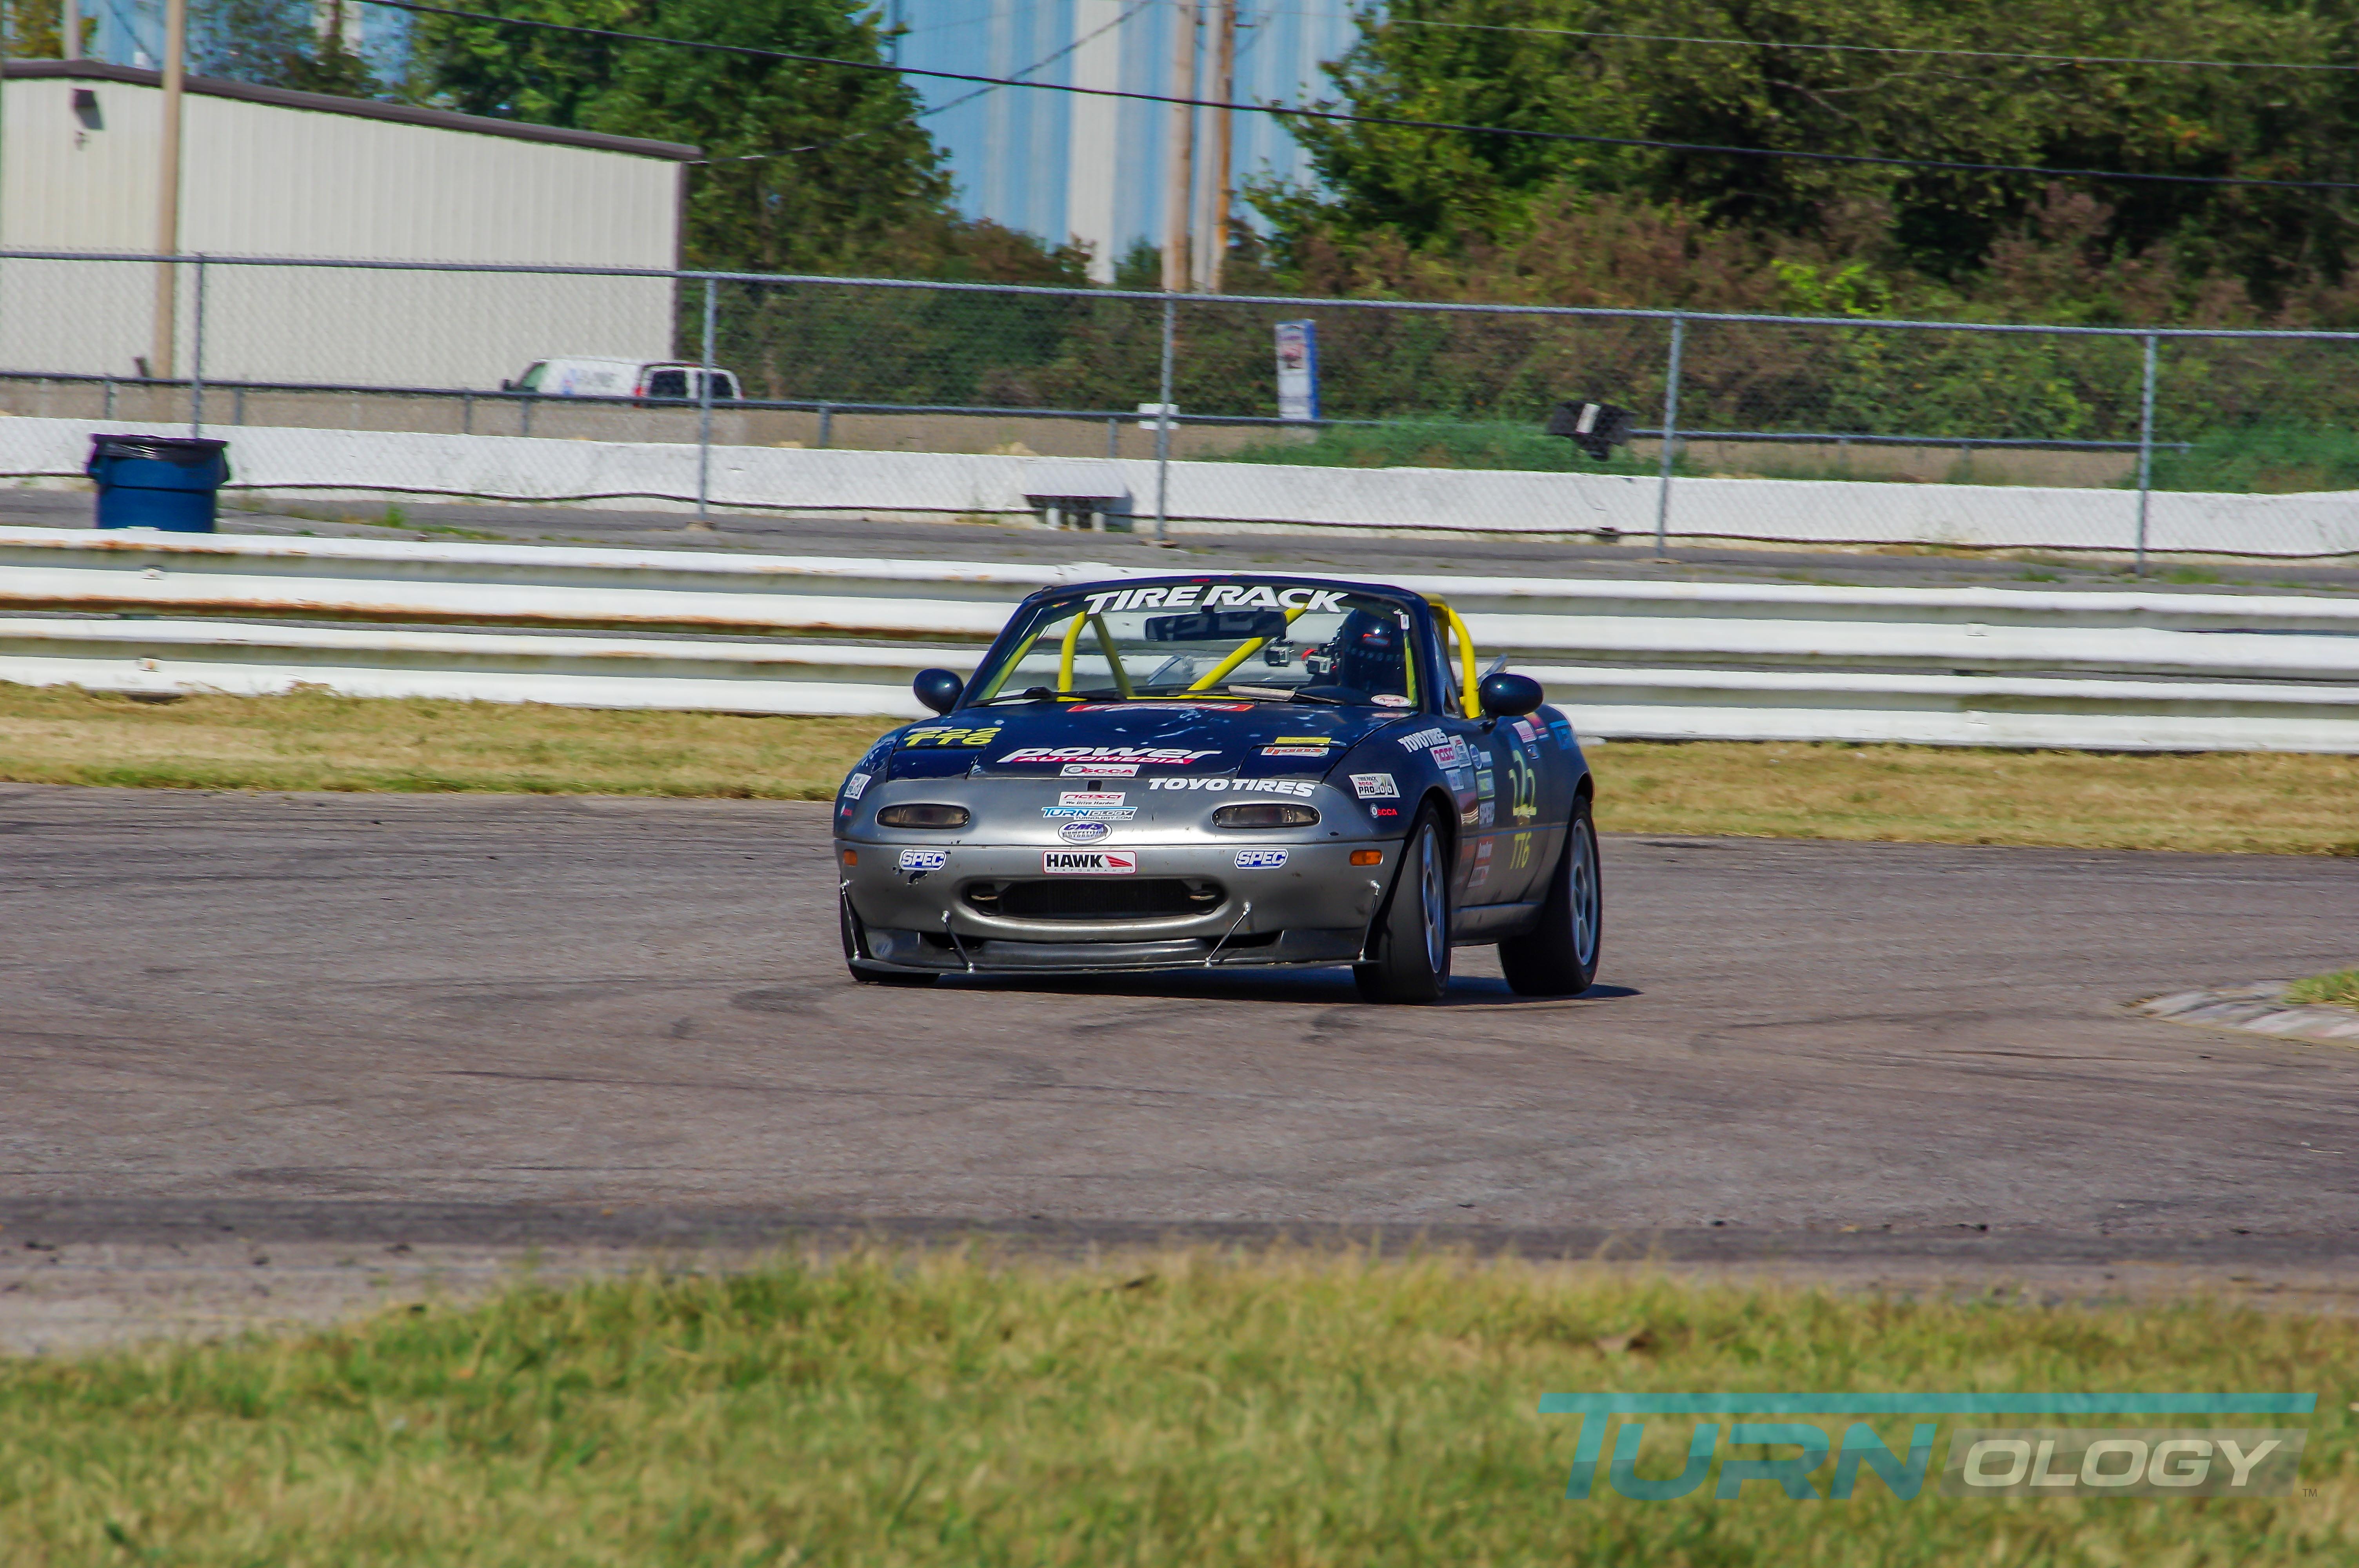
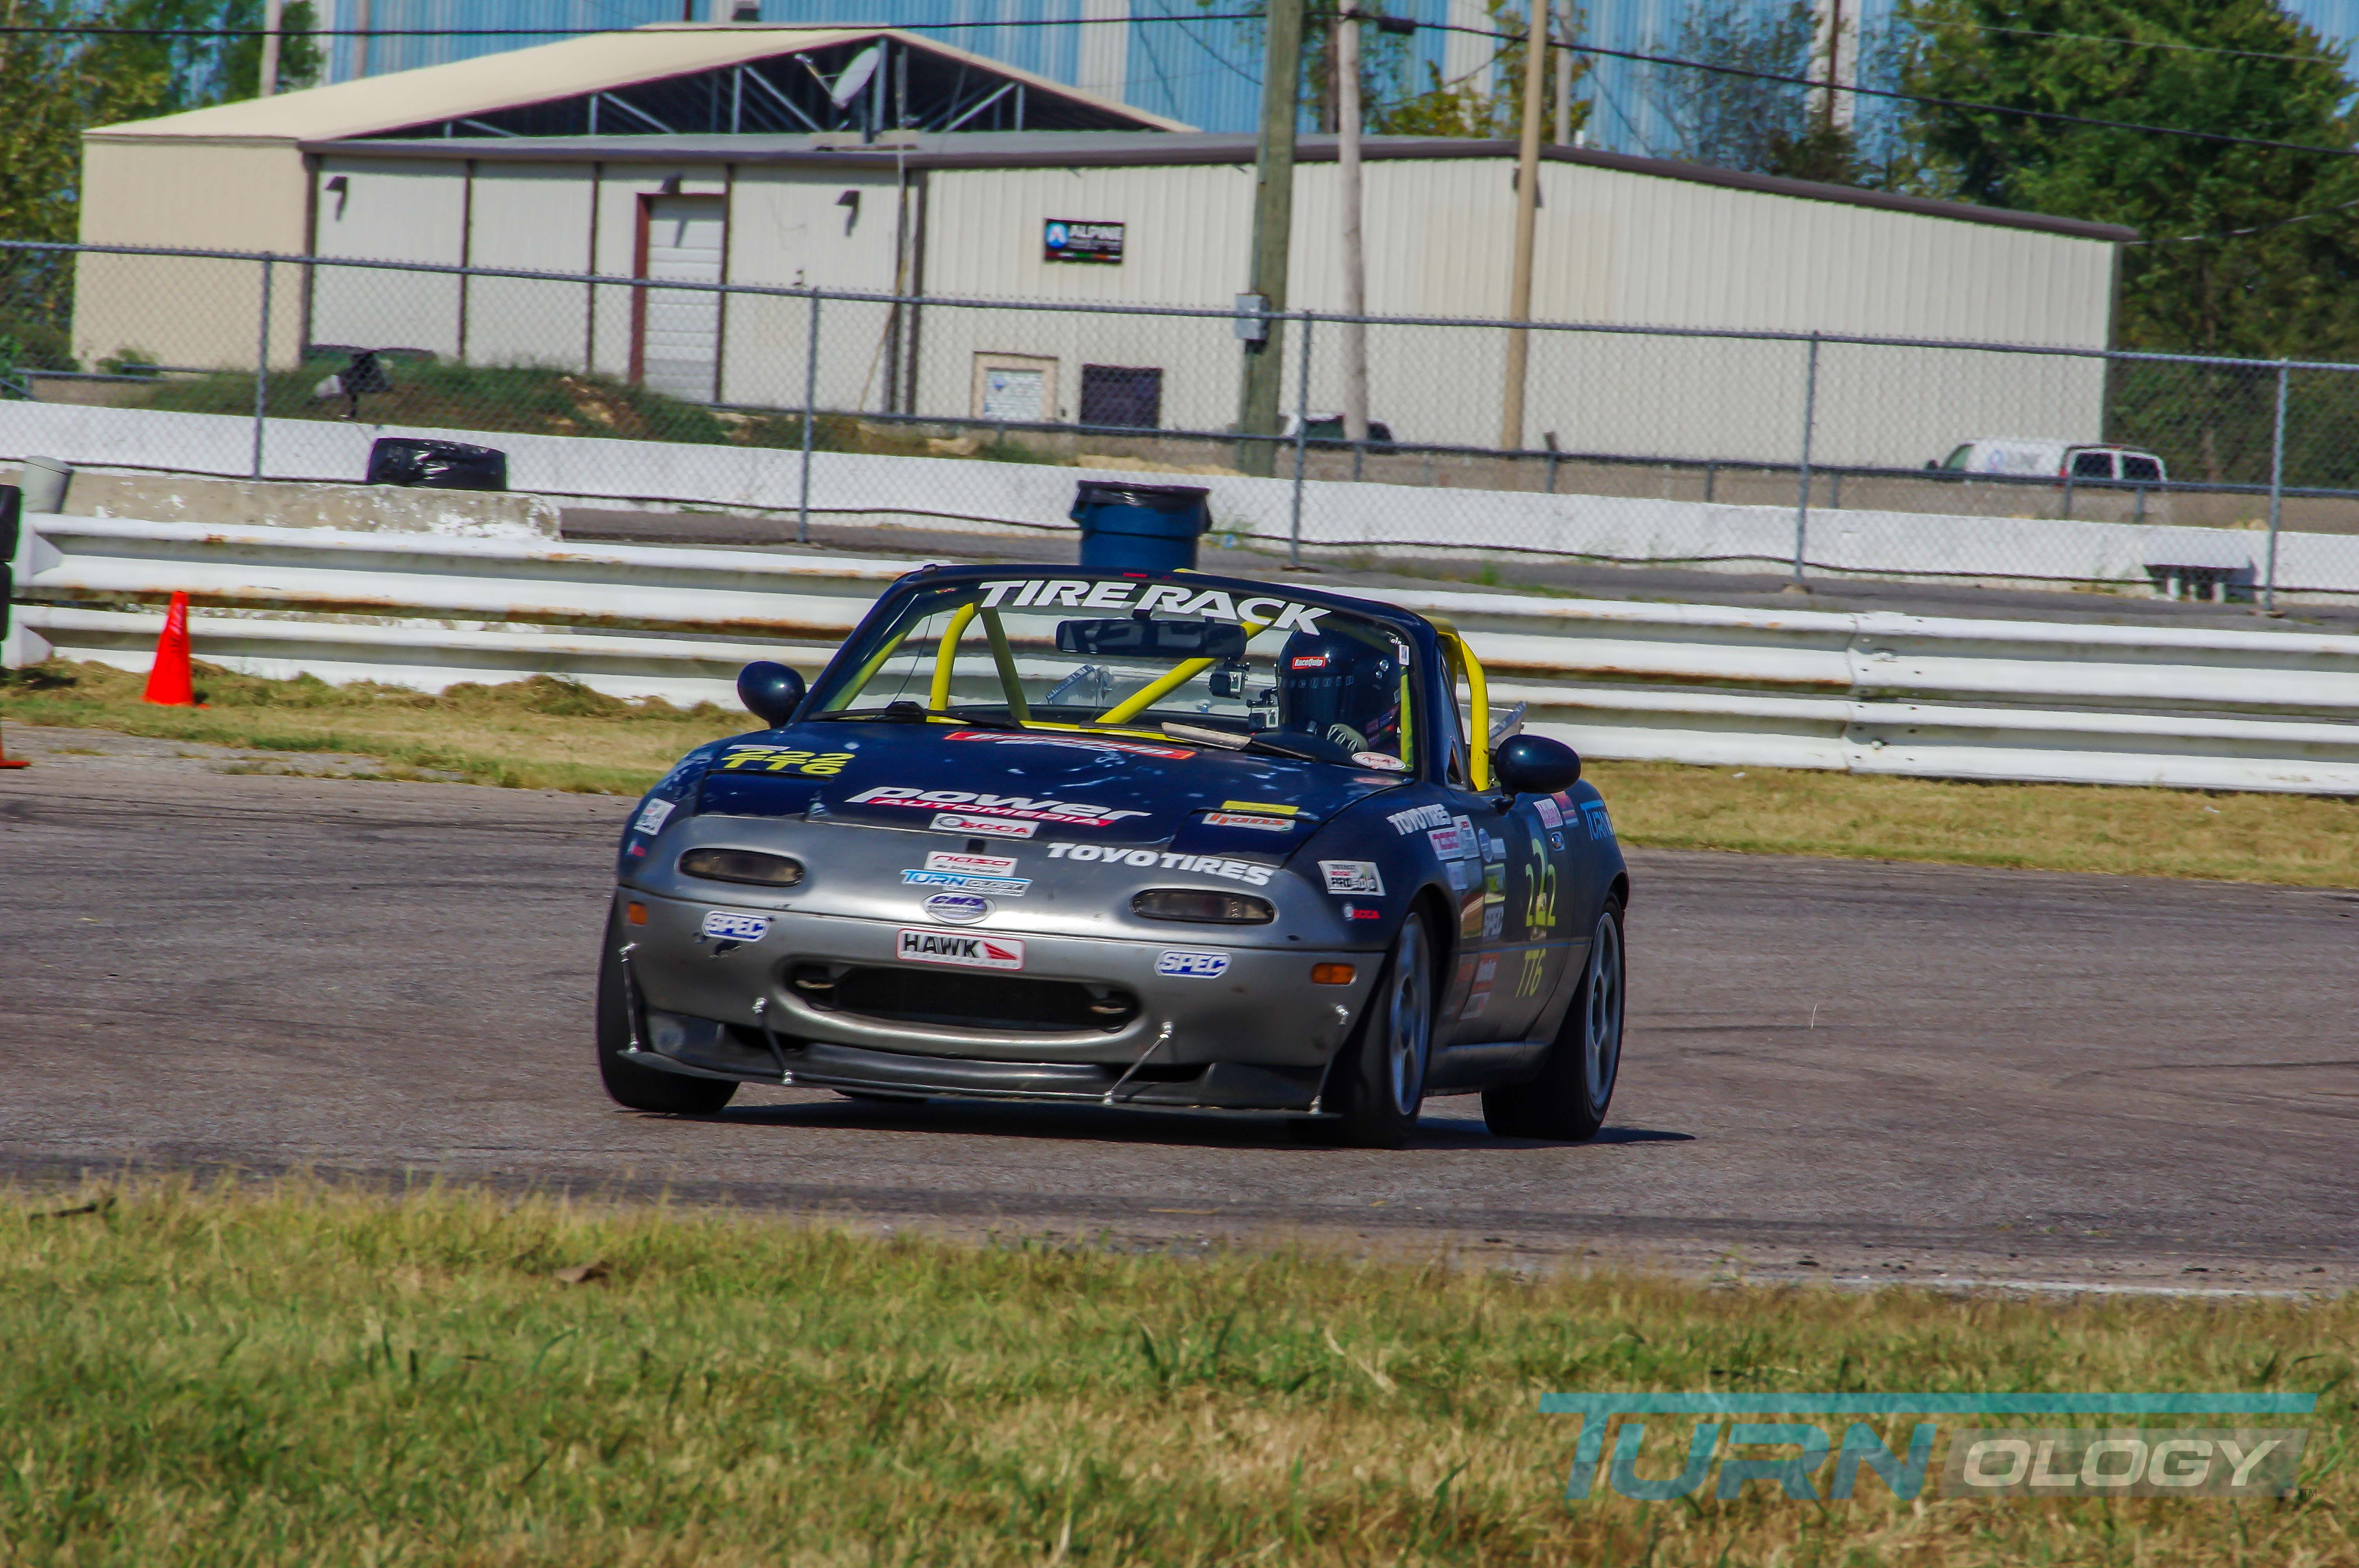
By Shawn Brereton February 13, 2020Whether you have a new or old car, there is one change you can make to help your vehicle handle better on the street or track. We�re talking about upgrading old, worn-out rubber bushings to performance polyurethane. With 189,000 miles on our Project CrossTime Miata, it was time to make the switch.
No matter the type of driving you are doing, consistency and predictability are vital to safety and making good lap times. If the suspension isn�t up to the task, you are leaving a lot on the table. We turned to Energy Suspension, the world�s largest manufacturer of performance and polyurethane automotive components for this upgrade. Follow along as we take you through the highlights of making the change on CrossTime.
We won�t sugarcoat it; this is not an easy process. Those old bushings will probably fight you every step of the way. The good news is, once you get the old ones out, the Energy Suspension bushings are easy to install.
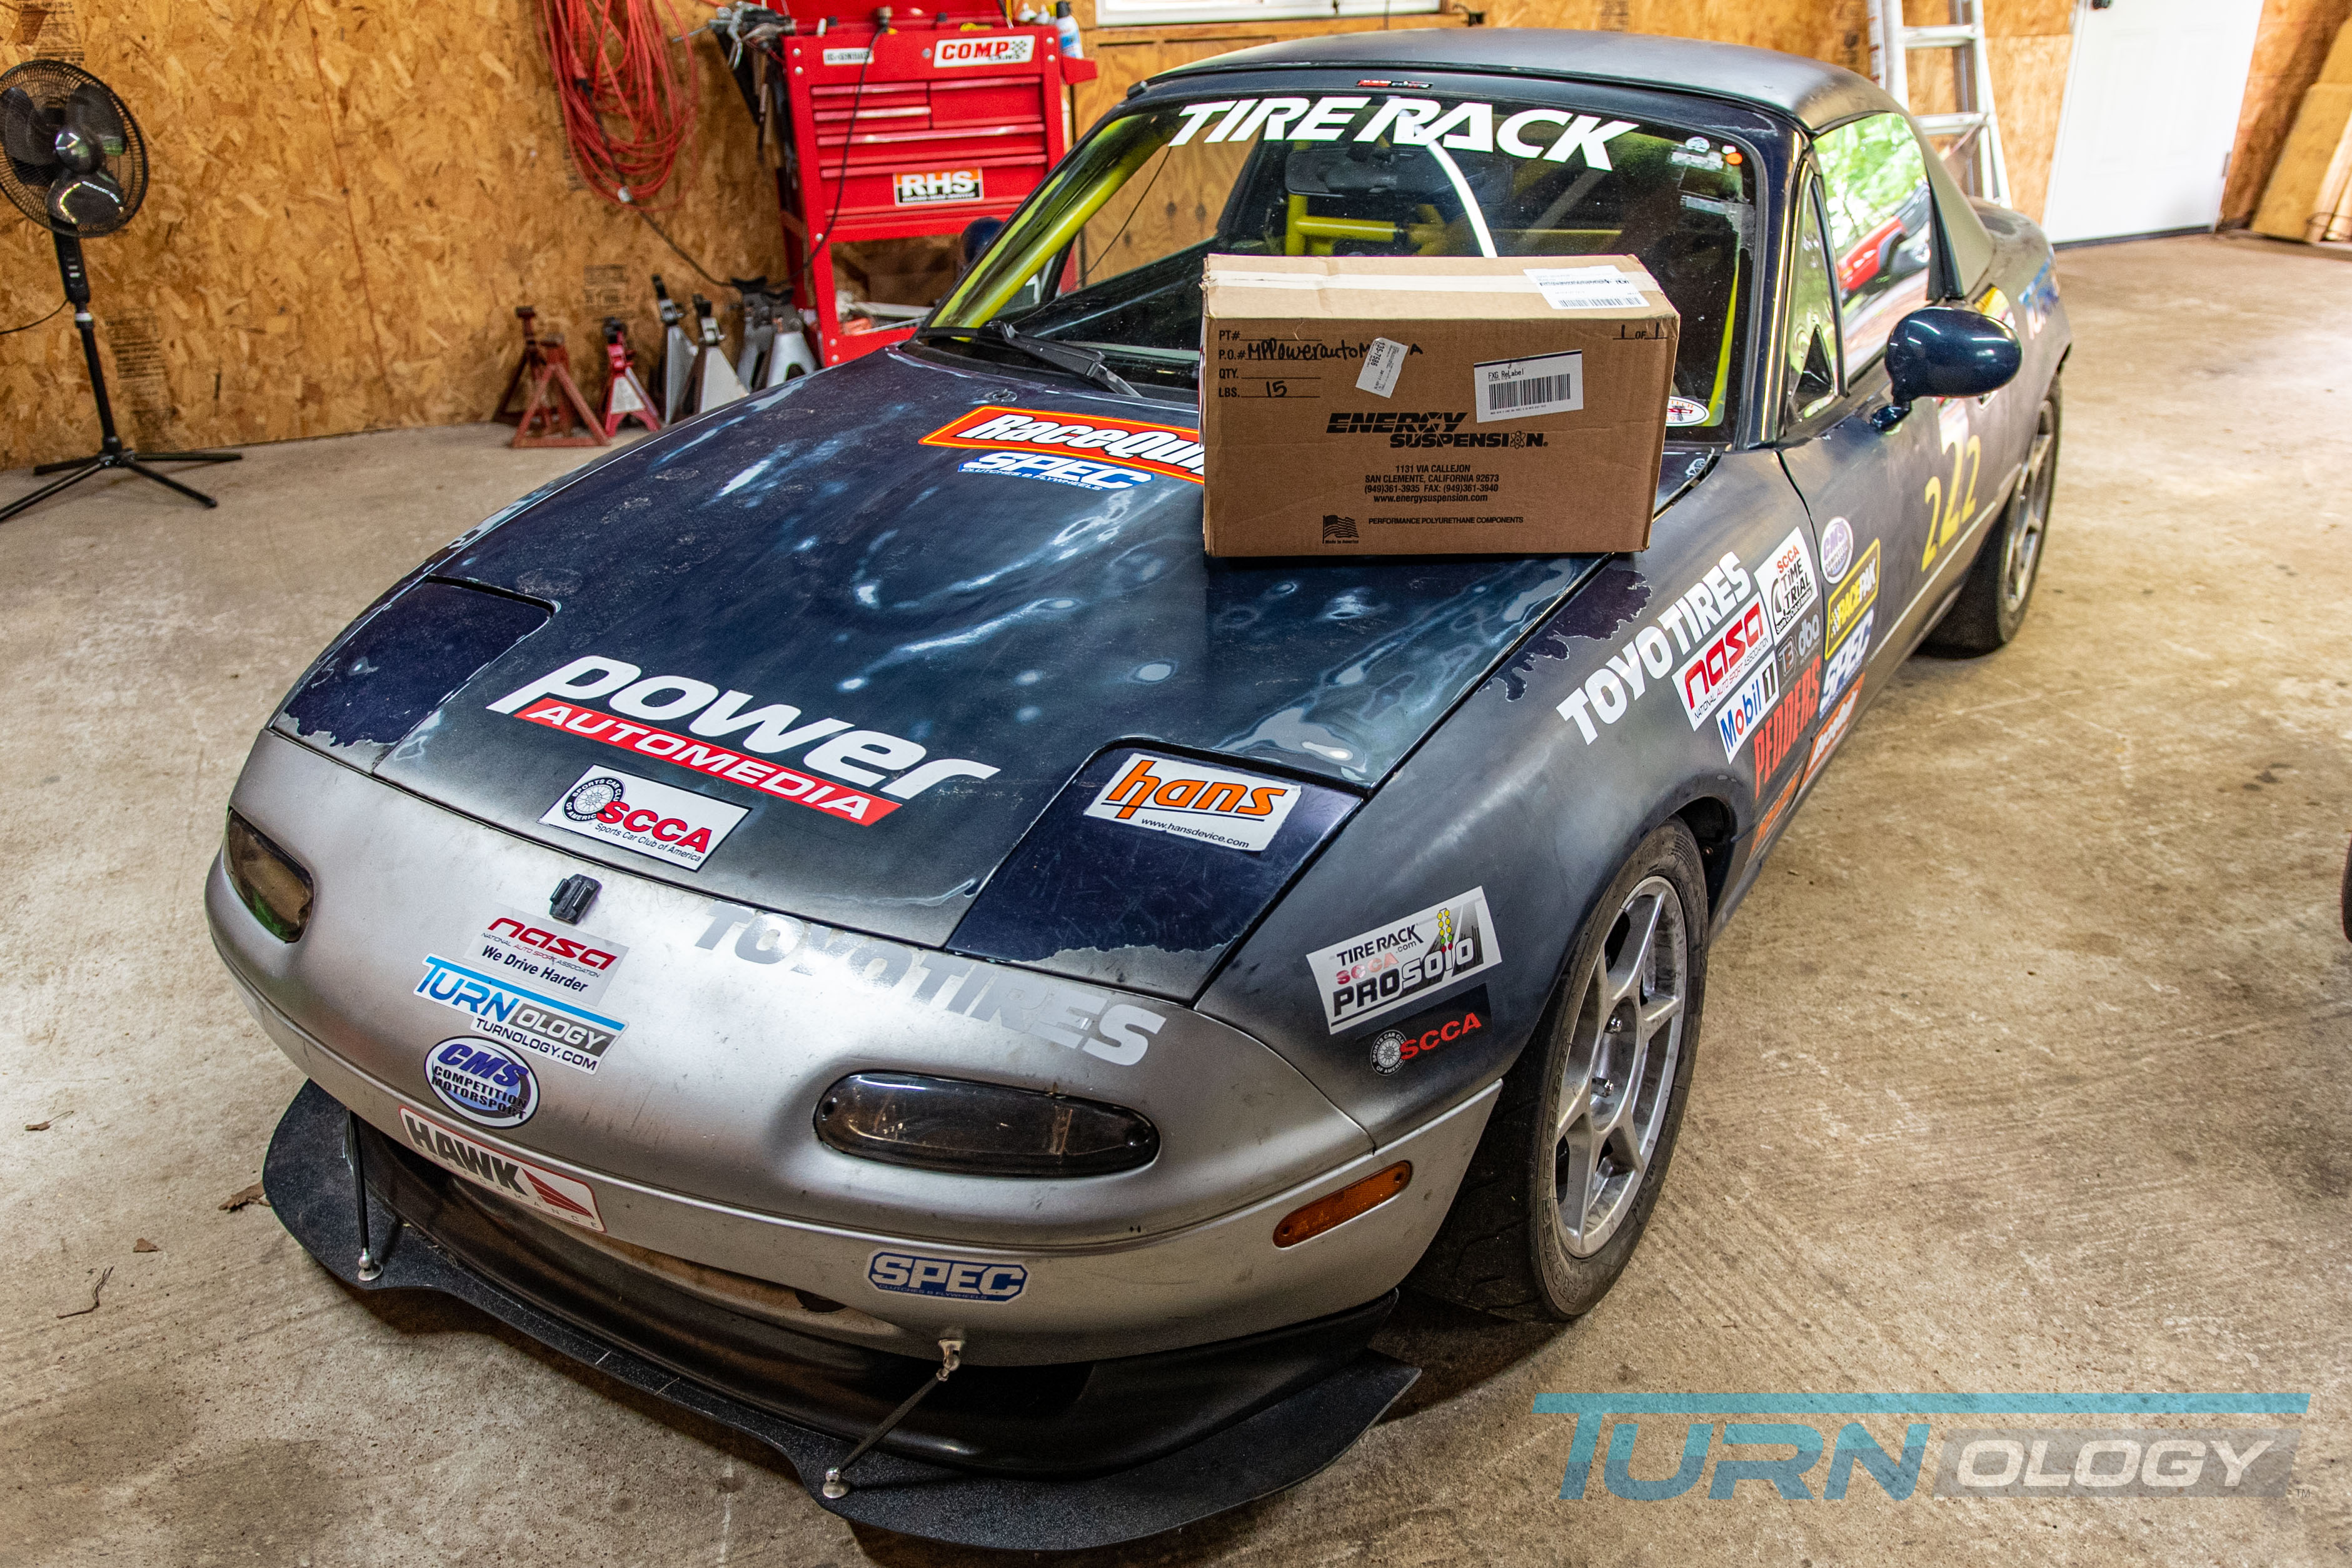 CrossTime goes under the knife to get performance polyurethane bushings installed.
Gaining Some Energy
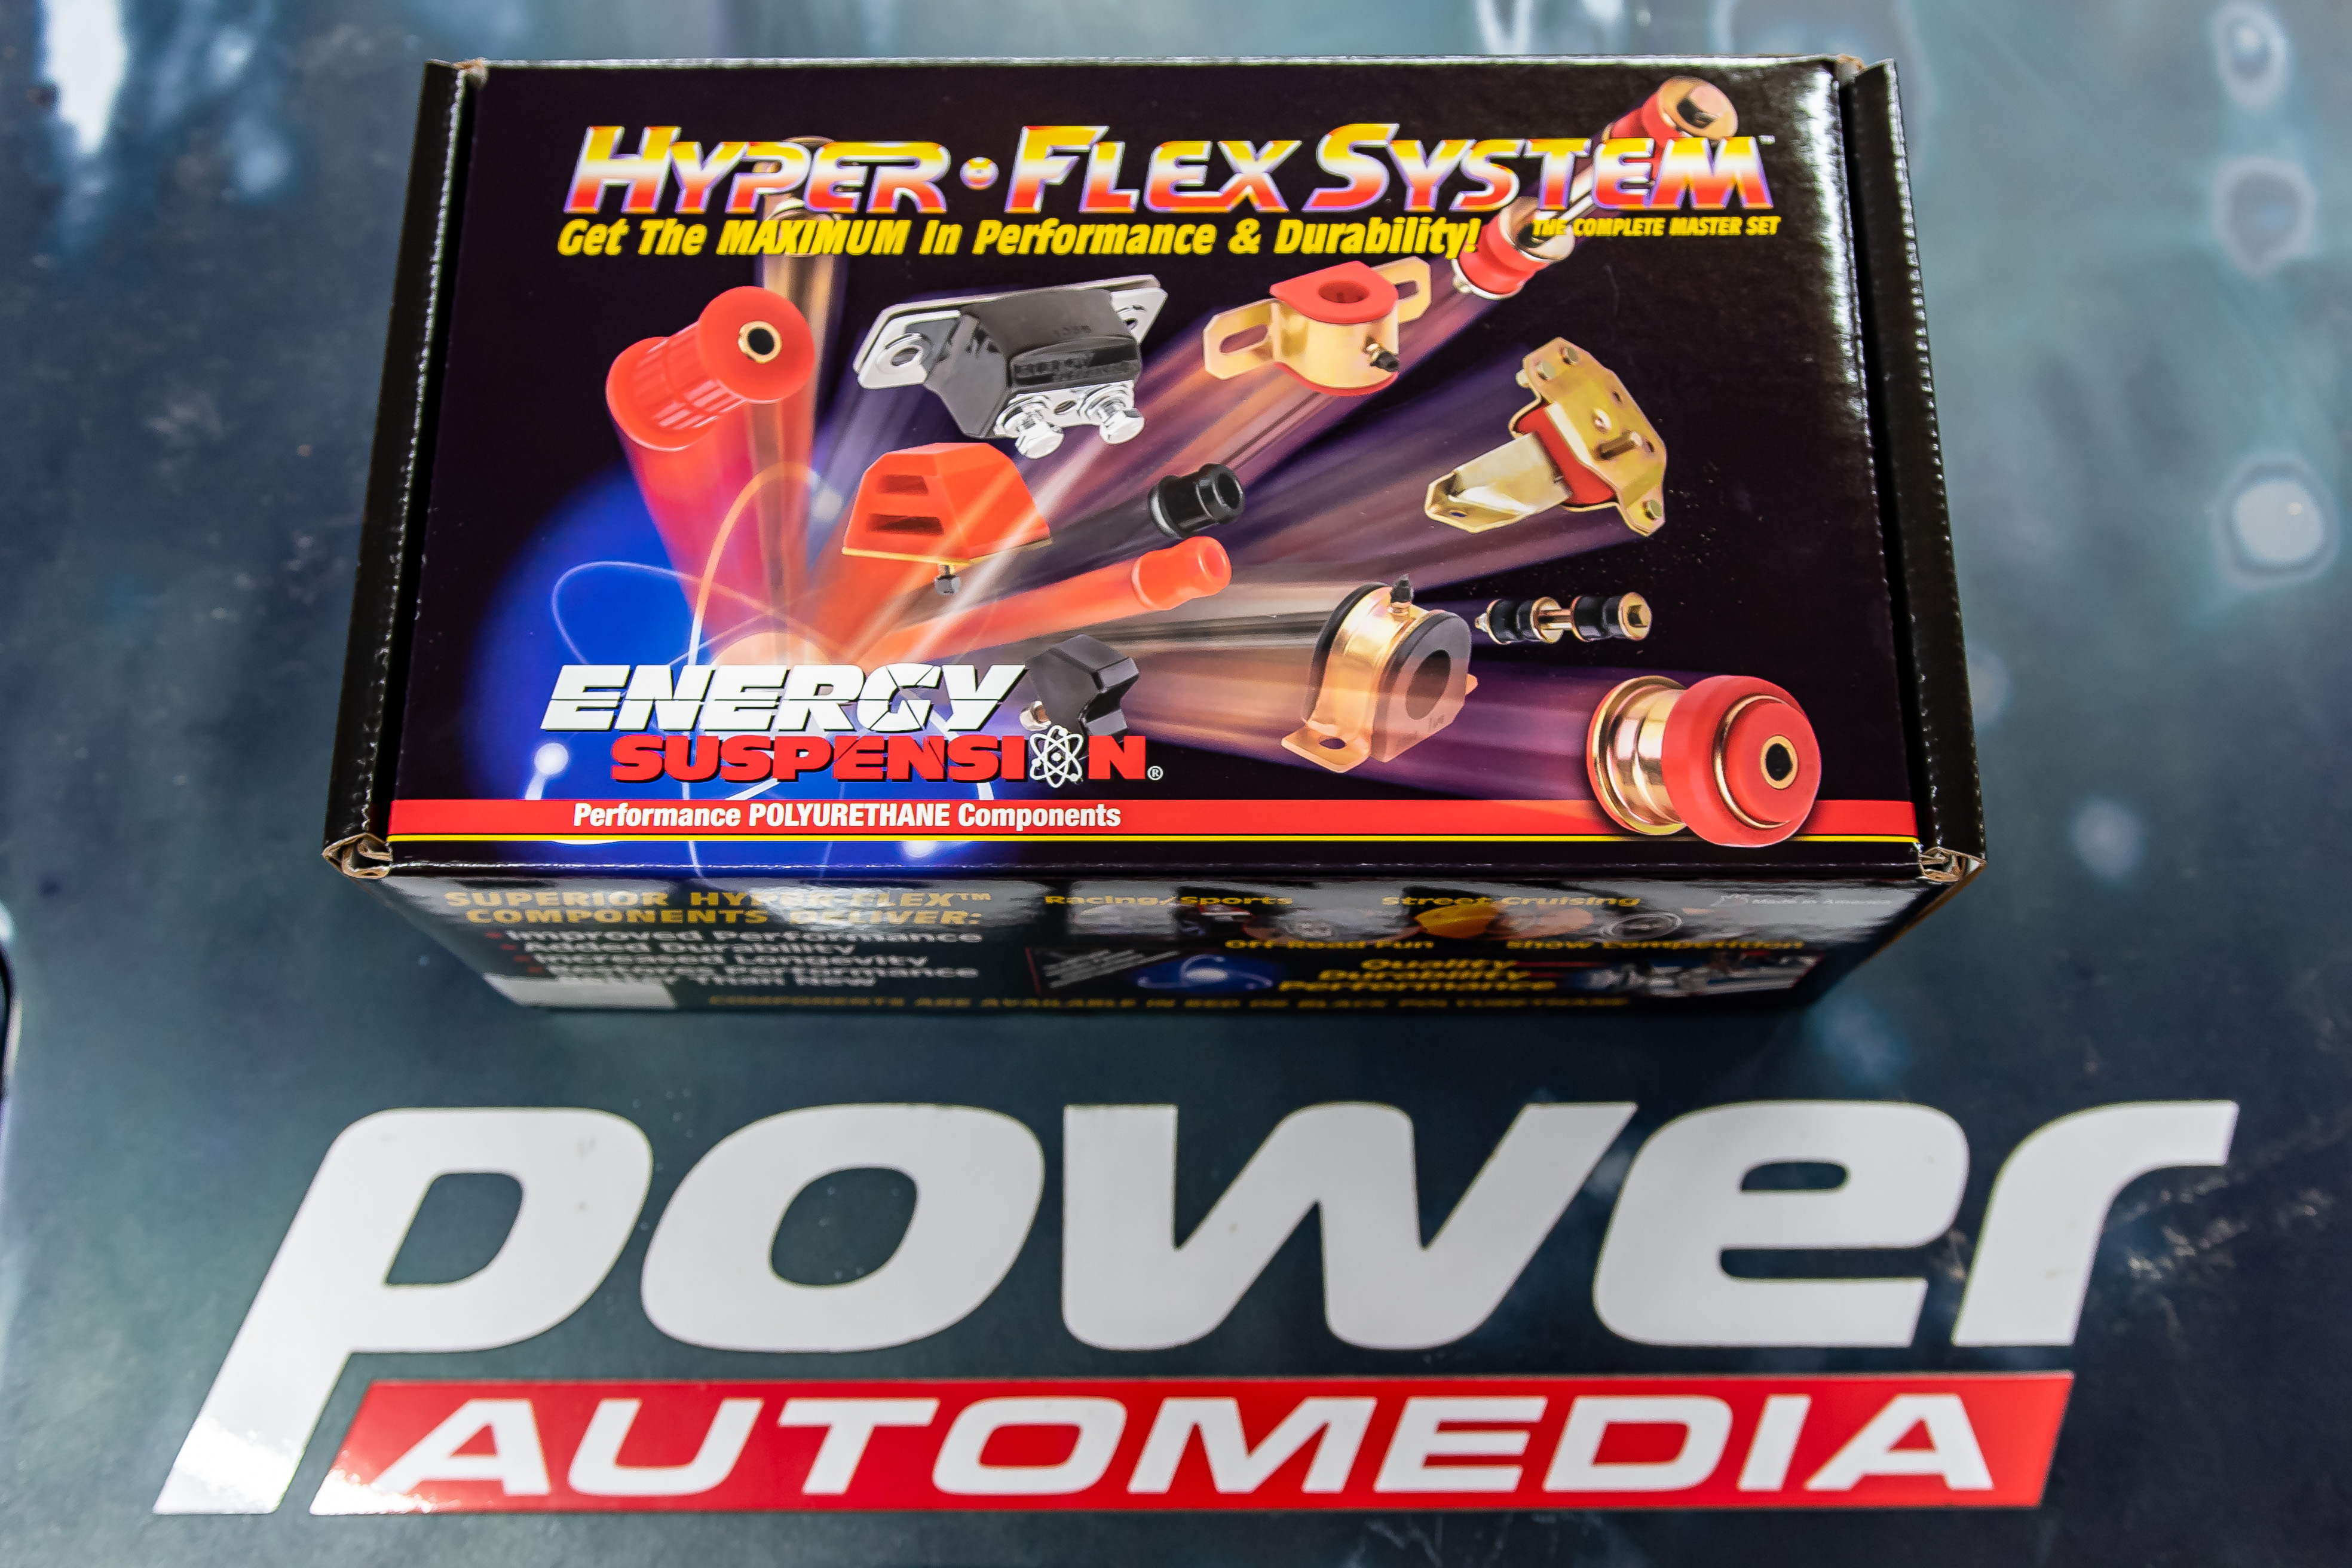
So, why Energy? You don�t become an expert at something by trying to do everything. Instead, you concentrate on one thing and become the best at it. More than 30 years ago, Energy Suspension decided to specialize in only polyurethane. Today, it sits as the leader in the industry. Manufacturing everything in-house in San Clemente, California, the engineers at Energy pride themselves on continually innovating, developing, and formulating new applications to fit the most popular models, both import and domestic.We chose to use Energy Suspension for this upgrade because we really like the kit it offers for our NA (1996) Miata. The Hyper-Flex Master Kit (P/N: 11.18102R) includes every bushing we needed to upgrade our project car. Hyper-Flex is Energy Suspension�s unique and technically advanced chemical formulation performance polyurethane. Performance is the keyword here � there are other replacement bushings on the market that don�t stand up to the years of abuse Hyper-Flex bushings are designed to take.
If your rubber bushings have any years on them, chances are they�ve given up, and your alignment is changing on the fly. Not good in any situation � but especially bad in a race situation. But why does this happen? We asked Energy Suspension Marketing Manager, Kyle Martin, for his insight.
__________________
Keystone Motor Club (Founded 2012)... Free car show Every 3rd Saturday, newsletter is
https://www.tamparacing.com/forums/e...-car-club.html
Keystone picture gallery is here:
https://carstoshow.com/eventdetails.aspx?eventid=93202
Veterans and Friends on First Saturday...Some pictures....
https://carstoshow.com/registerevent...eventid=102331
Port Richey Rod Run at Coast Buick GMC
https://carstoshow.com/registerevent.aspx?eventid=99114
50's Diner US19.... A Florida Attraction.
1730 US-19, Holiday Fl 34691 click: https://www.tamparacing.com/forums/t...-racing.html CHRA sanctioned cruise-in.
Cruise-In; Free; Every Saturday 5-8PM plus 10% off the whole menu to cruisers
50's Diner pictures are here: https://carstoshow.com/eventdetails.aspx?eventid=93194
All Cars Every 2nd Saturday Free Breakfast: Since 2015 and more. click: https://www.tamparacing.com/forums/e...ast-tampa.html
Tampa Racing.com covers the Tampa car scene and supports many fund raisers, worthy causes and events that enrich our community. We hope you enjoy them all.
What do I do? ---- on-site *Aftermarket* spring/suspension installations --- on-site impact wrenching---street lowering with your own stock springs...........True Bi-xenon HID projector headlight conversions........ Much more at Bob's Garage!
https://www.tamparacing.com/forums/b...ontact-us.html
https://www.tamparacing.com/forums/b...e-senor-honda/

Registered
Thread Starter
�OE rubber bushings and mounts are notorious for degrading and ultimately failing over time because they are often bonded to the inner and outer sleeves that encase them,� Martin tells us. �This causes a constant torsional strain on the bushings whenever the suspension components move.�
For that reason � along with cost � we decided against replacing the suspension with the same original equipment. Martin affirms, �Replacing the bushings as opposed to the entire component will save car owners hundreds, if not thousands, of dollars while completely restoring and upgrading that suspension component�s performance.�
When asked why he thinks this upgrade is a smart move on our part, he says, �In a track situation, you�ll lose time in the corners and can�t get back on the power quickly. The suspension components misalign and create sloppy handling, wheel hop, and other second-sucking problems. Our Hyper-Flex Performance Polyurethane bushings are designed to be �free-floating,� allowing the suspension component to move freely, without the resistance of a bonded bushing. They are resistant to oil, grease, and other road contaminants. They will not degrade or fail over time. You will see an instant improvement in steering response, handling, and control.�
This installation was done in a home garage, with no access to a lift or even a press, so this was about as grassroots as you can get. We started by jacking the car up and getting four jackstands securely under the body (Miatas are uni-body). Once in the air, we removed the wheels and got to work on removing the suspension. We took care of the front end first, then tackled the rear.
 As you can see, we�re bare bones in this garage � no lift, no press, only hand tools, and muscle!
Next, we removed the brake-caliper-mounting bolts and set the caliper and rotor on a bucket, out of the way. The next step is to remove the spindle. As with the tie rods, we removed the cotter pins and backed off the castle nuts for the upper and lower ball joints. We used a pickle fork to separate the ball joints from the spindle. Once free, we just needed to remove the castle nuts and set the spindle off to the side.
Now, we could remove the Pedders coilover, first by removing the lower mounting bolt, then the two upper bolts. I needed one of the guys to push down on the lower control arm to get the coilover out. At this point, all that is left to remove is the control arms themselves.
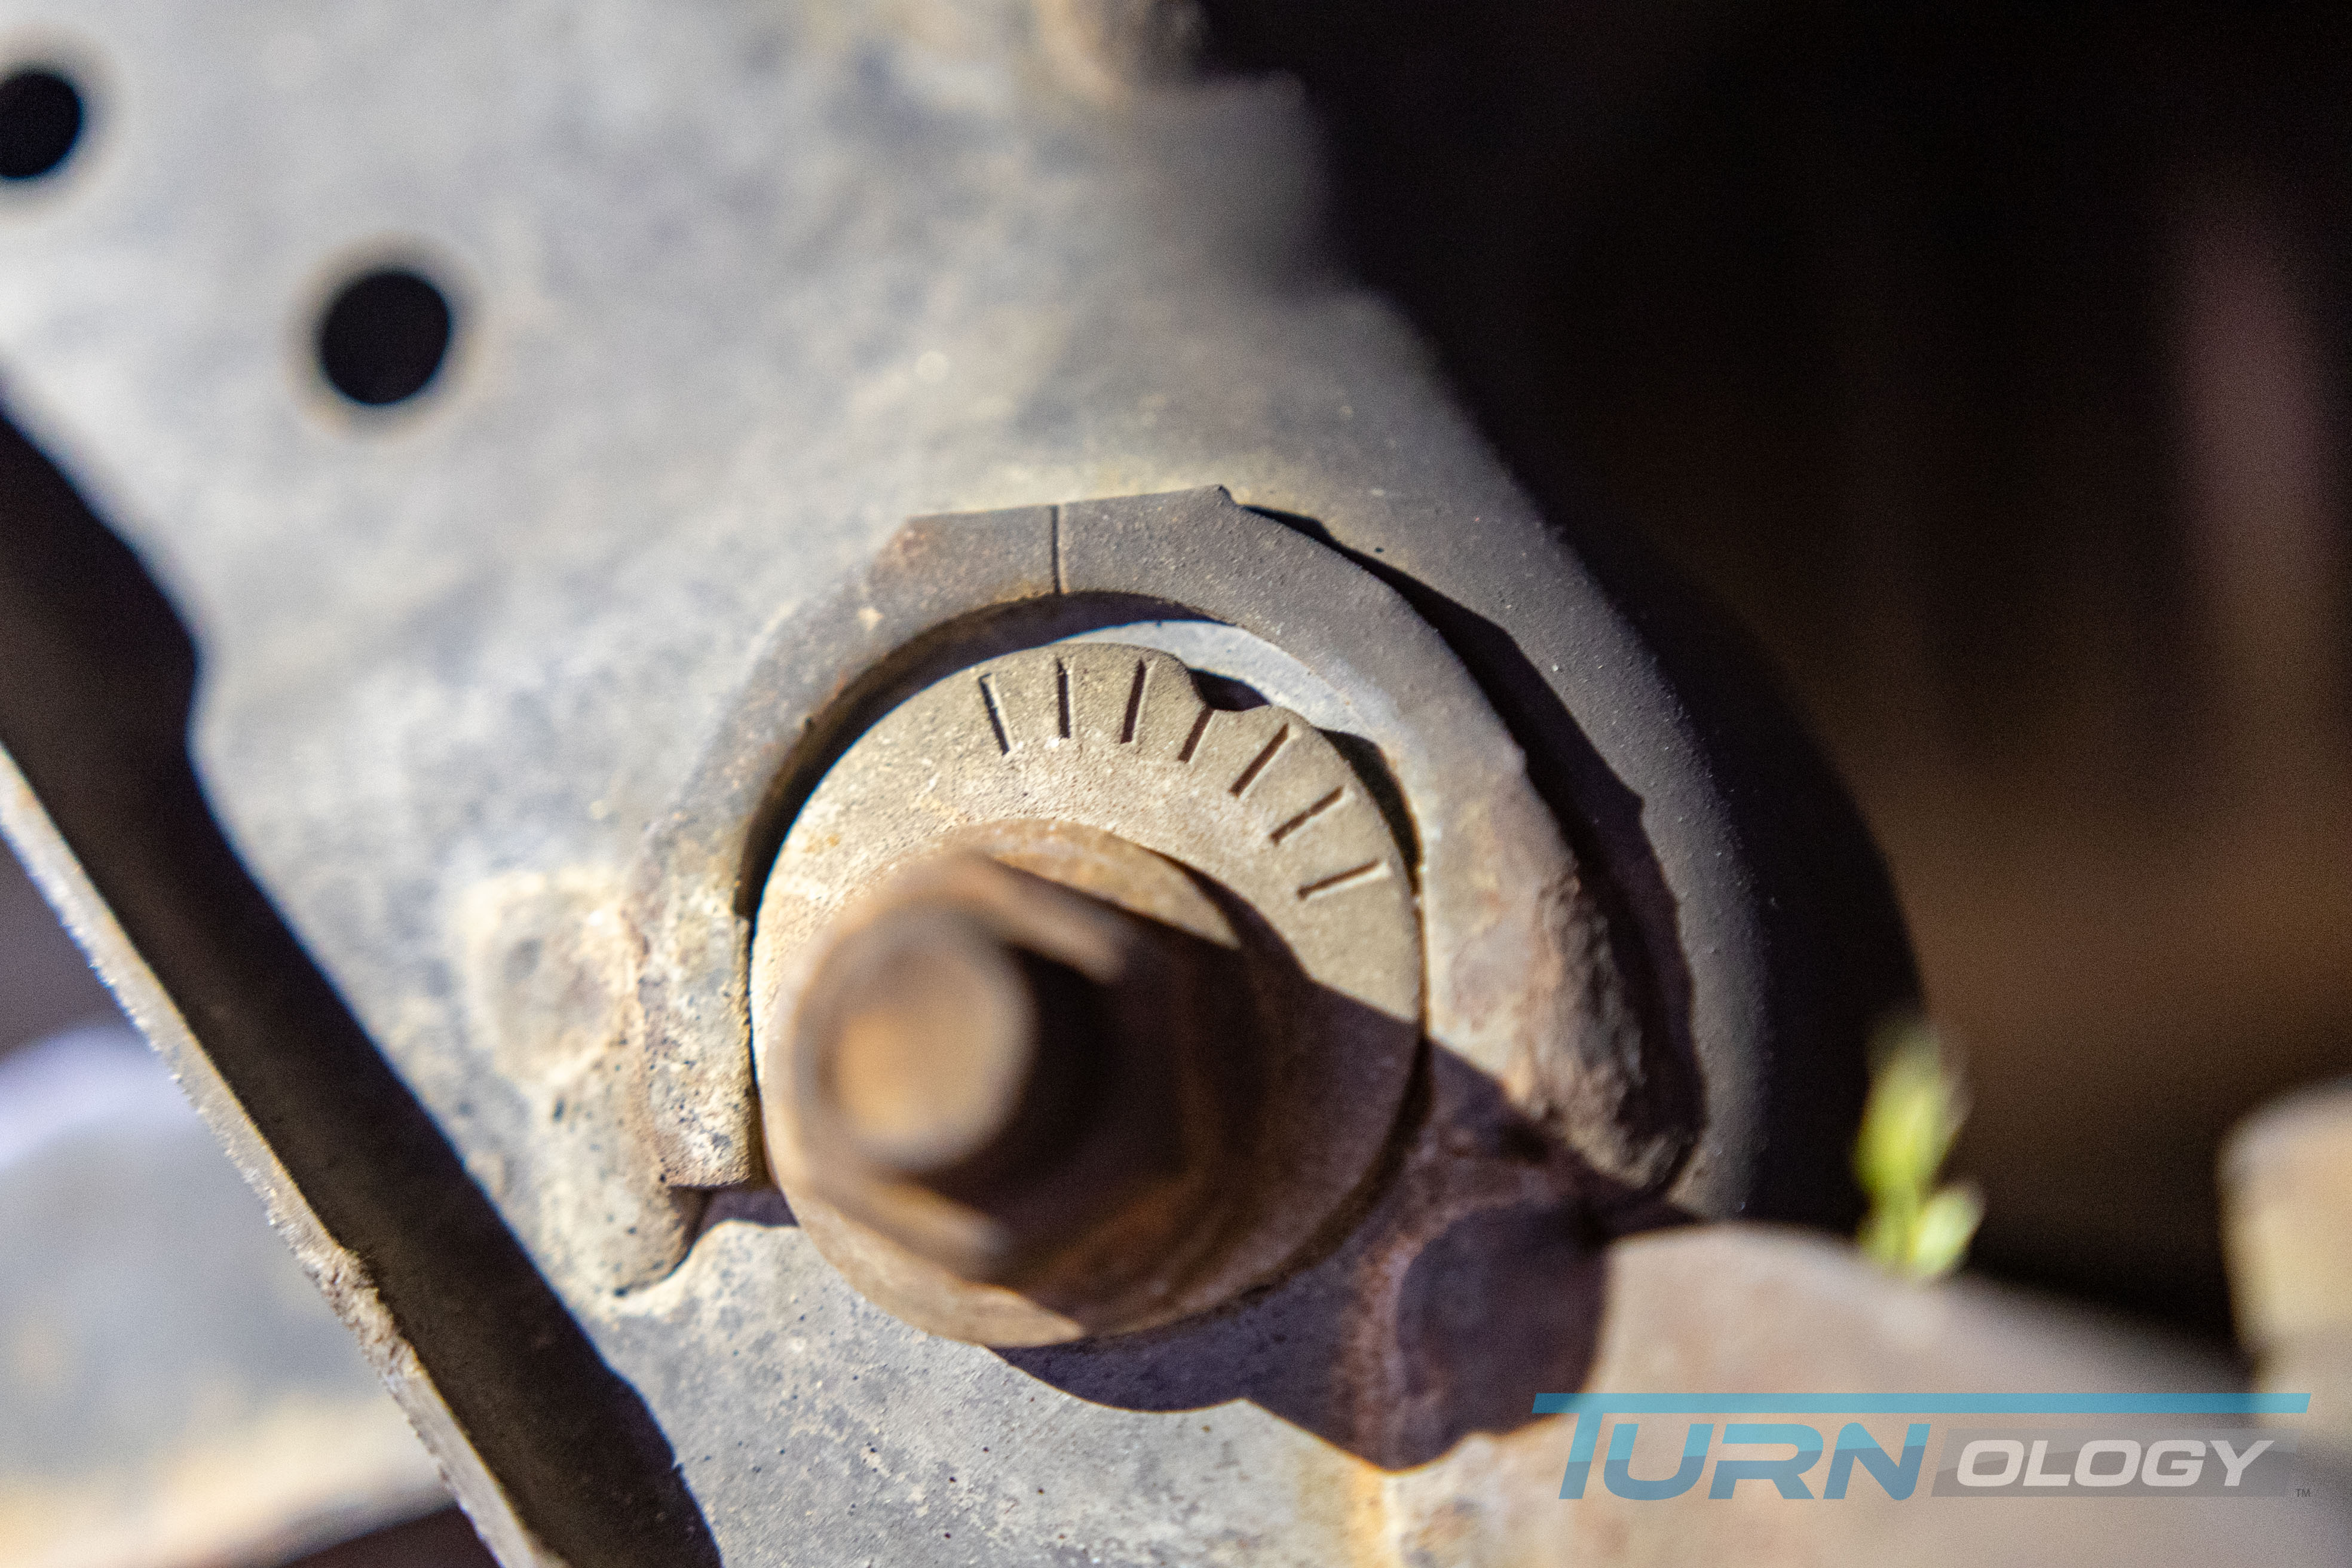
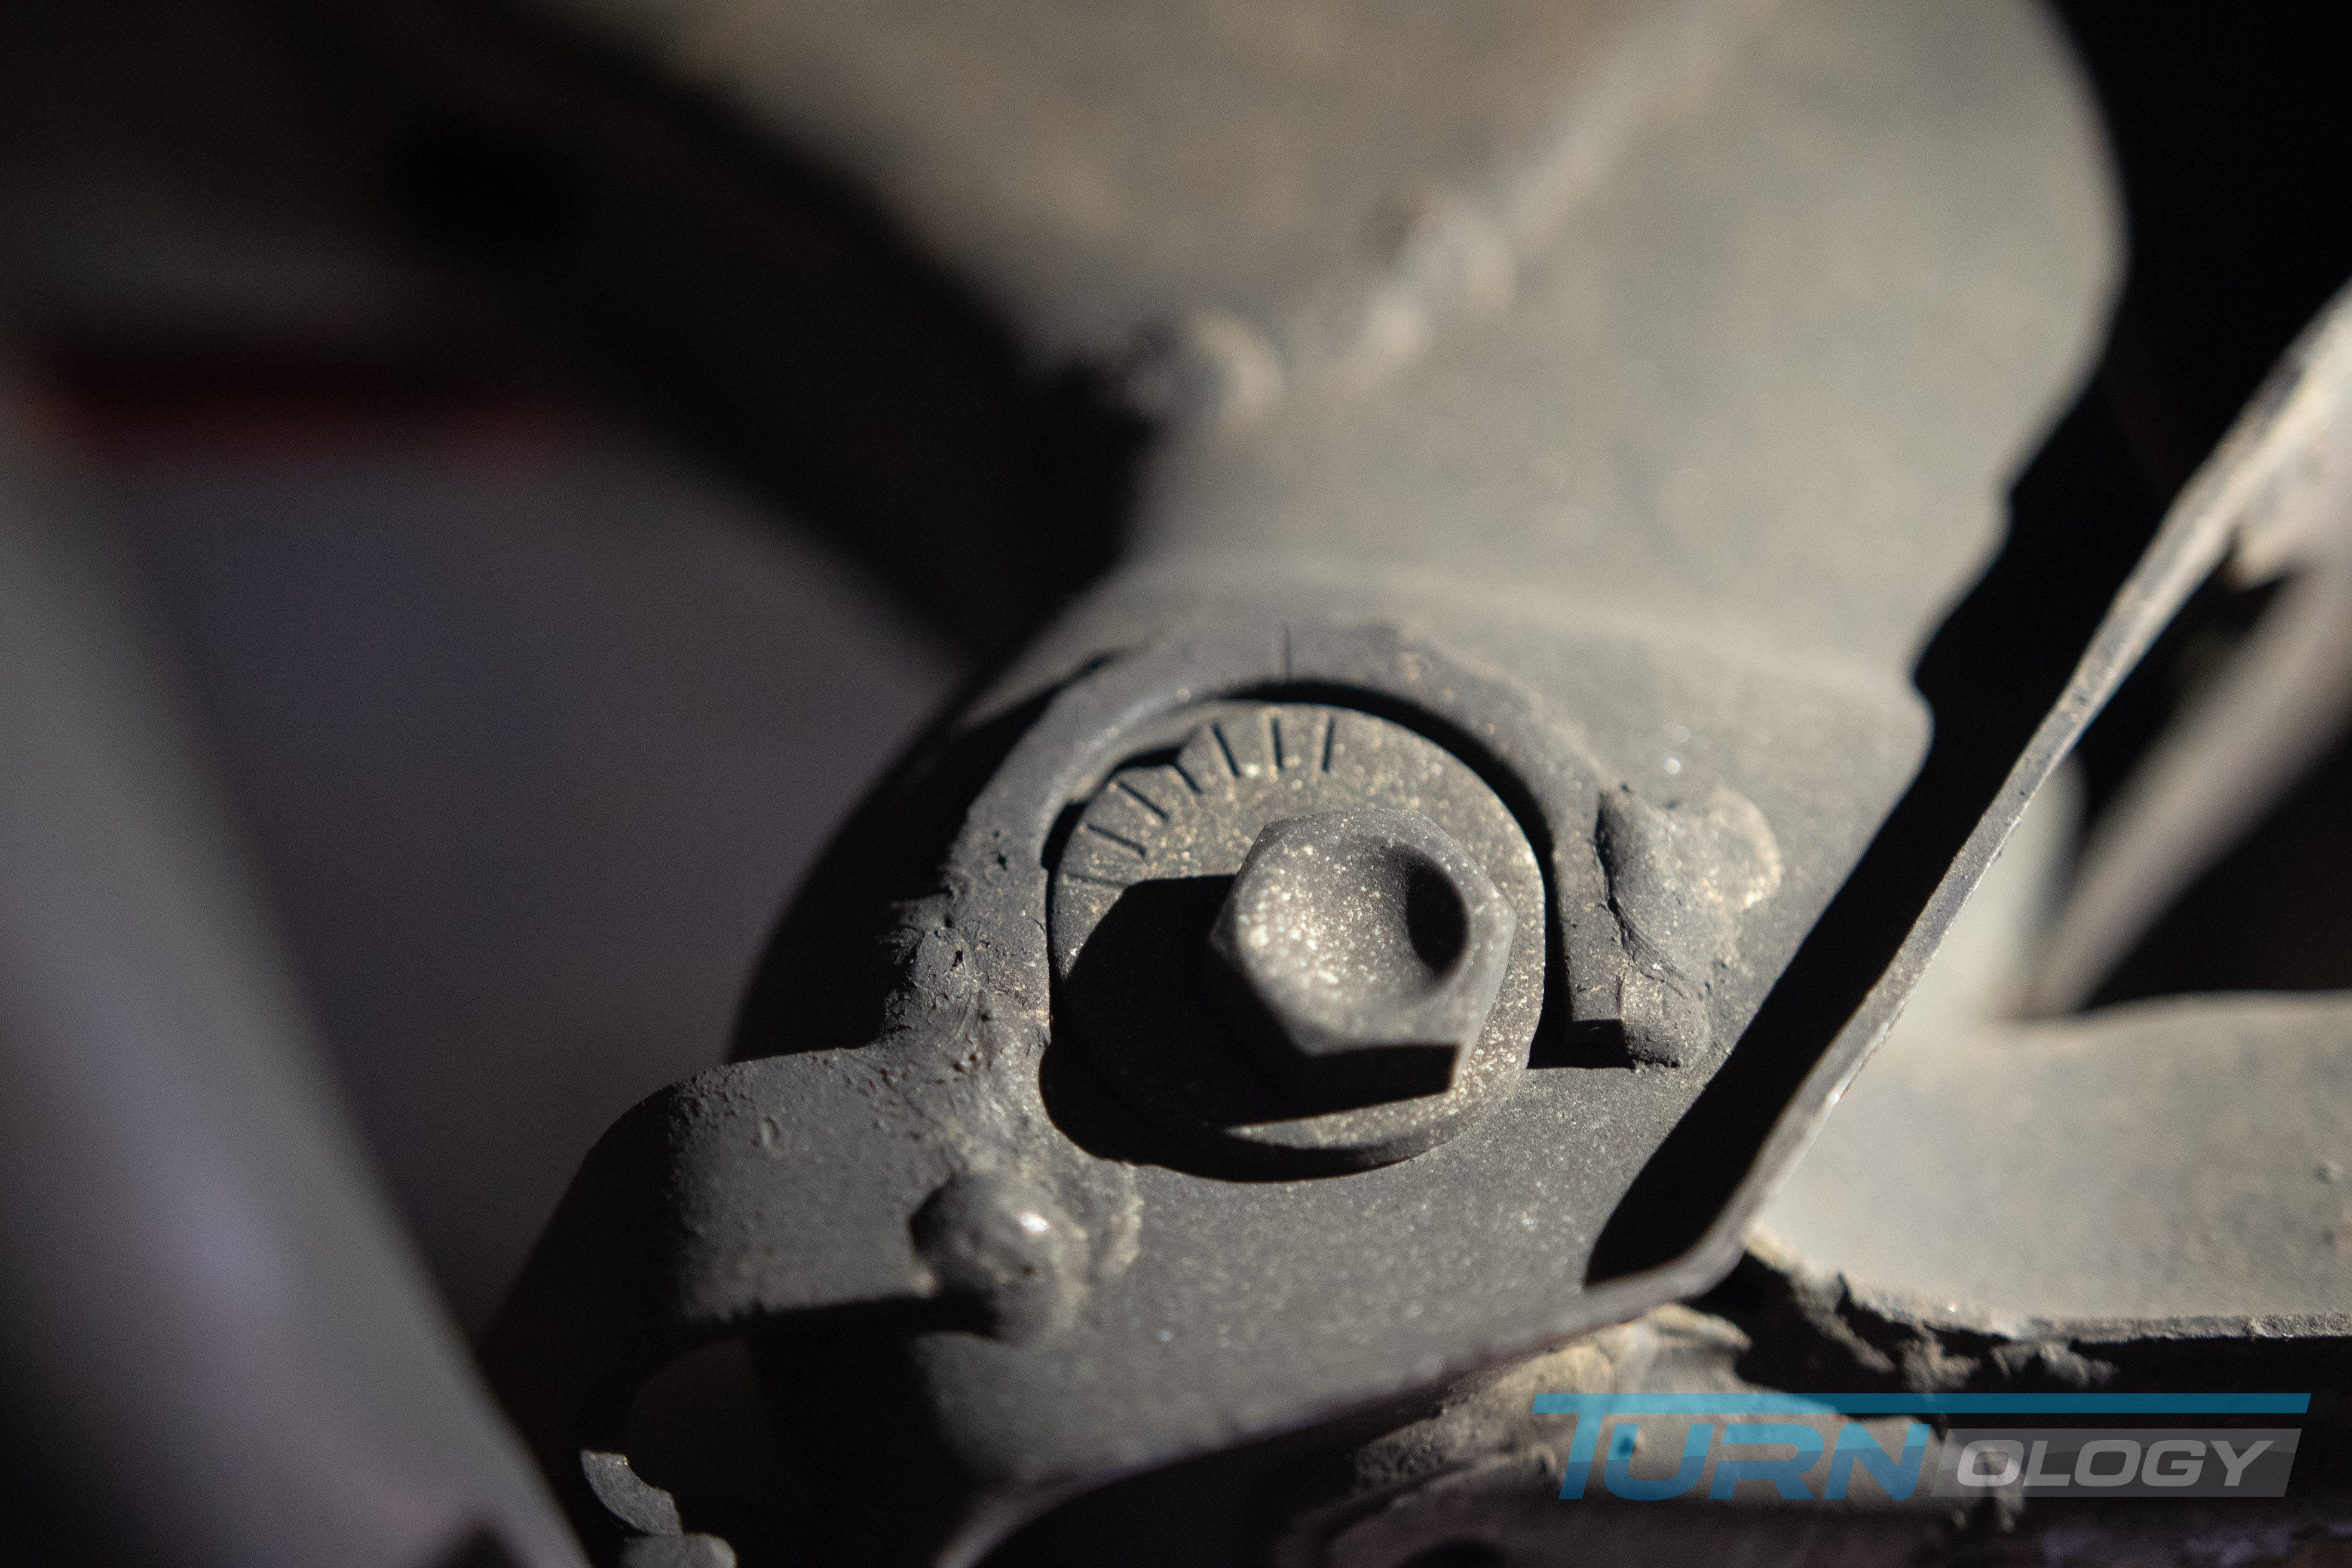
Before loosening anything, heed my advice. The lower control-arm bolts have a flat on one side with a cammed washer that adjusts the camber/caster/toe. It is a great idea to mark where your alignment washers are pointing with a Sharpie or chalk pen on the control arm so you can get the alignment close to where it was when you put it back together. This is where my inexperience (and maybe too much exuberance) came into play.
I took a few pictures, thinking I�d be able to refer back to them. However, unless you mark the washer location on each arm for the photo (LF, LR, RR, RF), it�s almost impossible to tell which washer you were photographing. It isn�t a major deal as you�ll have to realign the car anyway, but it�s nice to get it close, especially if you plan to drive to the alignment shop. Oh well, CrossTime was going on a trailer, and I was going to cross-weigh and realign it later.
For that reason � along with cost � we decided against replacing the suspension with the same original equipment. Martin affirms, �Replacing the bushings as opposed to the entire component will save car owners hundreds, if not thousands, of dollars while completely restoring and upgrading that suspension component�s performance.�
When asked why he thinks this upgrade is a smart move on our part, he says, �In a track situation, you�ll lose time in the corners and can�t get back on the power quickly. The suspension components misalign and create sloppy handling, wheel hop, and other second-sucking problems. Our Hyper-Flex Performance Polyurethane bushings are designed to be �free-floating,� allowing the suspension component to move freely, without the resistance of a bonded bushing. They are resistant to oil, grease, and other road contaminants. They will not degrade or fail over time. You will see an instant improvement in steering response, handling, and control.�
The Teardown Overview
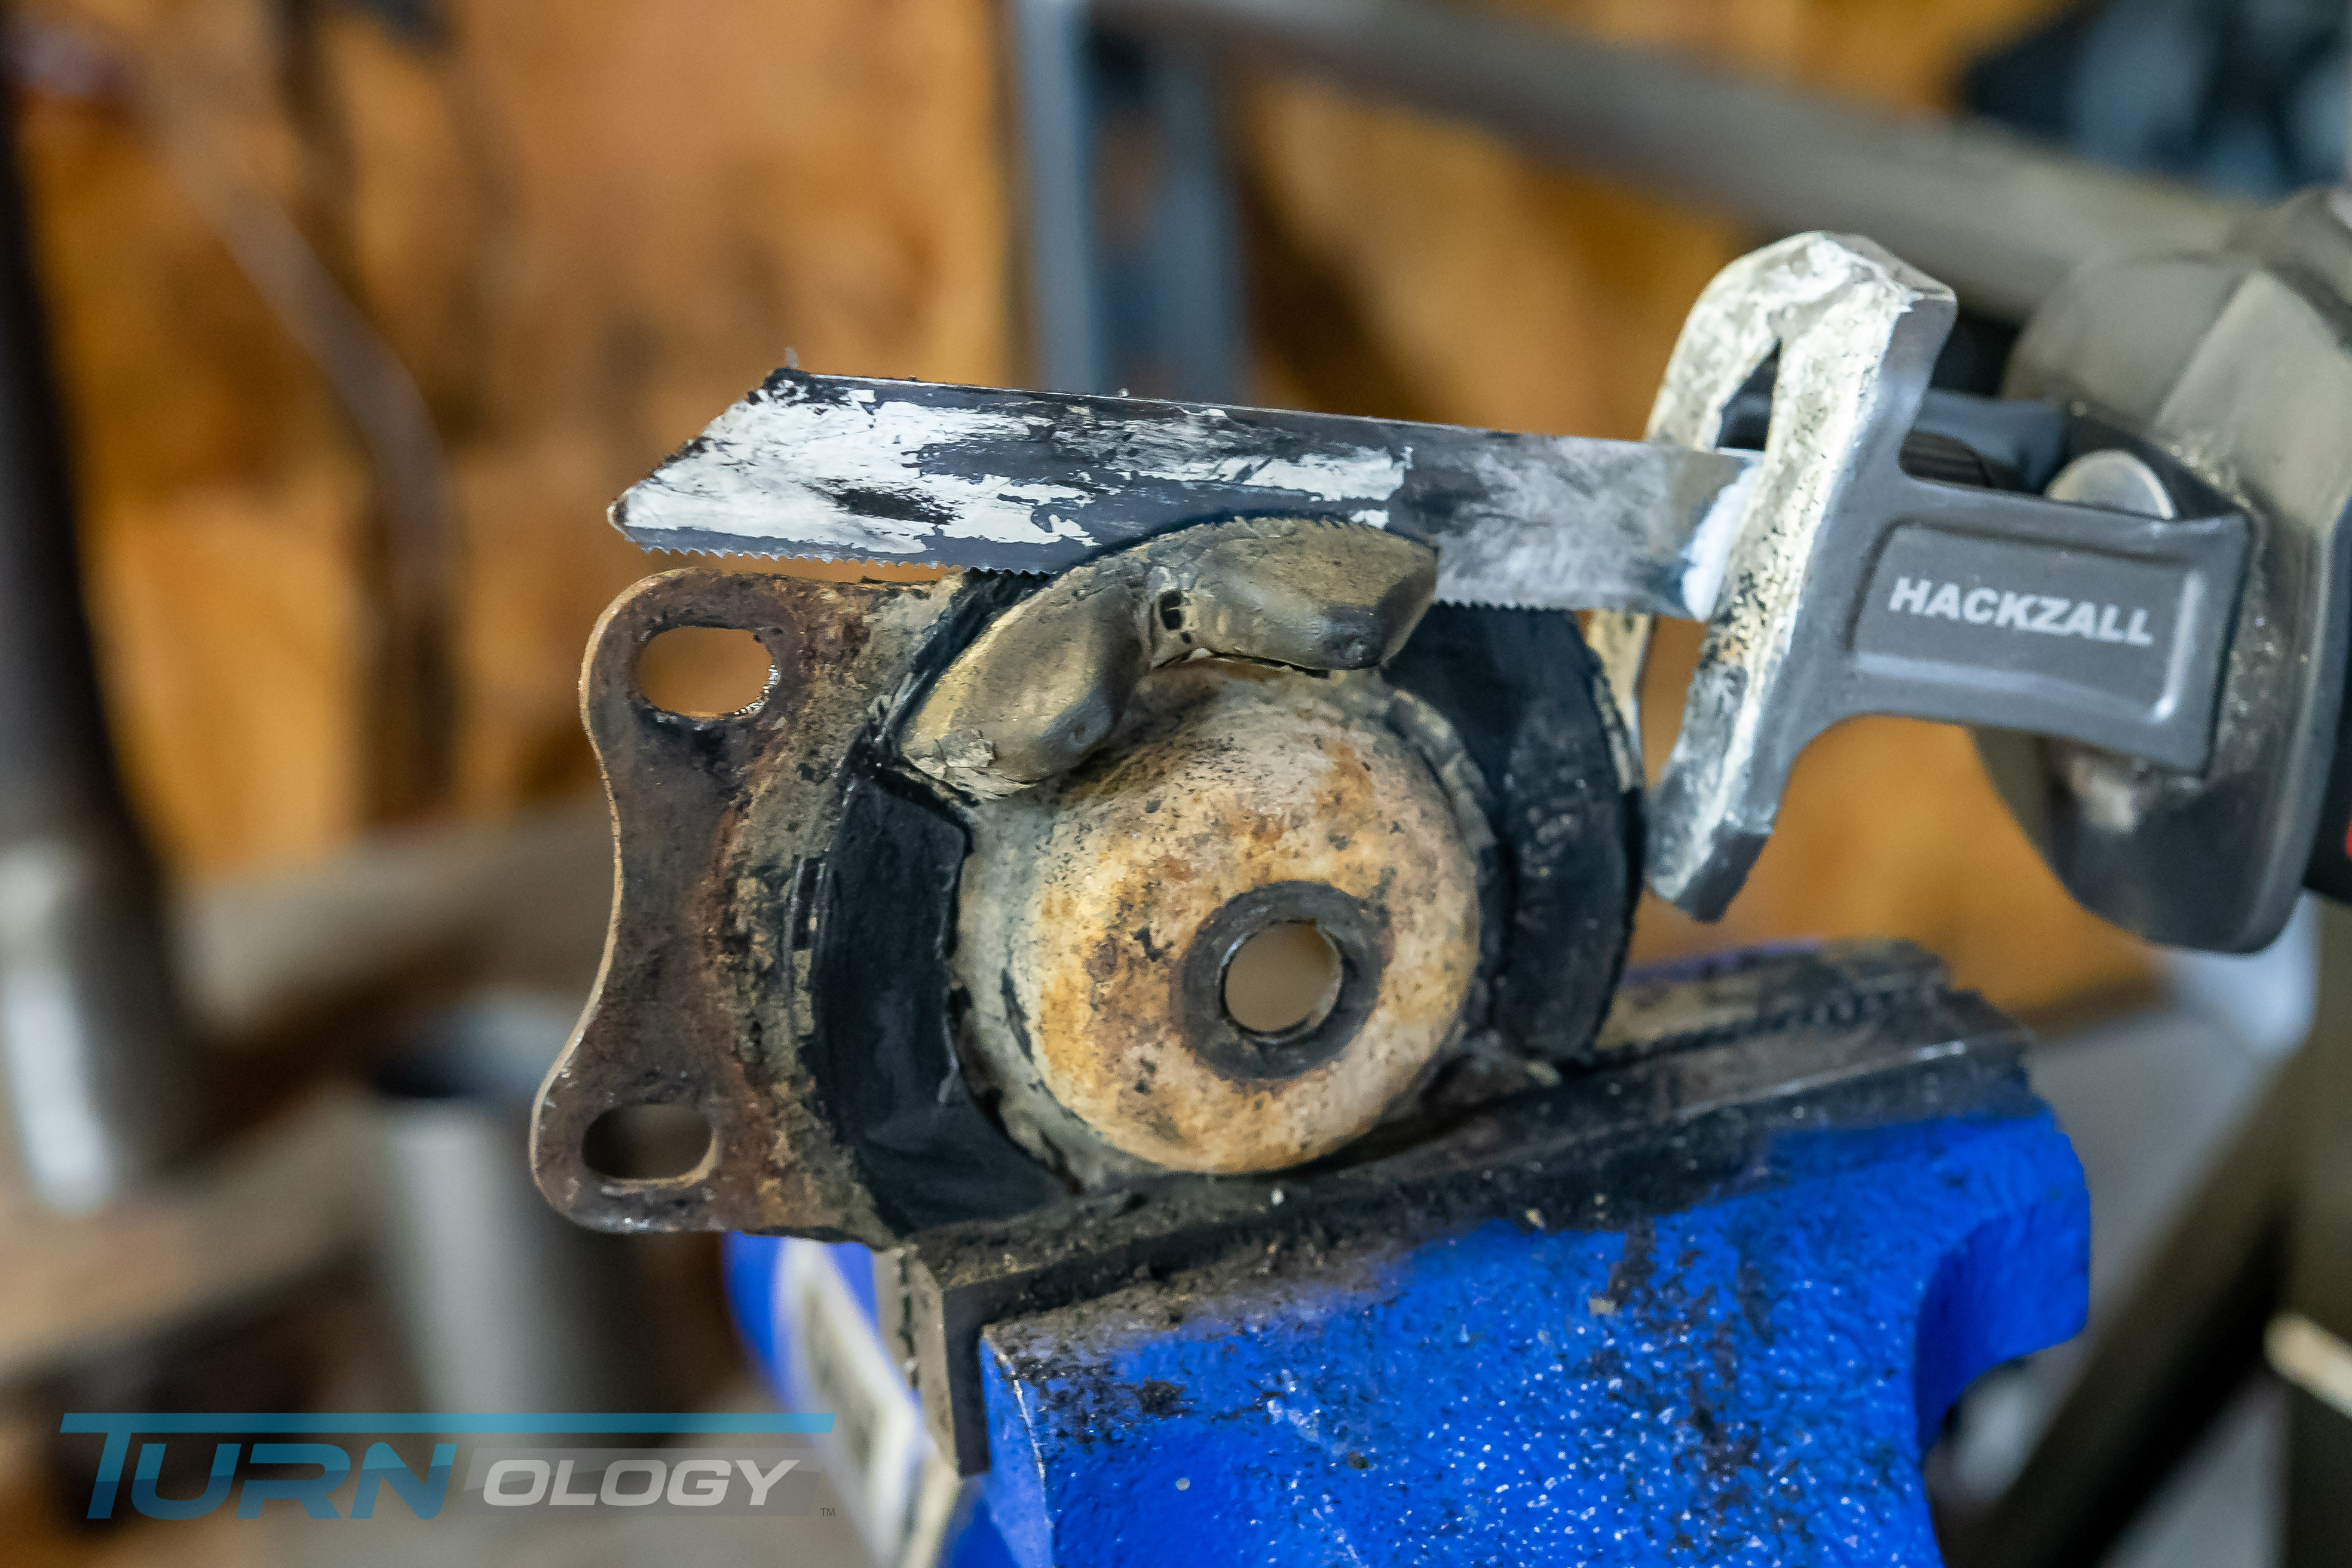
Hands down, the toughest part of upgrading to poly bushings is getting the old rubber bushings out. For the most part, you are disassembling the entire suspension, so it is imperative to take a lot of �before� pictures and be methodical about your process. We had four guys working on the car � none of which had ever done an entire car before � and it took the better amount of the day. Once we figured out a method, it got easier. In the end, we were all dirty (some bloody) and tired.This installation was done in a home garage, with no access to a lift or even a press, so this was about as grassroots as you can get. We started by jacking the car up and getting four jackstands securely under the body (Miatas are uni-body). Once in the air, we removed the wheels and got to work on removing the suspension. We took care of the front end first, then tackled the rear.
 As you can see, we�re bare bones in this garage � no lift, no press, only hand tools, and muscle!
Front Control Arm Removal
First, we disconnected the adjustable links connecting the Eibach sway bar to the control arms. The next step was to take out the cotter pin holding the castle nut in place on the tie-rod and loosen the castle nut a few threads. To pop the tie-rod end out of its seat in the spindle, the Miata has a flat spot on the spindle you can hit with a mini-sledgehammer to jolt them free. Once loose, you can remove the castle nut and swing the tie rods out of the way.Next, we removed the brake-caliper-mounting bolts and set the caliper and rotor on a bucket, out of the way. The next step is to remove the spindle. As with the tie rods, we removed the cotter pins and backed off the castle nuts for the upper and lower ball joints. We used a pickle fork to separate the ball joints from the spindle. Once free, we just needed to remove the castle nuts and set the spindle off to the side.

Now, we could remove the Pedders coilover, first by removing the lower mounting bolt, then the two upper bolts. I needed one of the guys to push down on the lower control arm to get the coilover out. At this point, all that is left to remove is the control arms themselves.
Before loosening anything, heed my advice. The lower control-arm bolts have a flat on one side with a cammed washer that adjusts the camber/caster/toe. It is a great idea to mark where your alignment washers are pointing with a Sharpie or chalk pen on the control arm so you can get the alignment close to where it was when you put it back together. This is where my inexperience (and maybe too much exuberance) came into play.
I took a few pictures, thinking I�d be able to refer back to them. However, unless you mark the washer location on each arm for the photo (LF, LR, RR, RF), it�s almost impossible to tell which washer you were photographing. It isn�t a major deal as you�ll have to realign the car anyway, but it�s nice to get it close, especially if you plan to drive to the alignment shop. Oh well, CrossTime was going on a trailer, and I was going to cross-weigh and realign it later.

__________________
Keystone Motor Club (Founded 2012)... Free car show Every 3rd Saturday, newsletter is
https://www.tamparacing.com/forums/e...-car-club.html
Keystone picture gallery is here:
https://carstoshow.com/eventdetails.aspx?eventid=93202
Veterans and Friends on First Saturday...Some pictures....
https://carstoshow.com/registerevent...eventid=102331
Port Richey Rod Run at Coast Buick GMC
https://carstoshow.com/registerevent.aspx?eventid=99114
50's Diner US19.... A Florida Attraction.
1730 US-19, Holiday Fl 34691 click: https://www.tamparacing.com/forums/t...-racing.html CHRA sanctioned cruise-in.
Cruise-In; Free; Every Saturday 5-8PM plus 10% off the whole menu to cruisers
50's Diner pictures are here: https://carstoshow.com/eventdetails.aspx?eventid=93194
All Cars Every 2nd Saturday Free Breakfast: Since 2015 and more. click: https://www.tamparacing.com/forums/e...ast-tampa.html
Tampa Racing.com covers the Tampa car scene and supports many fund raisers, worthy causes and events that enrich our community. We hope you enjoy them all.
What do I do? ---- on-site *Aftermarket* spring/suspension installations --- on-site impact wrenching---street lowering with your own stock springs...........True Bi-xenon HID projector headlight conversions........ Much more at Bob's Garage!
https://www.tamparacing.com/forums/b...ontact-us.html
https://www.tamparacing.com/forums/b...e-senor-honda/
Keystone Motor Club (Founded 2012)... Free car show Every 3rd Saturday, newsletter is
https://www.tamparacing.com/forums/e...-car-club.html
Keystone picture gallery is here:
https://carstoshow.com/eventdetails.aspx?eventid=93202
Veterans and Friends on First Saturday...Some pictures....
https://carstoshow.com/registerevent...eventid=102331
Port Richey Rod Run at Coast Buick GMC
https://carstoshow.com/registerevent.aspx?eventid=99114
50's Diner US19.... A Florida Attraction.
1730 US-19, Holiday Fl 34691 click: https://www.tamparacing.com/forums/t...-racing.html CHRA sanctioned cruise-in.
Cruise-In; Free; Every Saturday 5-8PM plus 10% off the whole menu to cruisers
50's Diner pictures are here: https://carstoshow.com/eventdetails.aspx?eventid=93194
All Cars Every 2nd Saturday Free Breakfast: Since 2015 and more. click: https://www.tamparacing.com/forums/e...ast-tampa.html
Tampa Racing.com covers the Tampa car scene and supports many fund raisers, worthy causes and events that enrich our community. We hope you enjoy them all.
What do I do? ---- on-site *Aftermarket* spring/suspension installations --- on-site impact wrenching---street lowering with your own stock springs...........True Bi-xenon HID projector headlight conversions........ Much more at Bob's Garage!
https://www.tamparacing.com/forums/b...ontact-us.html
https://www.tamparacing.com/forums/b...e-senor-honda/
Registered
Thread Starter

Once you�ve marked the washer locations, you can loosen the nut and remove the long bolt holding the upper control arm to the frame. Then, do the same for the two bottom control-arm bolts. This can be harder than it seems when working in a tight space, and the bolts sometimes need a little coaxing with liberal use of lube. It may help to use a hammer and another smaller bolt to drive the control-arm bolts out. When we got the bolts out, we made sure to clean them up with some light sandpaper and coated them with white lithium grease before reinstalling. However, we still have a long way to go yet.
Rear Control Arm Removal
Removing the rear control arms is very similar to the front. We started by disconnecting the sway bar end links from the control arm. Next, we removed the two bolts securing the brake caliper to its bracket and set it on a bucket off to the side as well as the brake rotor revealing the axle hub. On the rear, we went ahead and removed the coilover and got it out of the way so the suspension could move freely. Pulling the rear spindle is slightly different than the front � instead of ball joints, there are upper and lower bolts that need to be removed that go through the control arms.We kept the spindle and hub attached to the axle. You can pull all of this as one piece. It helped to lift the axle a bit, so it was almost in a straight line. Then, I grabbed the hub and gave it a good yank to pull the shaft out of the differential. Have some rags handy and leave the axle hanging in the spindle and set them off to the side to be reinstalled later.
Now you can remove the four bolts � two uppers and two lowers � holding the control arms to the frame. As with the front, you should mark your alignment washers before pulling them. Once you�ve got the bolts out, the control arms are free, and it�s time for the fun to begin!
Control Arm Bushing Removal/Install
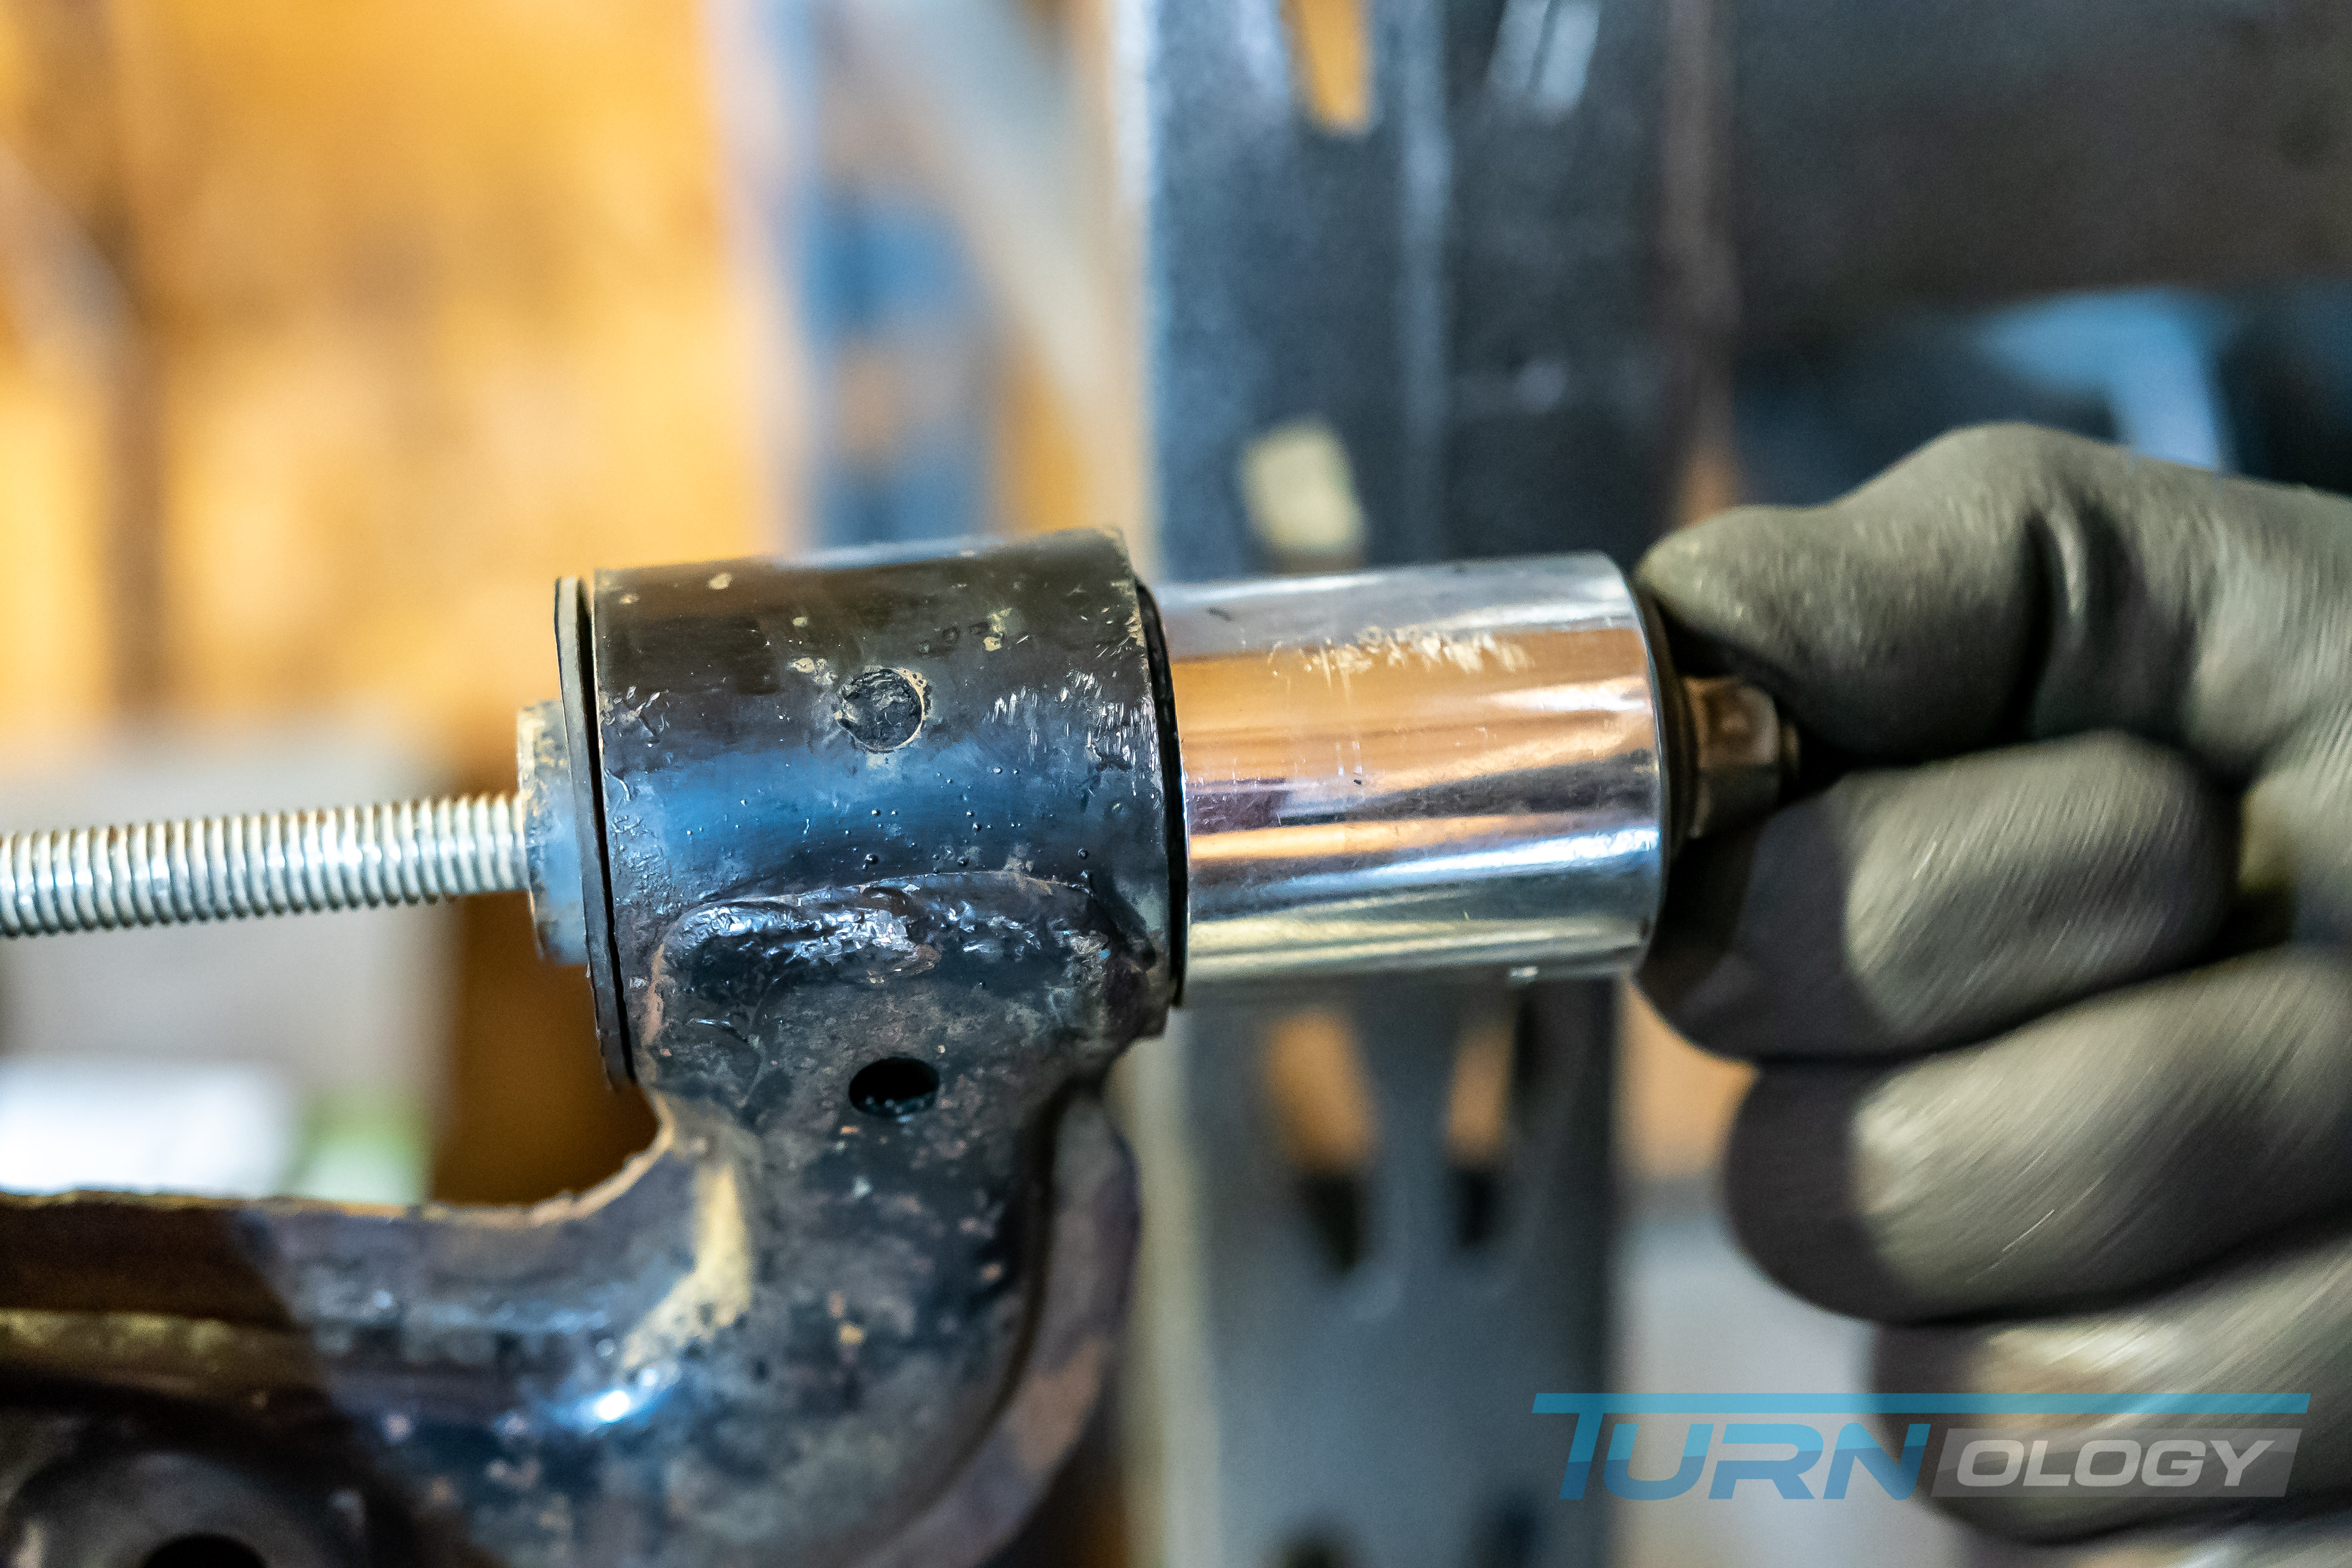
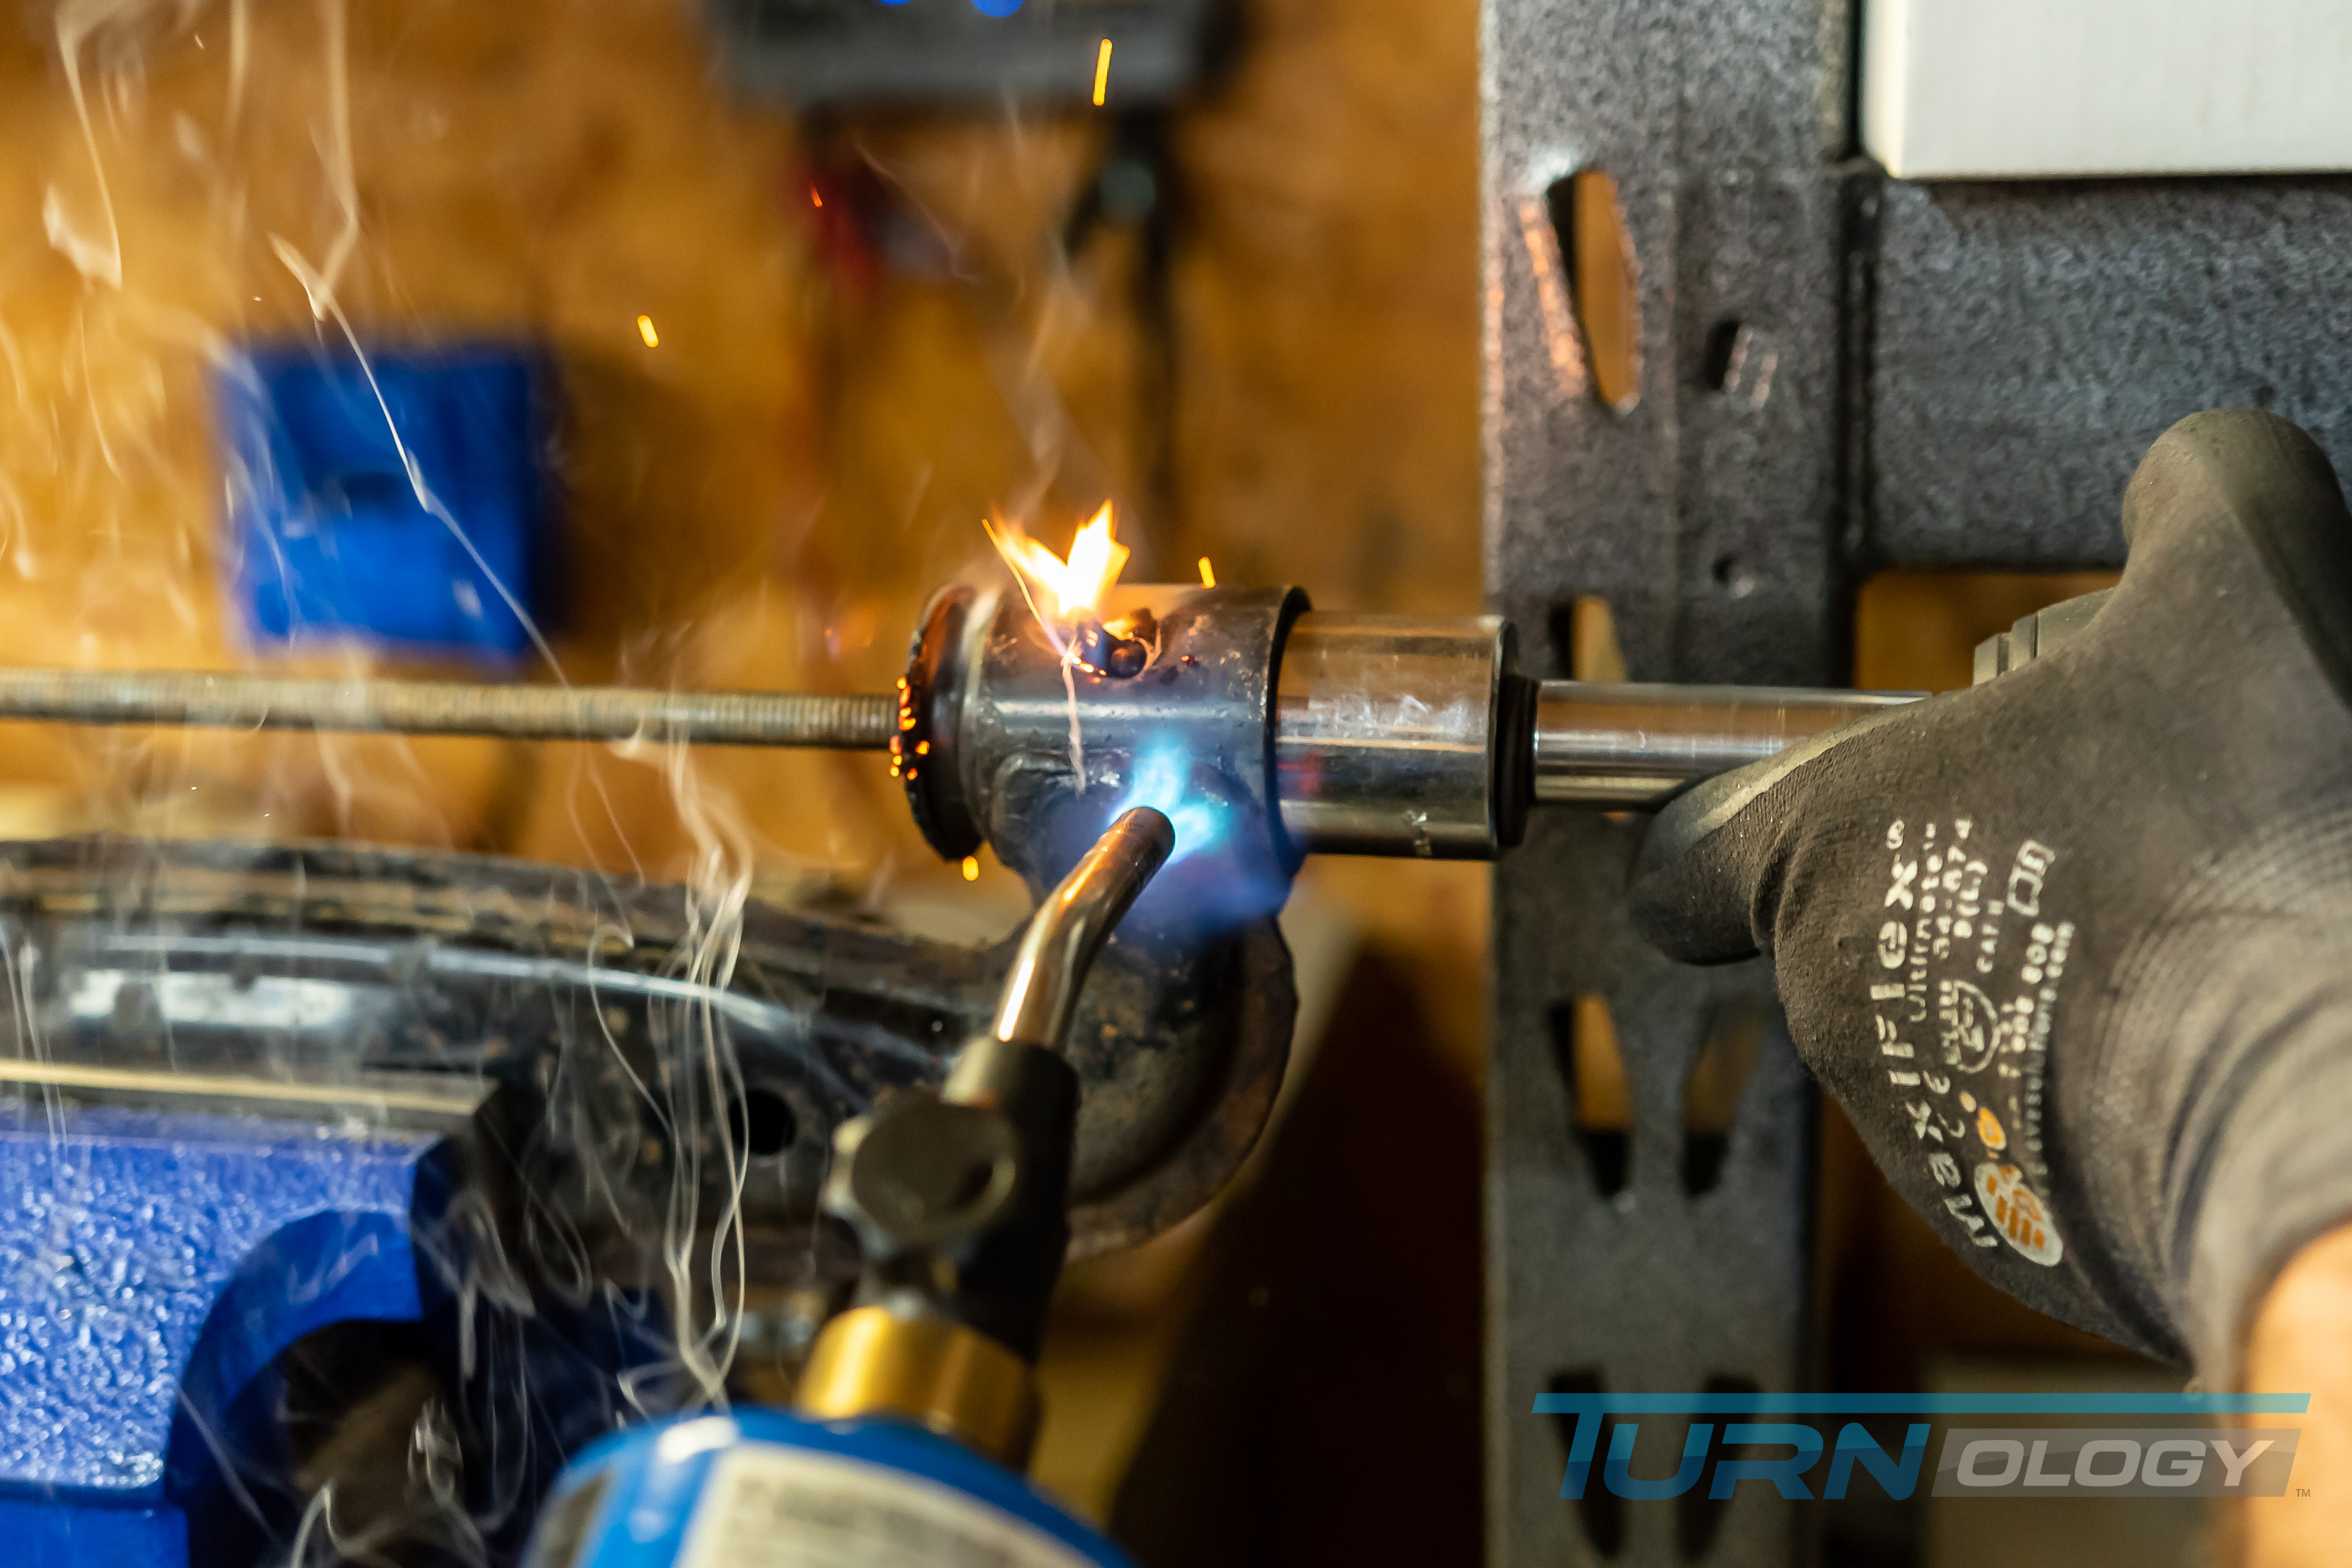
We took the control arms over to the vise to figure out the best way to remove the bushings without the use of a press. After several failed attempts at an easy removal, we finally hit paydirt. We devised a plan to cut off the mushroom lip on one side of each bushing. Then, we ran a long ⅜-inch threaded-rod through both openings with a thick washer and nut on one end and a small socket, small washer, and nut on the other. We used lots of heat to loosen the rubber along with some spray lubricant.Using an impact to �tighten� the bolt on one end and a double nut on the other, we made quick work of pulling the bushings free from each side.
__________________
Keystone Motor Club (Founded 2012)... Free car show Every 3rd Saturday, newsletter is
https://www.tamparacing.com/forums/e...-car-club.html
Keystone picture gallery is here:
https://carstoshow.com/eventdetails.aspx?eventid=93202
Veterans and Friends on First Saturday...Some pictures....
https://carstoshow.com/registerevent...eventid=102331
Port Richey Rod Run at Coast Buick GMC
https://carstoshow.com/registerevent.aspx?eventid=99114
50's Diner US19.... A Florida Attraction.
1730 US-19, Holiday Fl 34691 click: https://www.tamparacing.com/forums/t...-racing.html CHRA sanctioned cruise-in.
Cruise-In; Free; Every Saturday 5-8PM plus 10% off the whole menu to cruisers
50's Diner pictures are here: https://carstoshow.com/eventdetails.aspx?eventid=93194
All Cars Every 2nd Saturday Free Breakfast: Since 2015 and more. click: https://www.tamparacing.com/forums/e...ast-tampa.html
Tampa Racing.com covers the Tampa car scene and supports many fund raisers, worthy causes and events that enrich our community. We hope you enjoy them all.
What do I do? ---- on-site *Aftermarket* spring/suspension installations --- on-site impact wrenching---street lowering with your own stock springs...........True Bi-xenon HID projector headlight conversions........ Much more at Bob's Garage!
https://www.tamparacing.com/forums/b...ontact-us.html
https://www.tamparacing.com/forums/b...e-senor-honda/
Keystone Motor Club (Founded 2012)... Free car show Every 3rd Saturday, newsletter is
https://www.tamparacing.com/forums/e...-car-club.html
Keystone picture gallery is here:
https://carstoshow.com/eventdetails.aspx?eventid=93202
Veterans and Friends on First Saturday...Some pictures....
https://carstoshow.com/registerevent...eventid=102331
Port Richey Rod Run at Coast Buick GMC
https://carstoshow.com/registerevent.aspx?eventid=99114
50's Diner US19.... A Florida Attraction.
1730 US-19, Holiday Fl 34691 click: https://www.tamparacing.com/forums/t...-racing.html CHRA sanctioned cruise-in.
Cruise-In; Free; Every Saturday 5-8PM plus 10% off the whole menu to cruisers
50's Diner pictures are here: https://carstoshow.com/eventdetails.aspx?eventid=93194
All Cars Every 2nd Saturday Free Breakfast: Since 2015 and more. click: https://www.tamparacing.com/forums/e...ast-tampa.html
Tampa Racing.com covers the Tampa car scene and supports many fund raisers, worthy causes and events that enrich our community. We hope you enjoy them all.
What do I do? ---- on-site *Aftermarket* spring/suspension installations --- on-site impact wrenching---street lowering with your own stock springs...........True Bi-xenon HID projector headlight conversions........ Much more at Bob's Garage!
https://www.tamparacing.com/forums/b...ontact-us.html
https://www.tamparacing.com/forums/b...e-senor-honda/
Registered
Thread Starter

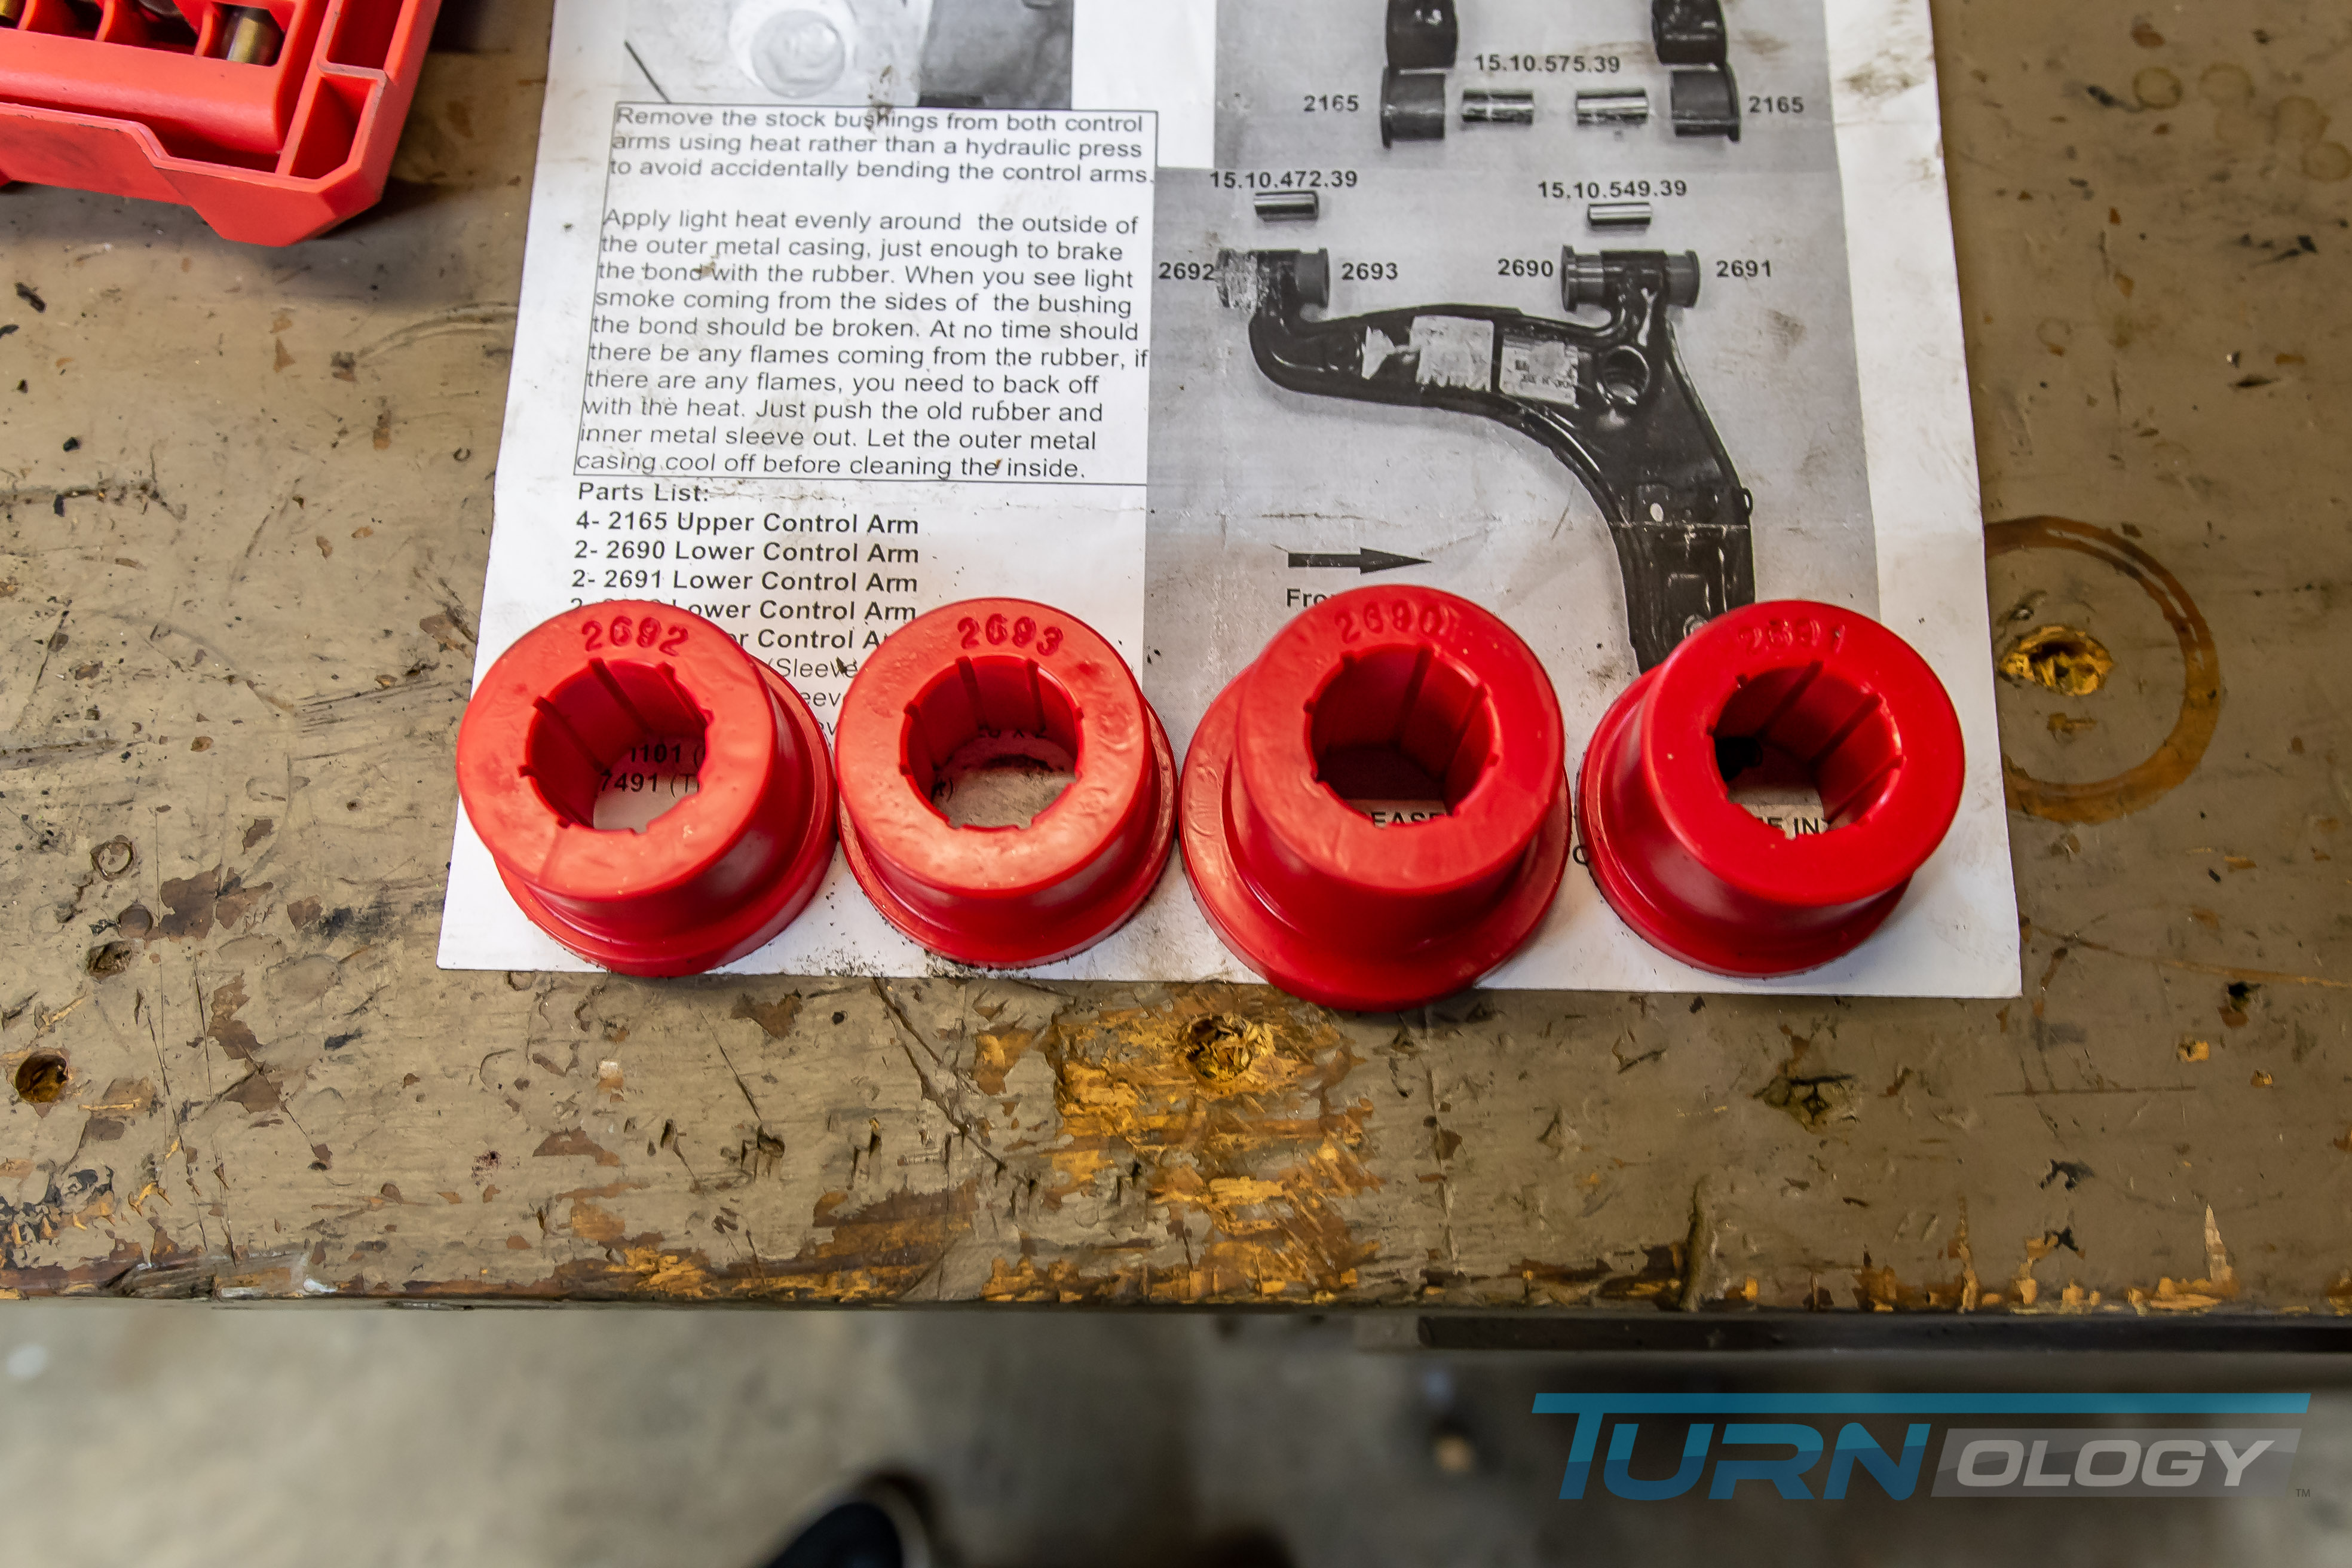
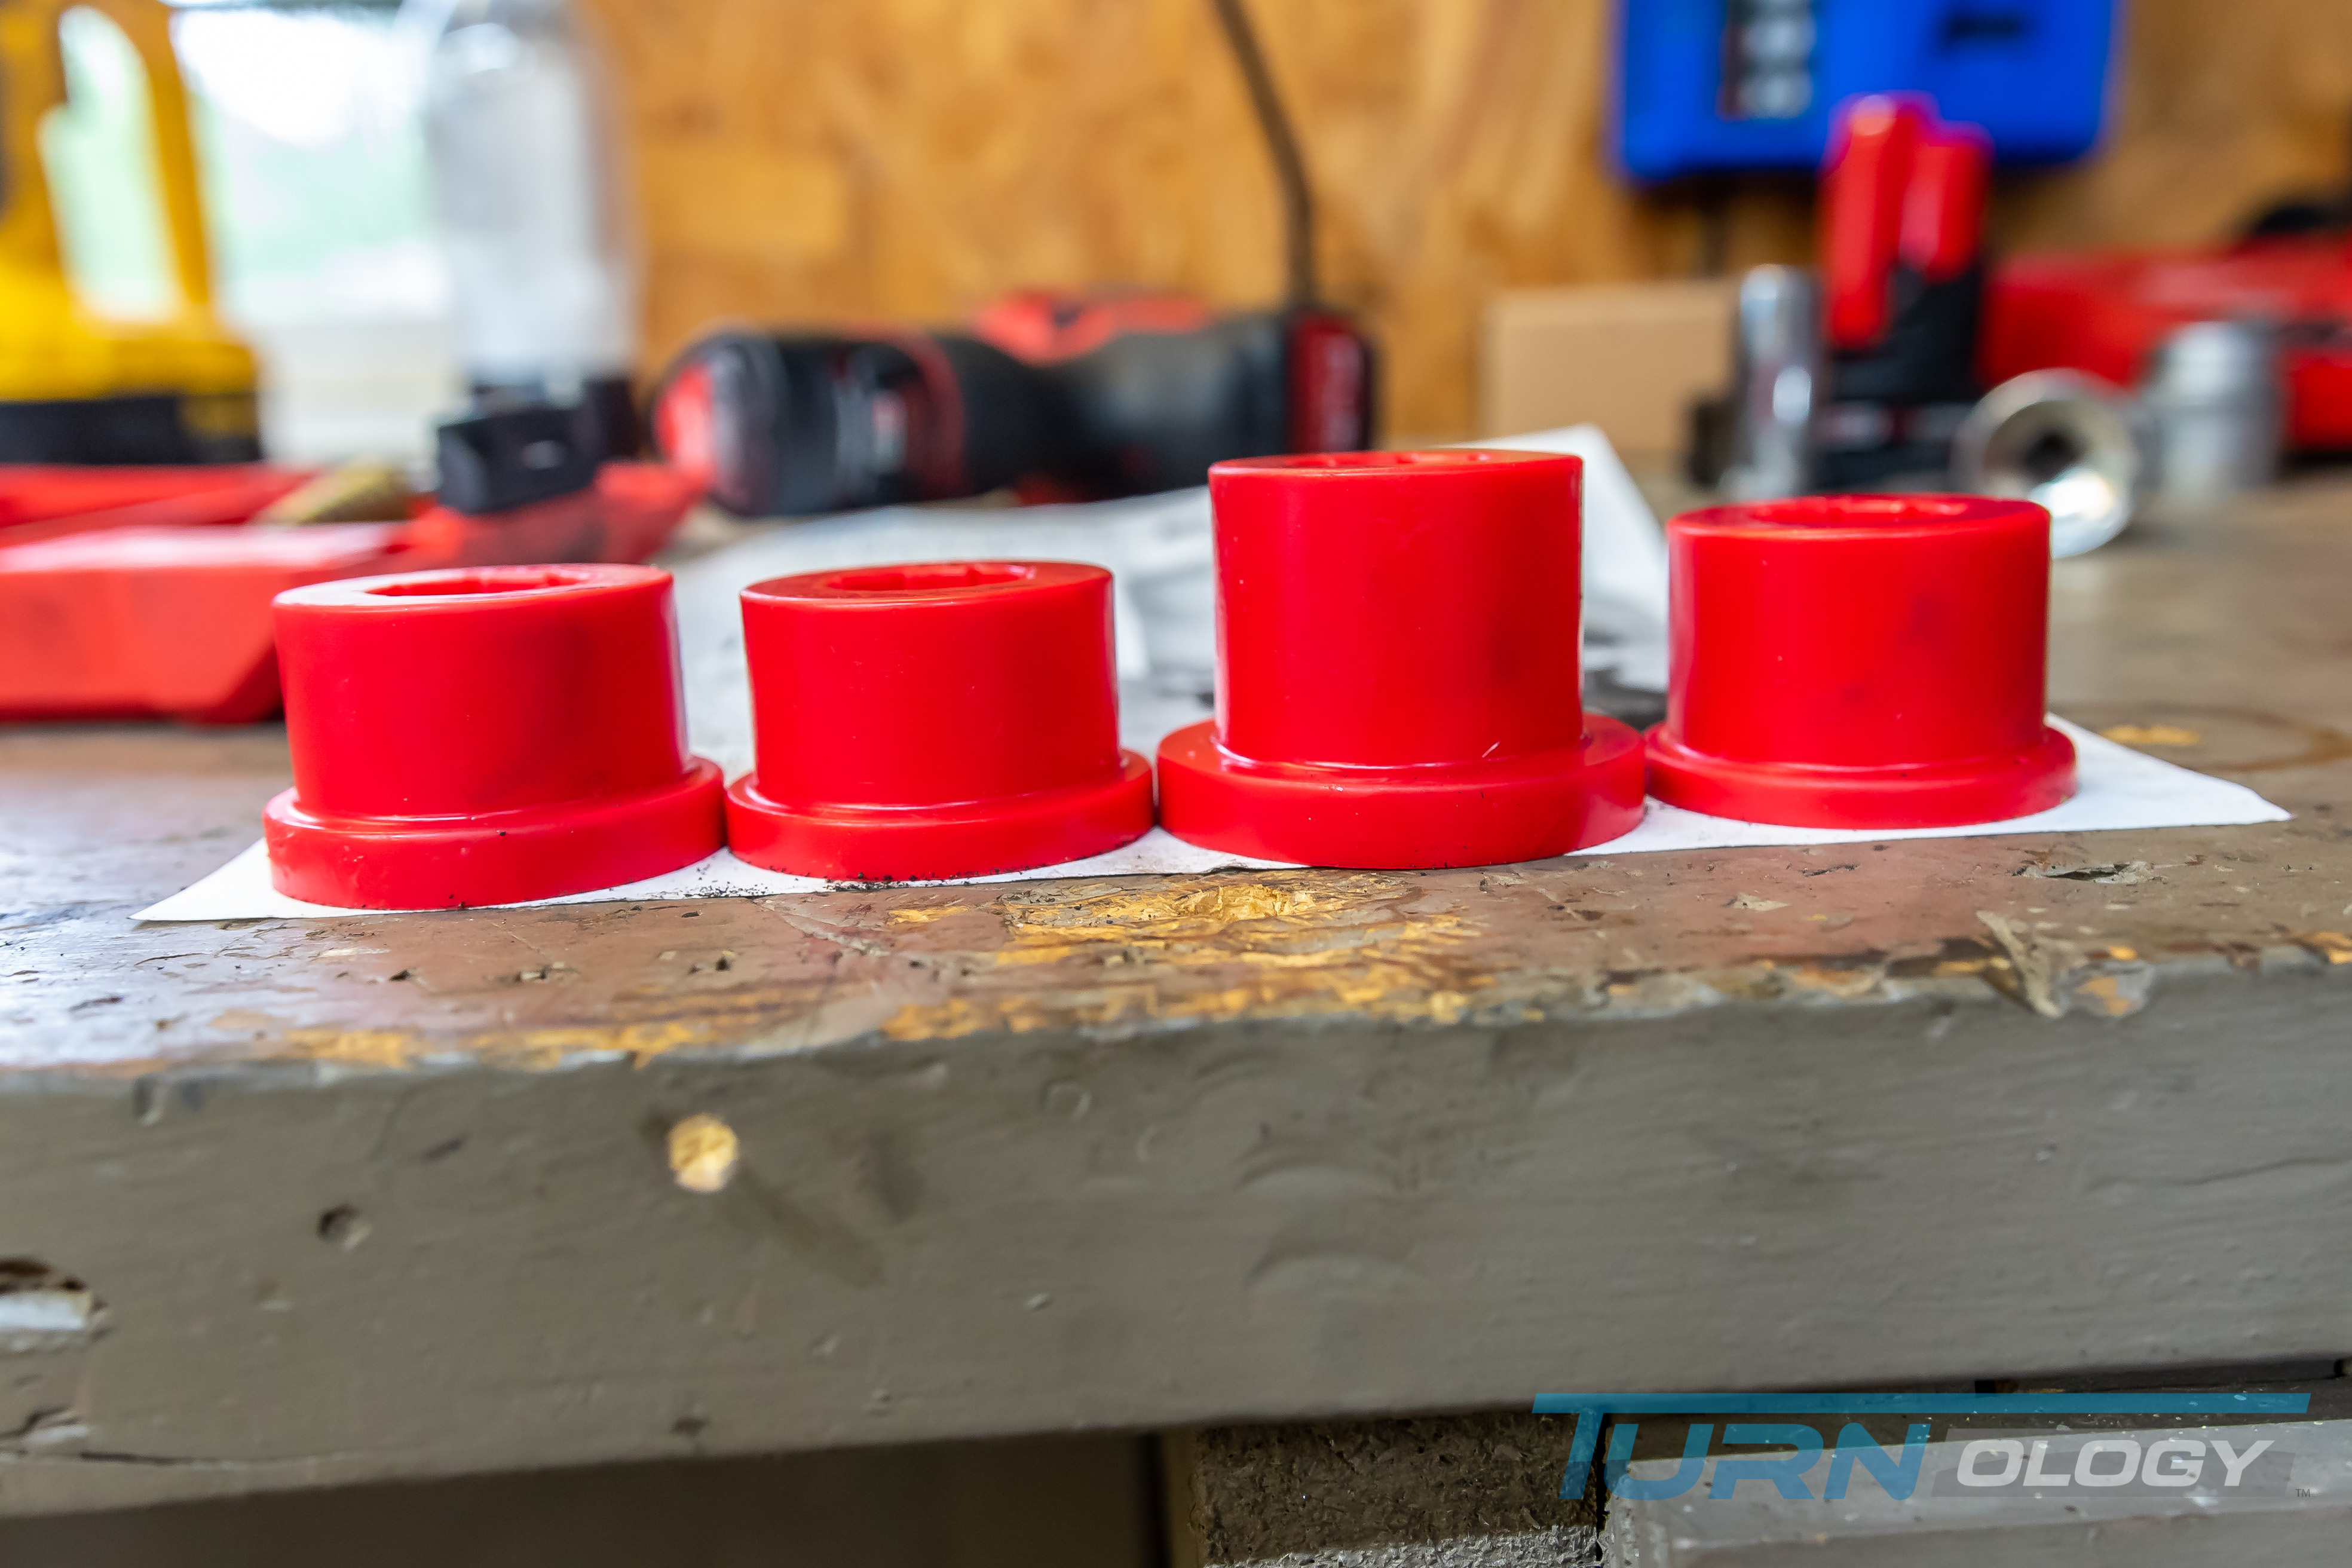
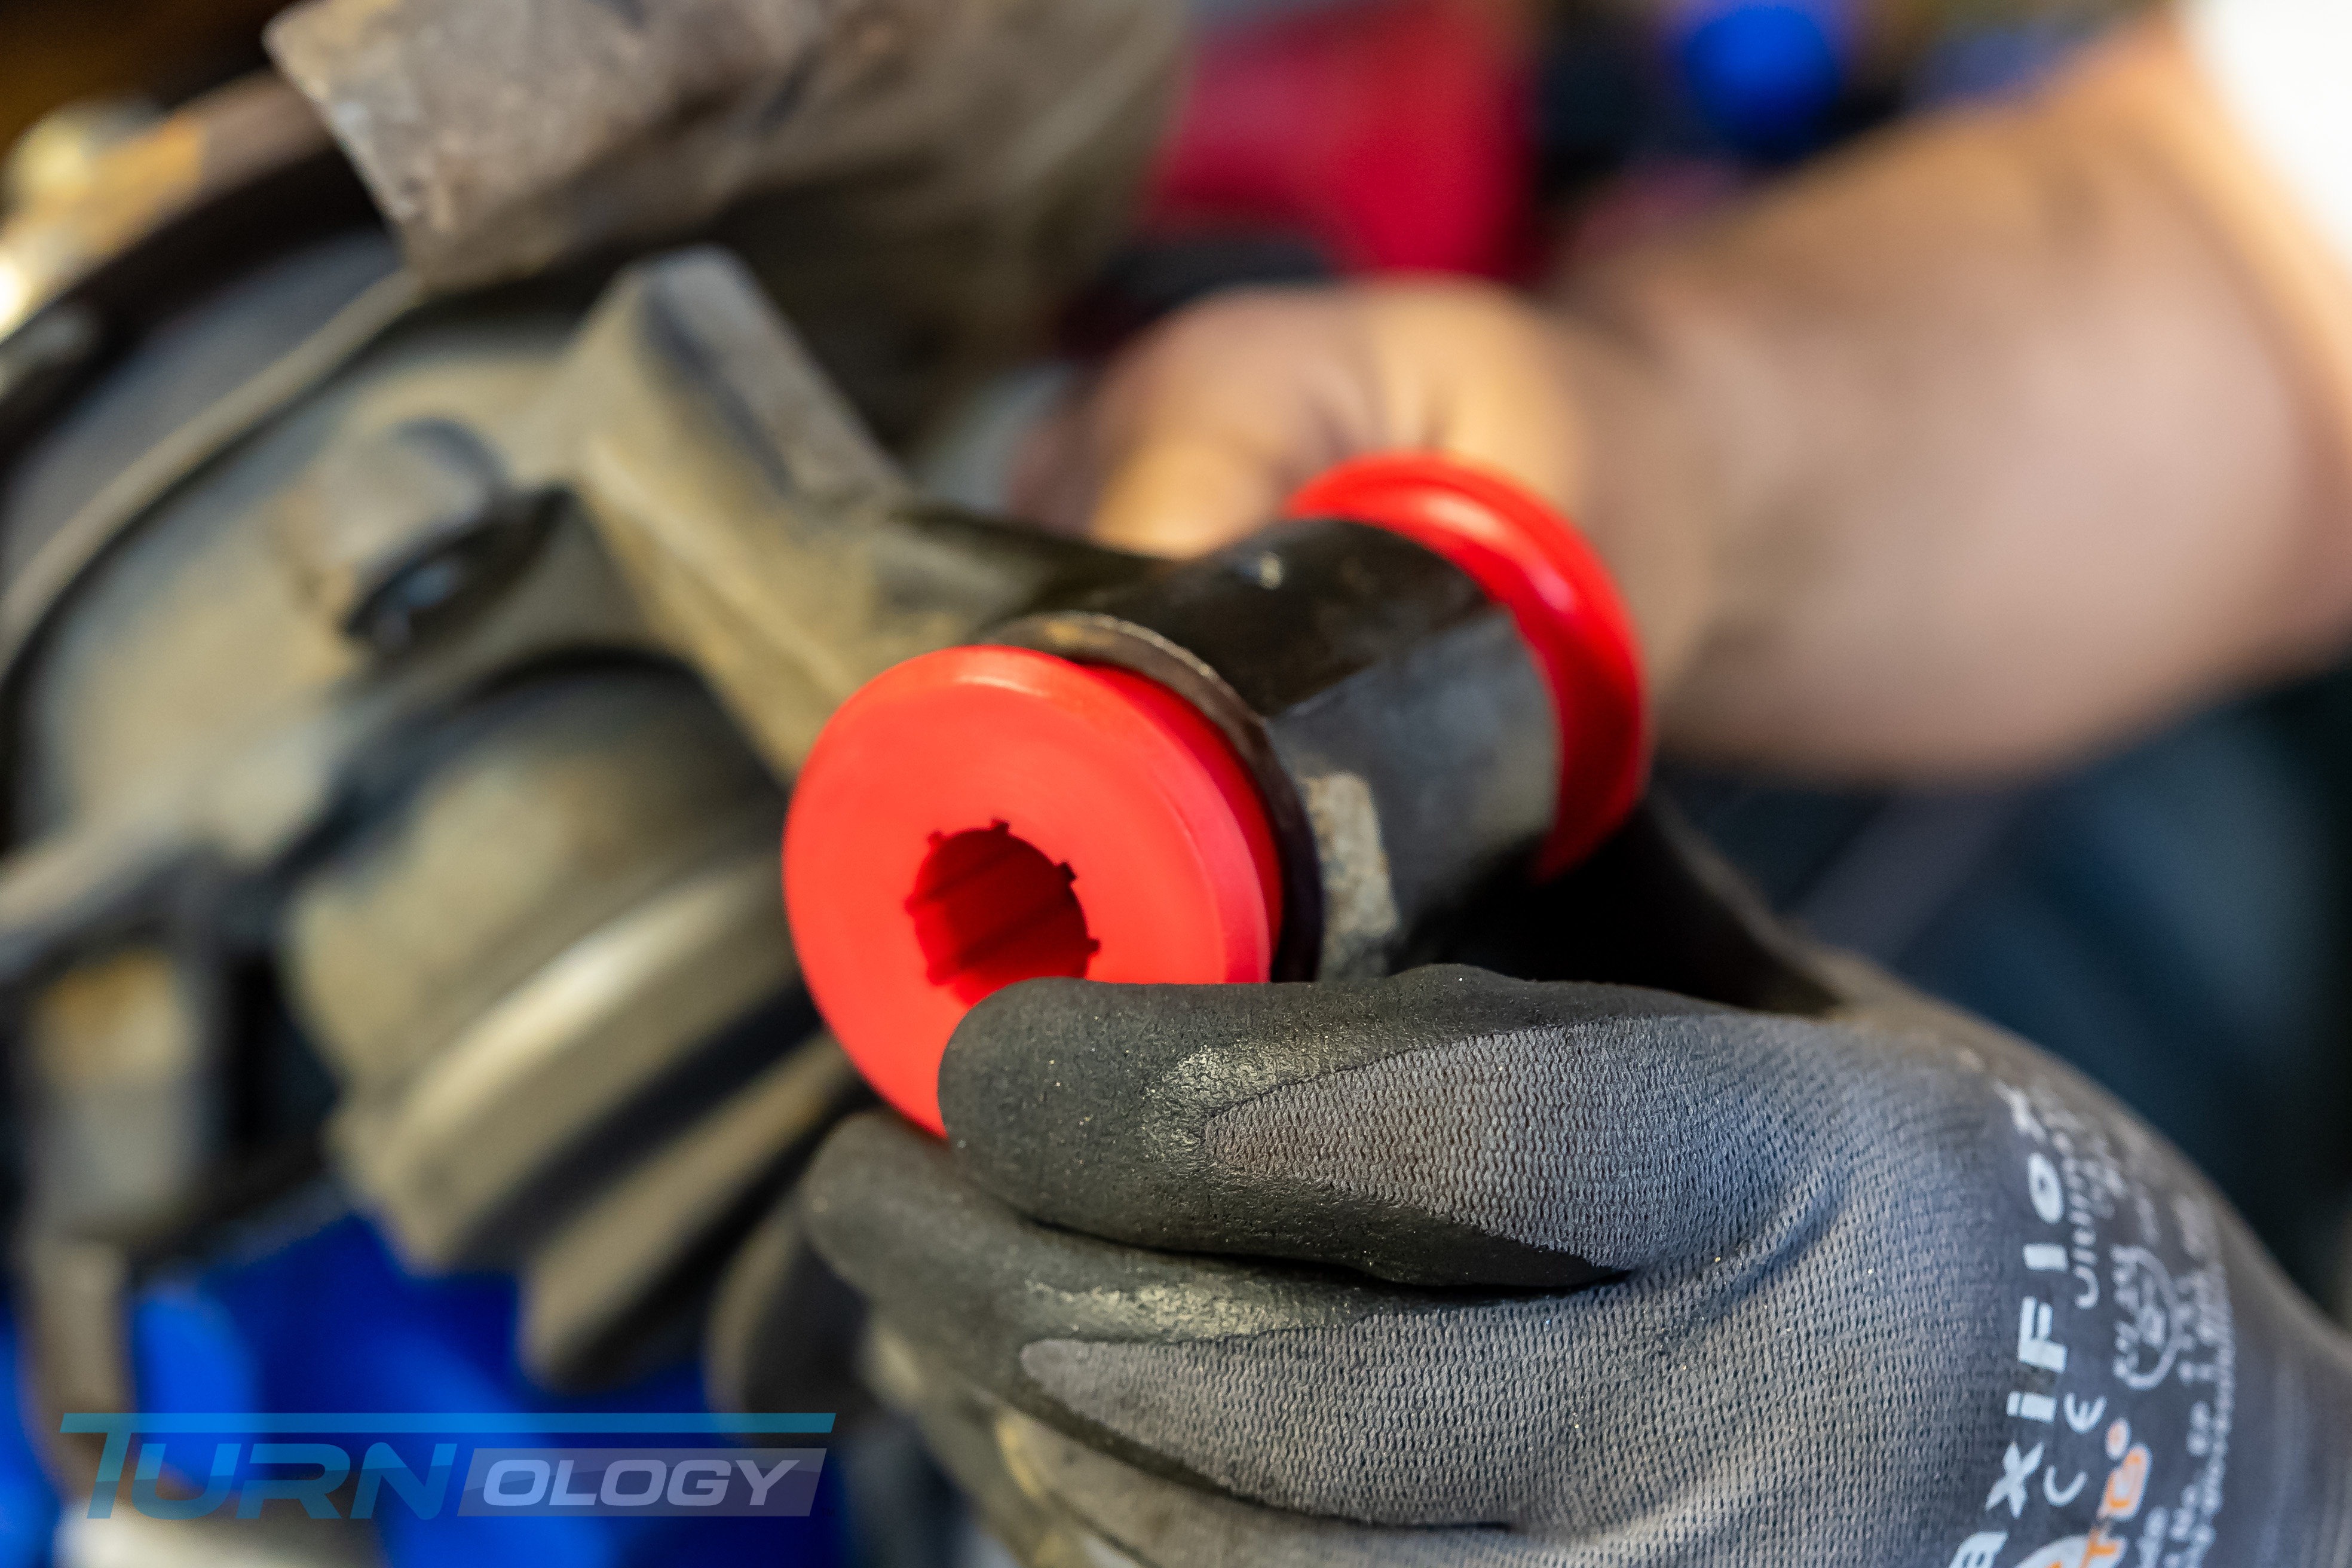
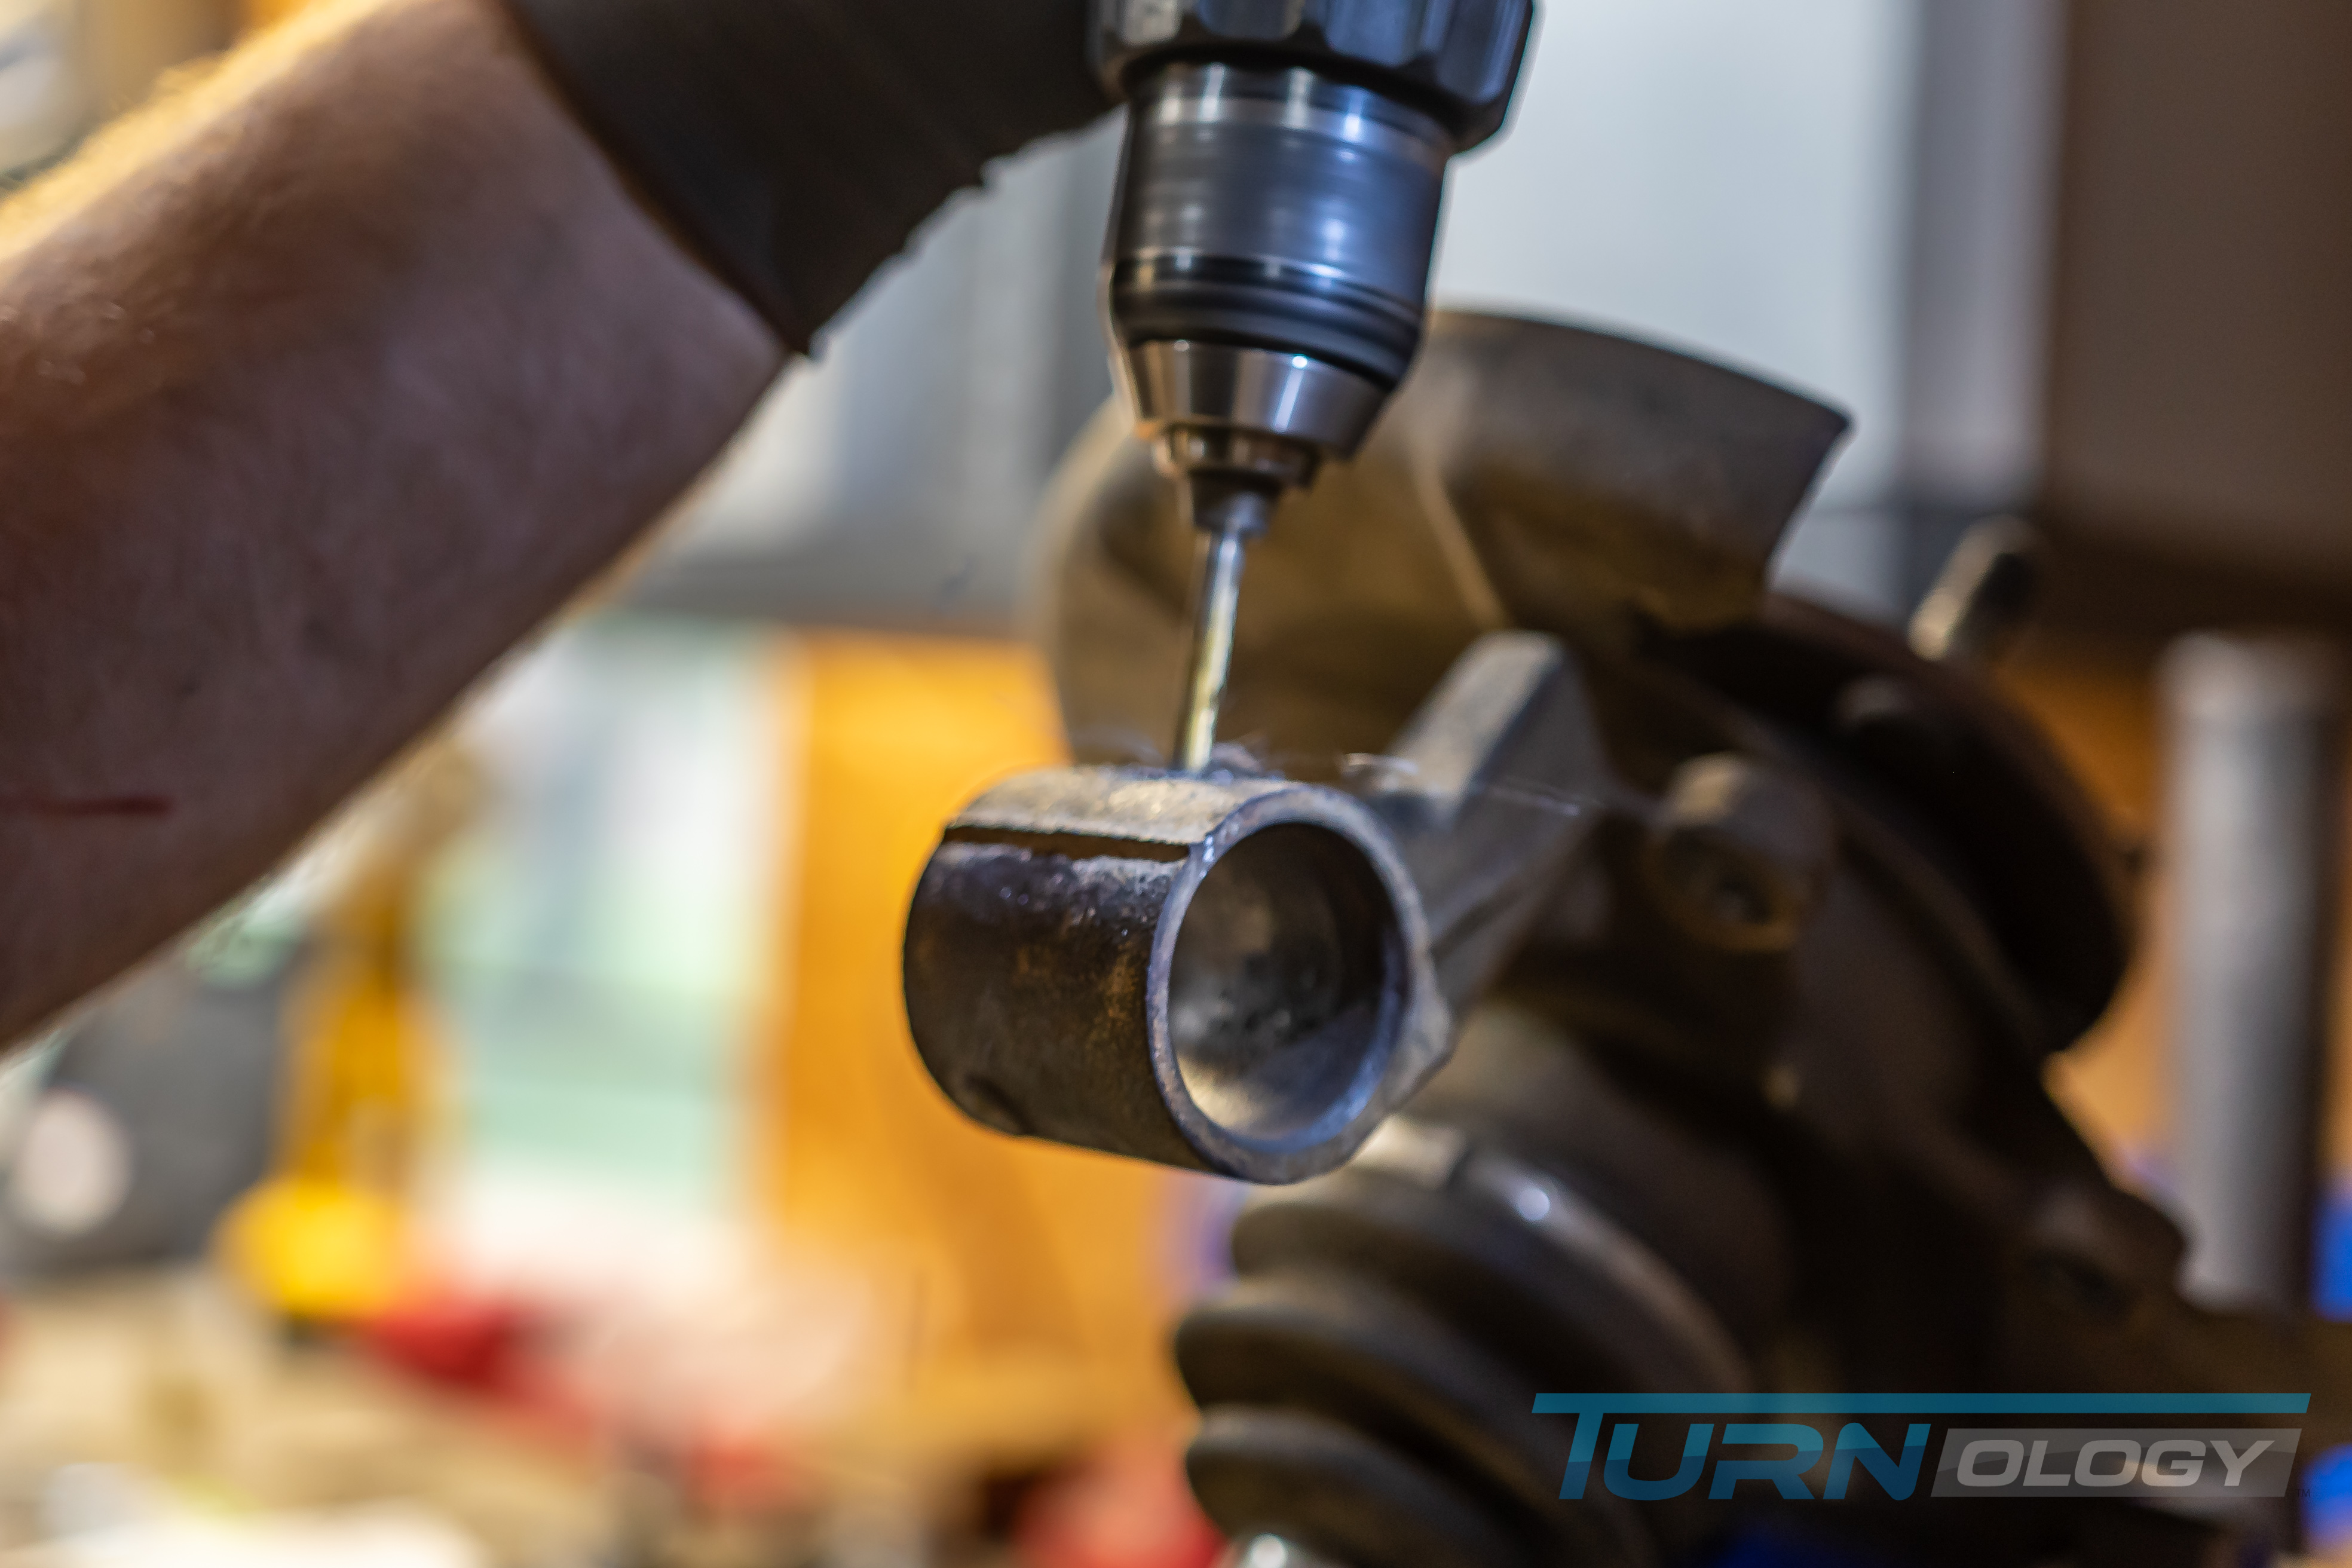
Once the bushings were out, we cleaned up the inside of the holes with some sandpaper and Emory cloth so the new Hyper-Flex bushings could slide right in after using a light coat of the supplied Energy grease (As an aside, this stuff should be called glue, it is super sticky!).
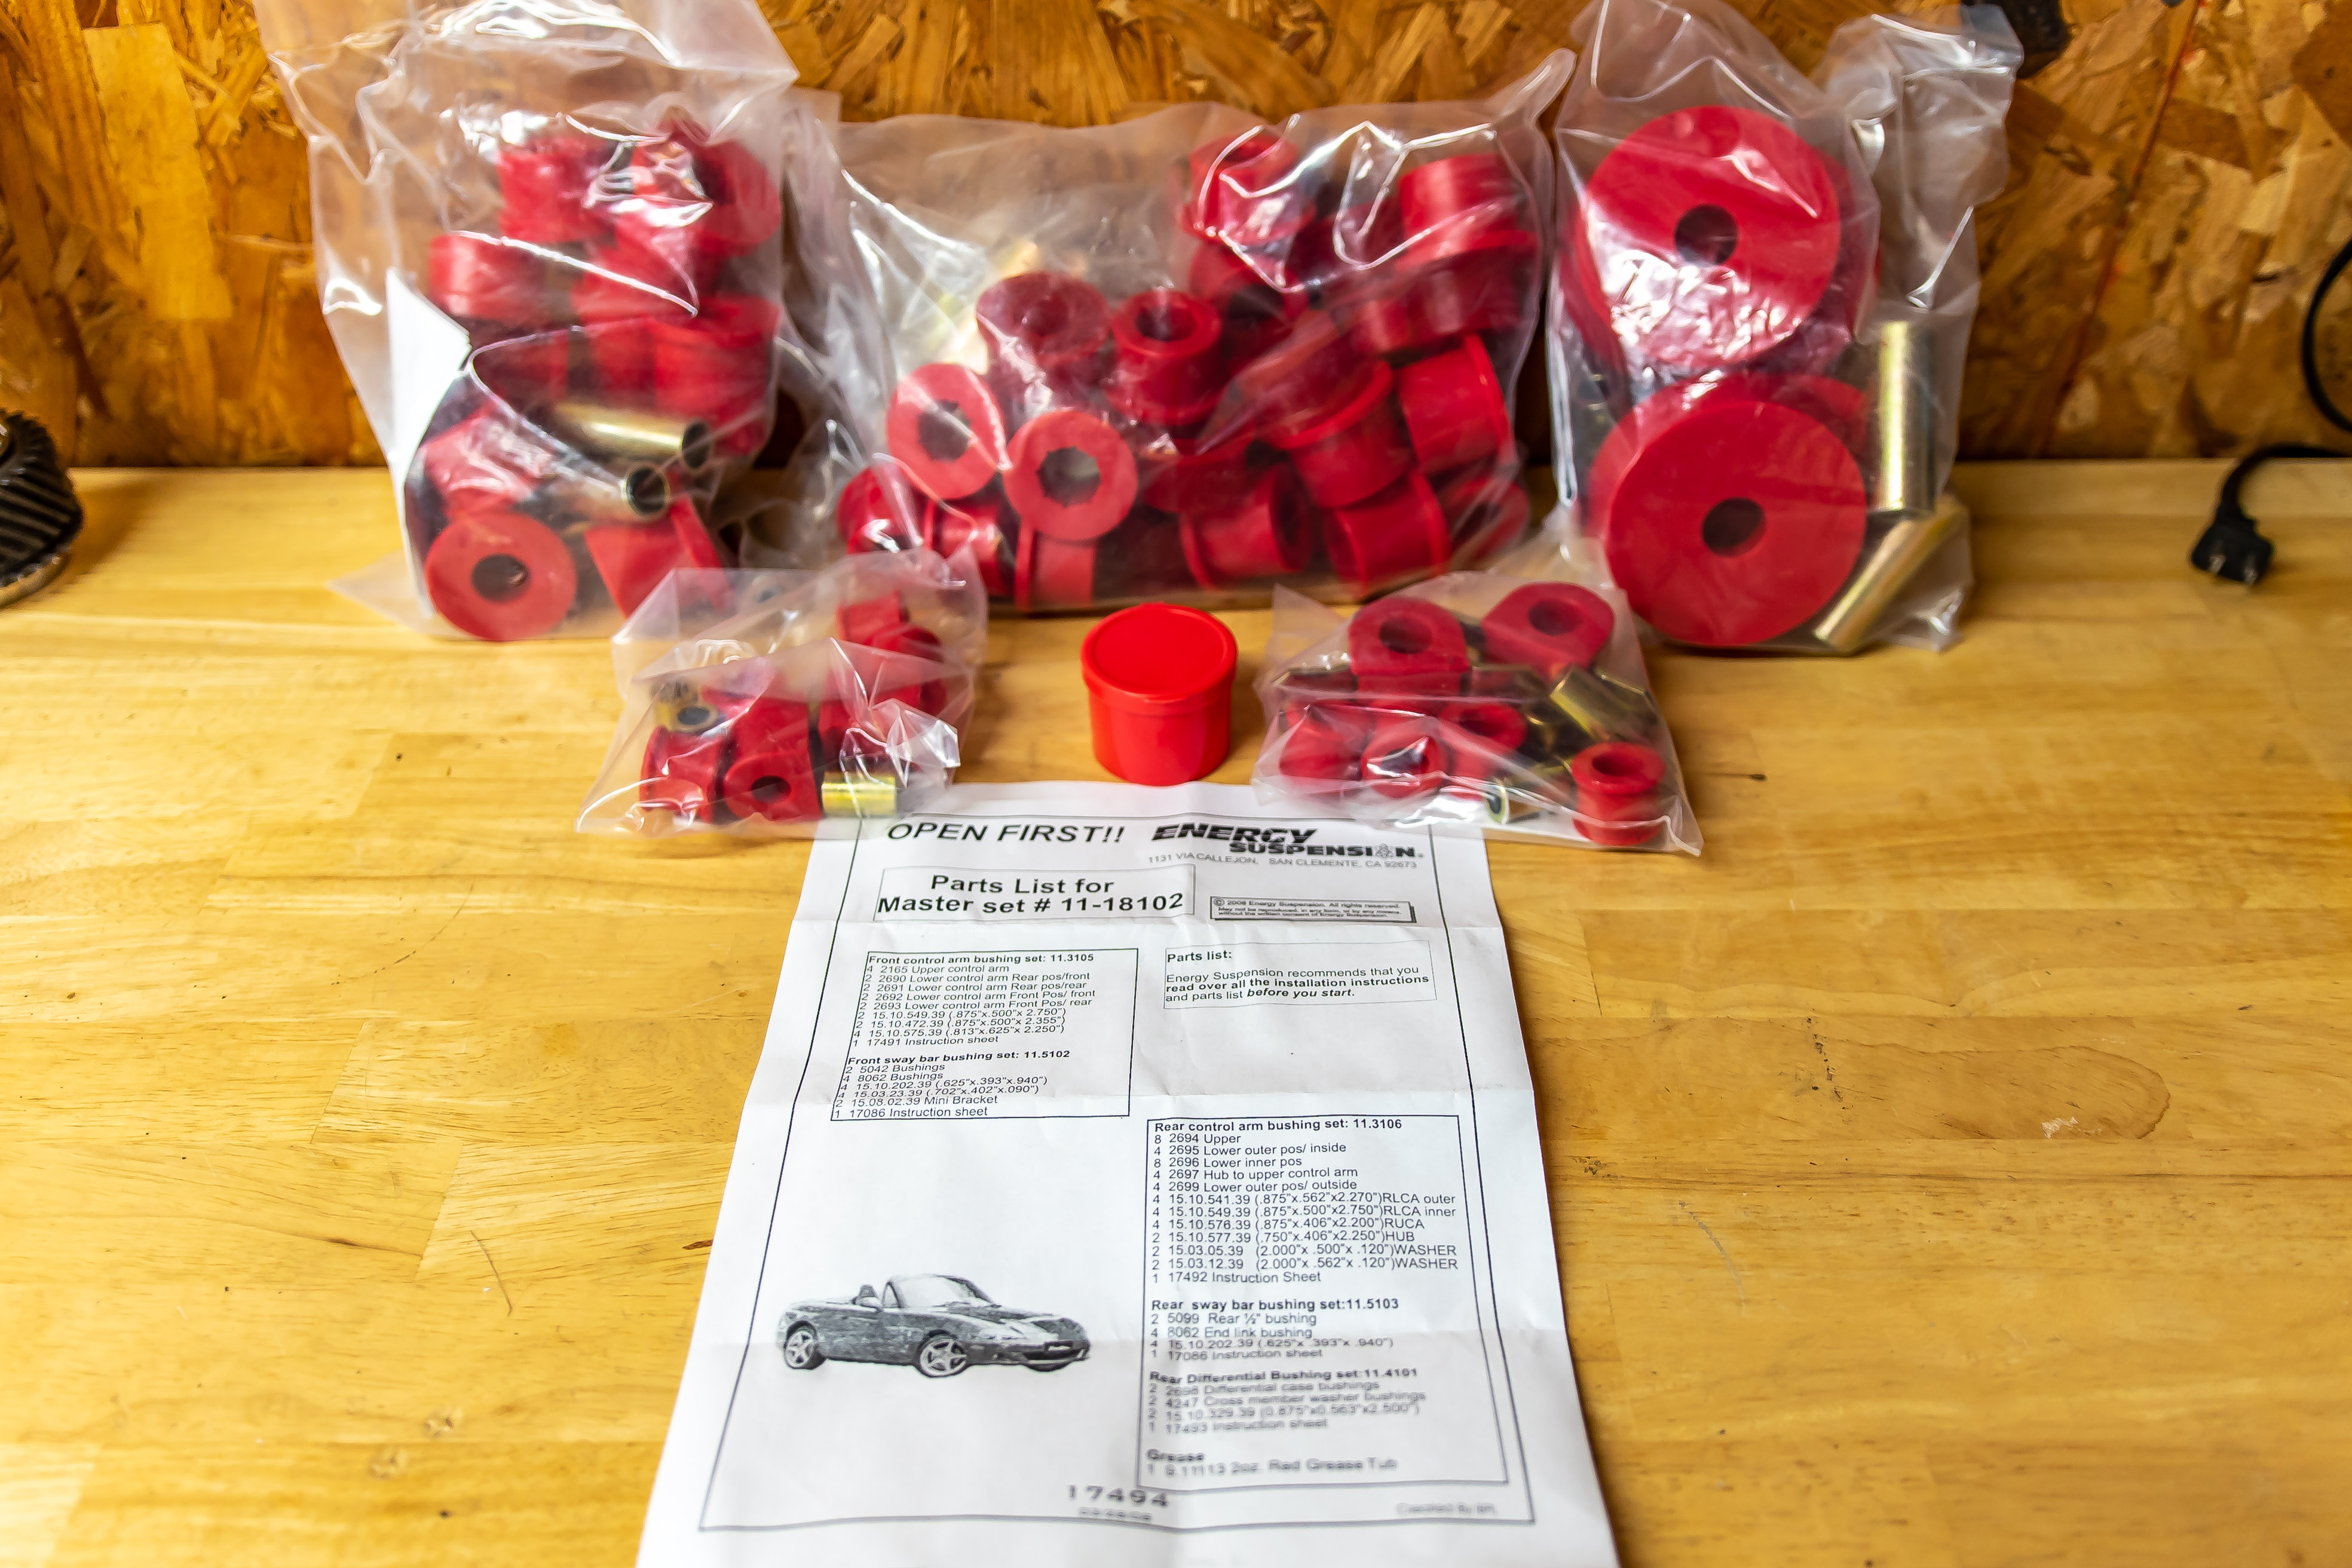
Note, there are six total bushings per control arm per side � by far the majority of the bushings we needed to change, but not the most difficult (see rear differential below). Also note, there are four different bushing lengths and two different sleeve lengths, so make sure you are using the right ones in the proper locations.
__________________
Keystone Motor Club (Founded 2012)... Free car show Every 3rd Saturday, newsletter is
https://www.tamparacing.com/forums/e...-car-club.html
Keystone picture gallery is here:
https://carstoshow.com/eventdetails.aspx?eventid=93202
Veterans and Friends on First Saturday...Some pictures....
https://carstoshow.com/registerevent...eventid=102331
Port Richey Rod Run at Coast Buick GMC
https://carstoshow.com/registerevent.aspx?eventid=99114
50's Diner US19.... A Florida Attraction.
1730 US-19, Holiday Fl 34691 click: https://www.tamparacing.com/forums/t...-racing.html CHRA sanctioned cruise-in.
Cruise-In; Free; Every Saturday 5-8PM plus 10% off the whole menu to cruisers
50's Diner pictures are here: https://carstoshow.com/eventdetails.aspx?eventid=93194
All Cars Every 2nd Saturday Free Breakfast: Since 2015 and more. click: https://www.tamparacing.com/forums/e...ast-tampa.html
Tampa Racing.com covers the Tampa car scene and supports many fund raisers, worthy causes and events that enrich our community. We hope you enjoy them all.
What do I do? ---- on-site *Aftermarket* spring/suspension installations --- on-site impact wrenching---street lowering with your own stock springs...........True Bi-xenon HID projector headlight conversions........ Much more at Bob's Garage!
https://www.tamparacing.com/forums/b...ontact-us.html
https://www.tamparacing.com/forums/b...e-senor-honda/
Keystone Motor Club (Founded 2012)... Free car show Every 3rd Saturday, newsletter is
https://www.tamparacing.com/forums/e...-car-club.html
Keystone picture gallery is here:
https://carstoshow.com/eventdetails.aspx?eventid=93202
Veterans and Friends on First Saturday...Some pictures....
https://carstoshow.com/registerevent...eventid=102331
Port Richey Rod Run at Coast Buick GMC
https://carstoshow.com/registerevent.aspx?eventid=99114
50's Diner US19.... A Florida Attraction.
1730 US-19, Holiday Fl 34691 click: https://www.tamparacing.com/forums/t...-racing.html CHRA sanctioned cruise-in.
Cruise-In; Free; Every Saturday 5-8PM plus 10% off the whole menu to cruisers
50's Diner pictures are here: https://carstoshow.com/eventdetails.aspx?eventid=93194
All Cars Every 2nd Saturday Free Breakfast: Since 2015 and more. click: https://www.tamparacing.com/forums/e...ast-tampa.html
Tampa Racing.com covers the Tampa car scene and supports many fund raisers, worthy causes and events that enrich our community. We hope you enjoy them all.
What do I do? ---- on-site *Aftermarket* spring/suspension installations --- on-site impact wrenching---street lowering with your own stock springs...........True Bi-xenon HID projector headlight conversions........ Much more at Bob's Garage!
https://www.tamparacing.com/forums/b...ontact-us.html
https://www.tamparacing.com/forums/b...e-senor-honda/
Registered
Thread Starter
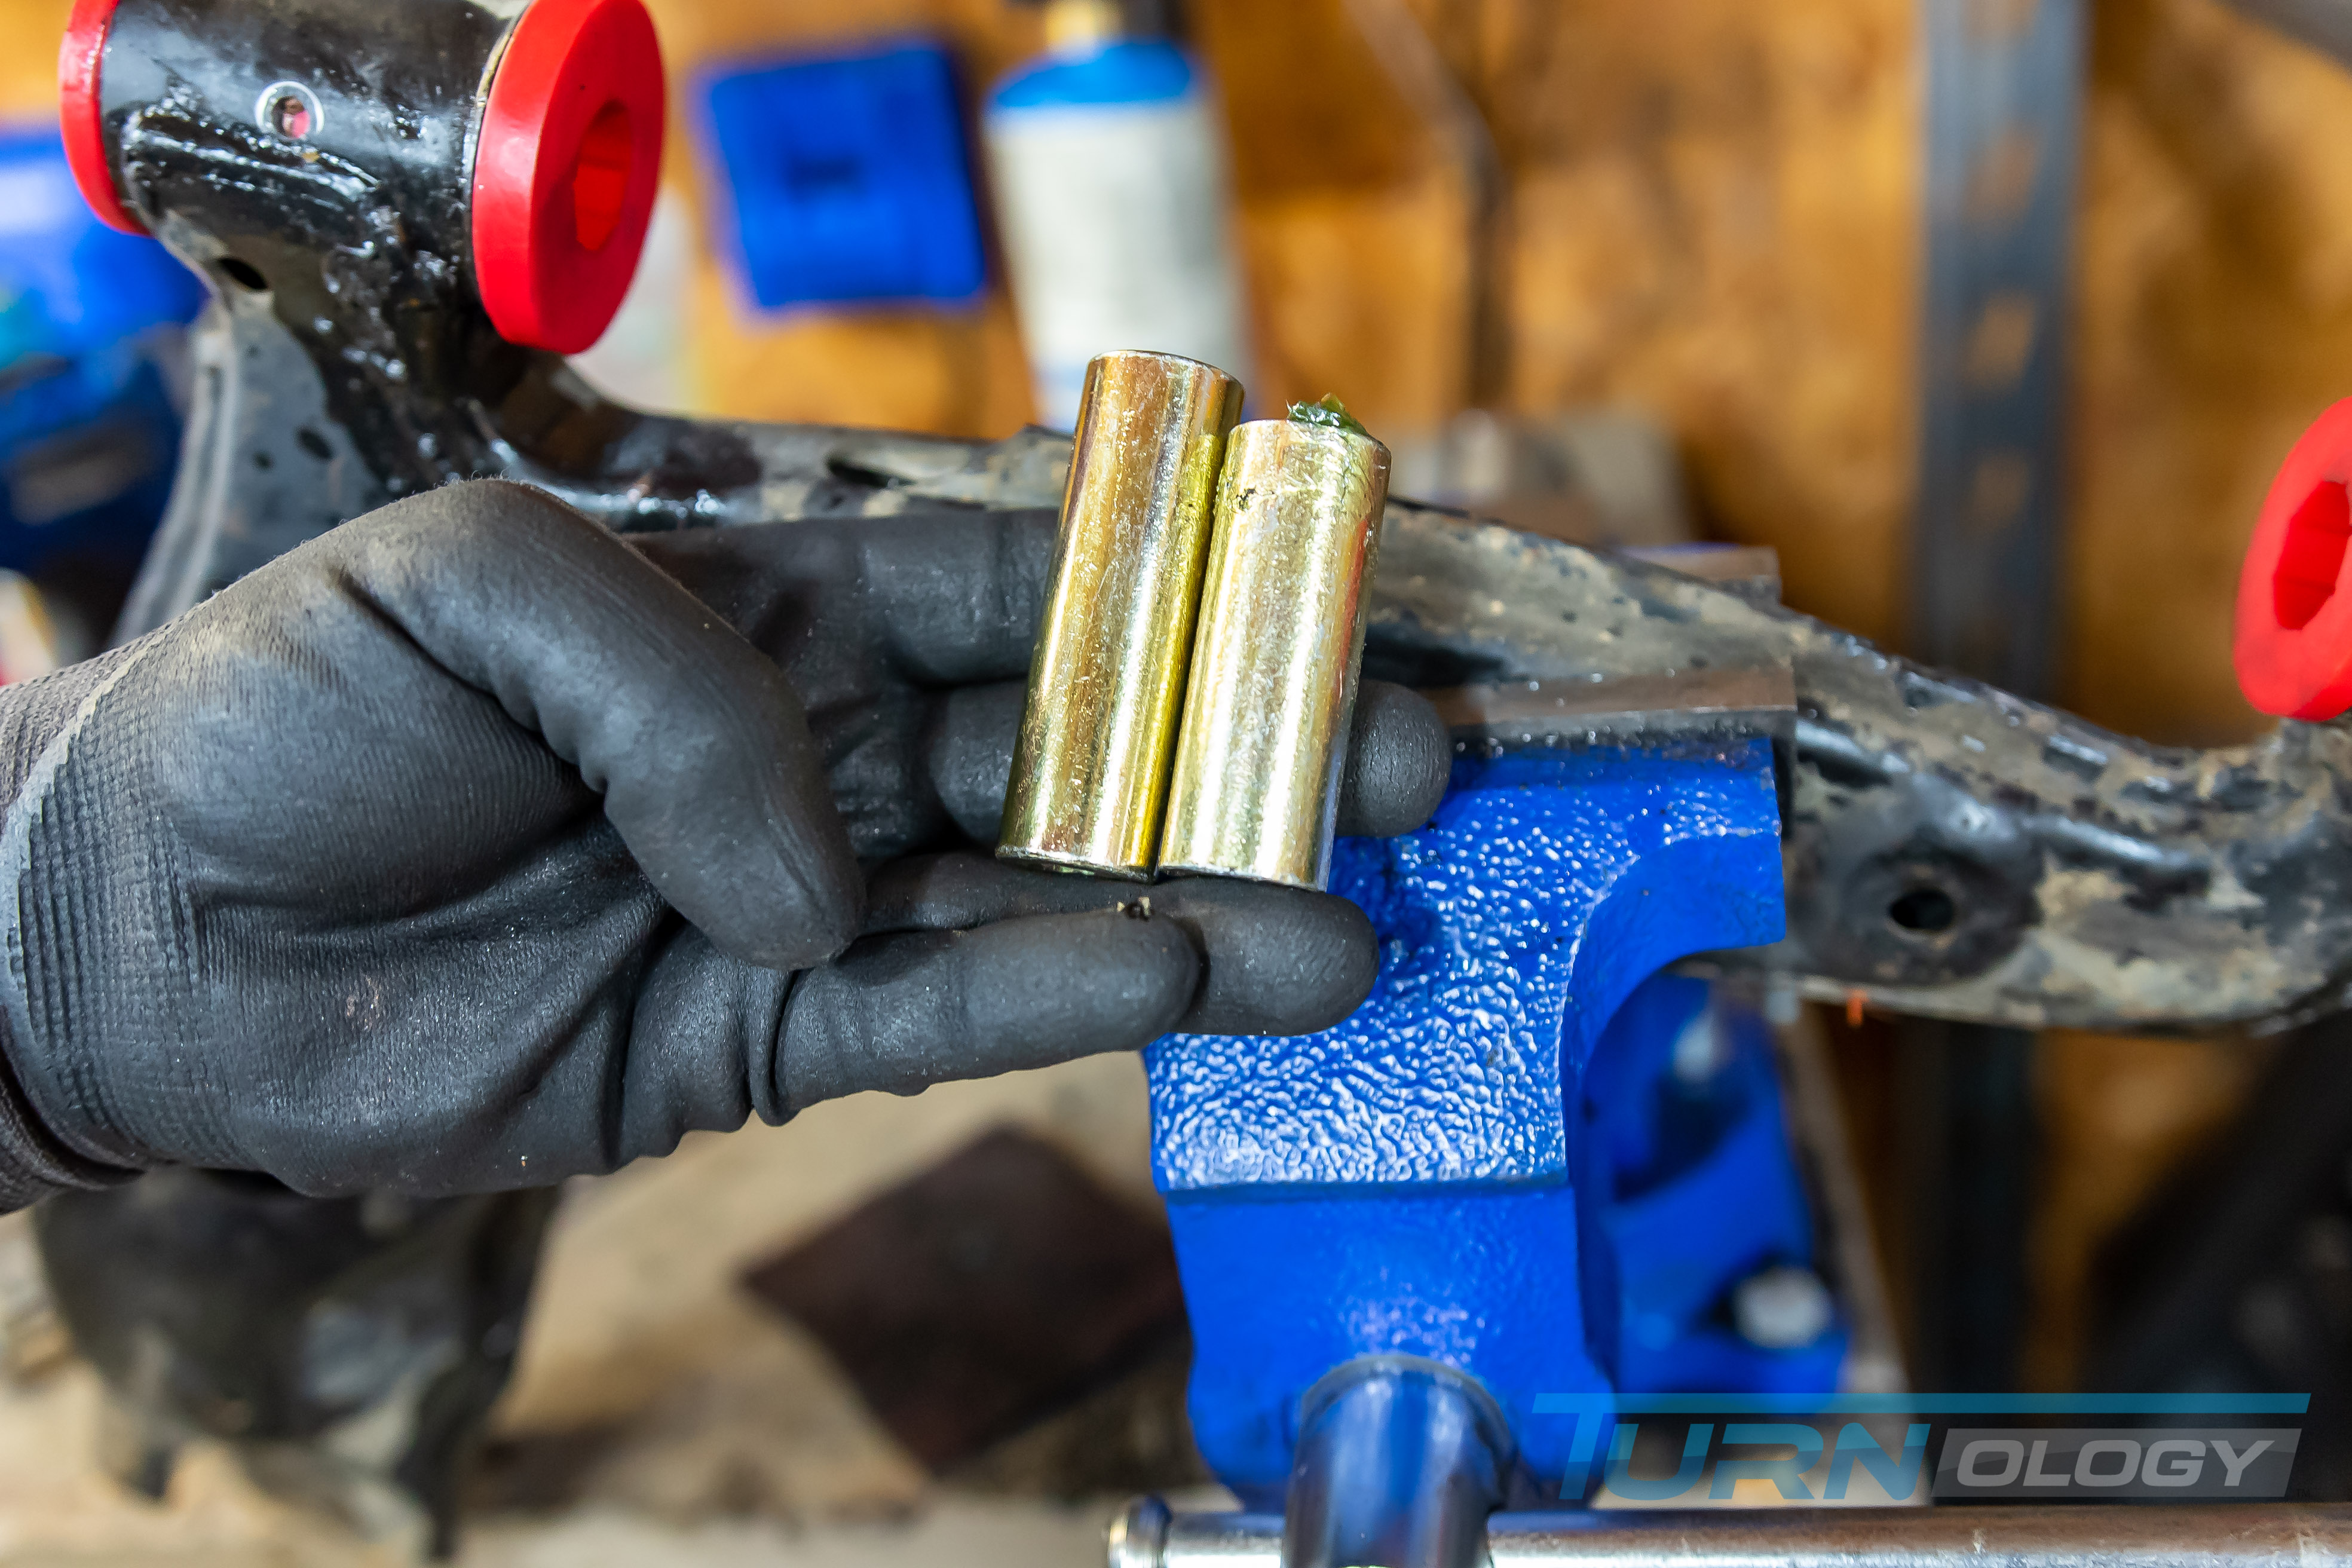
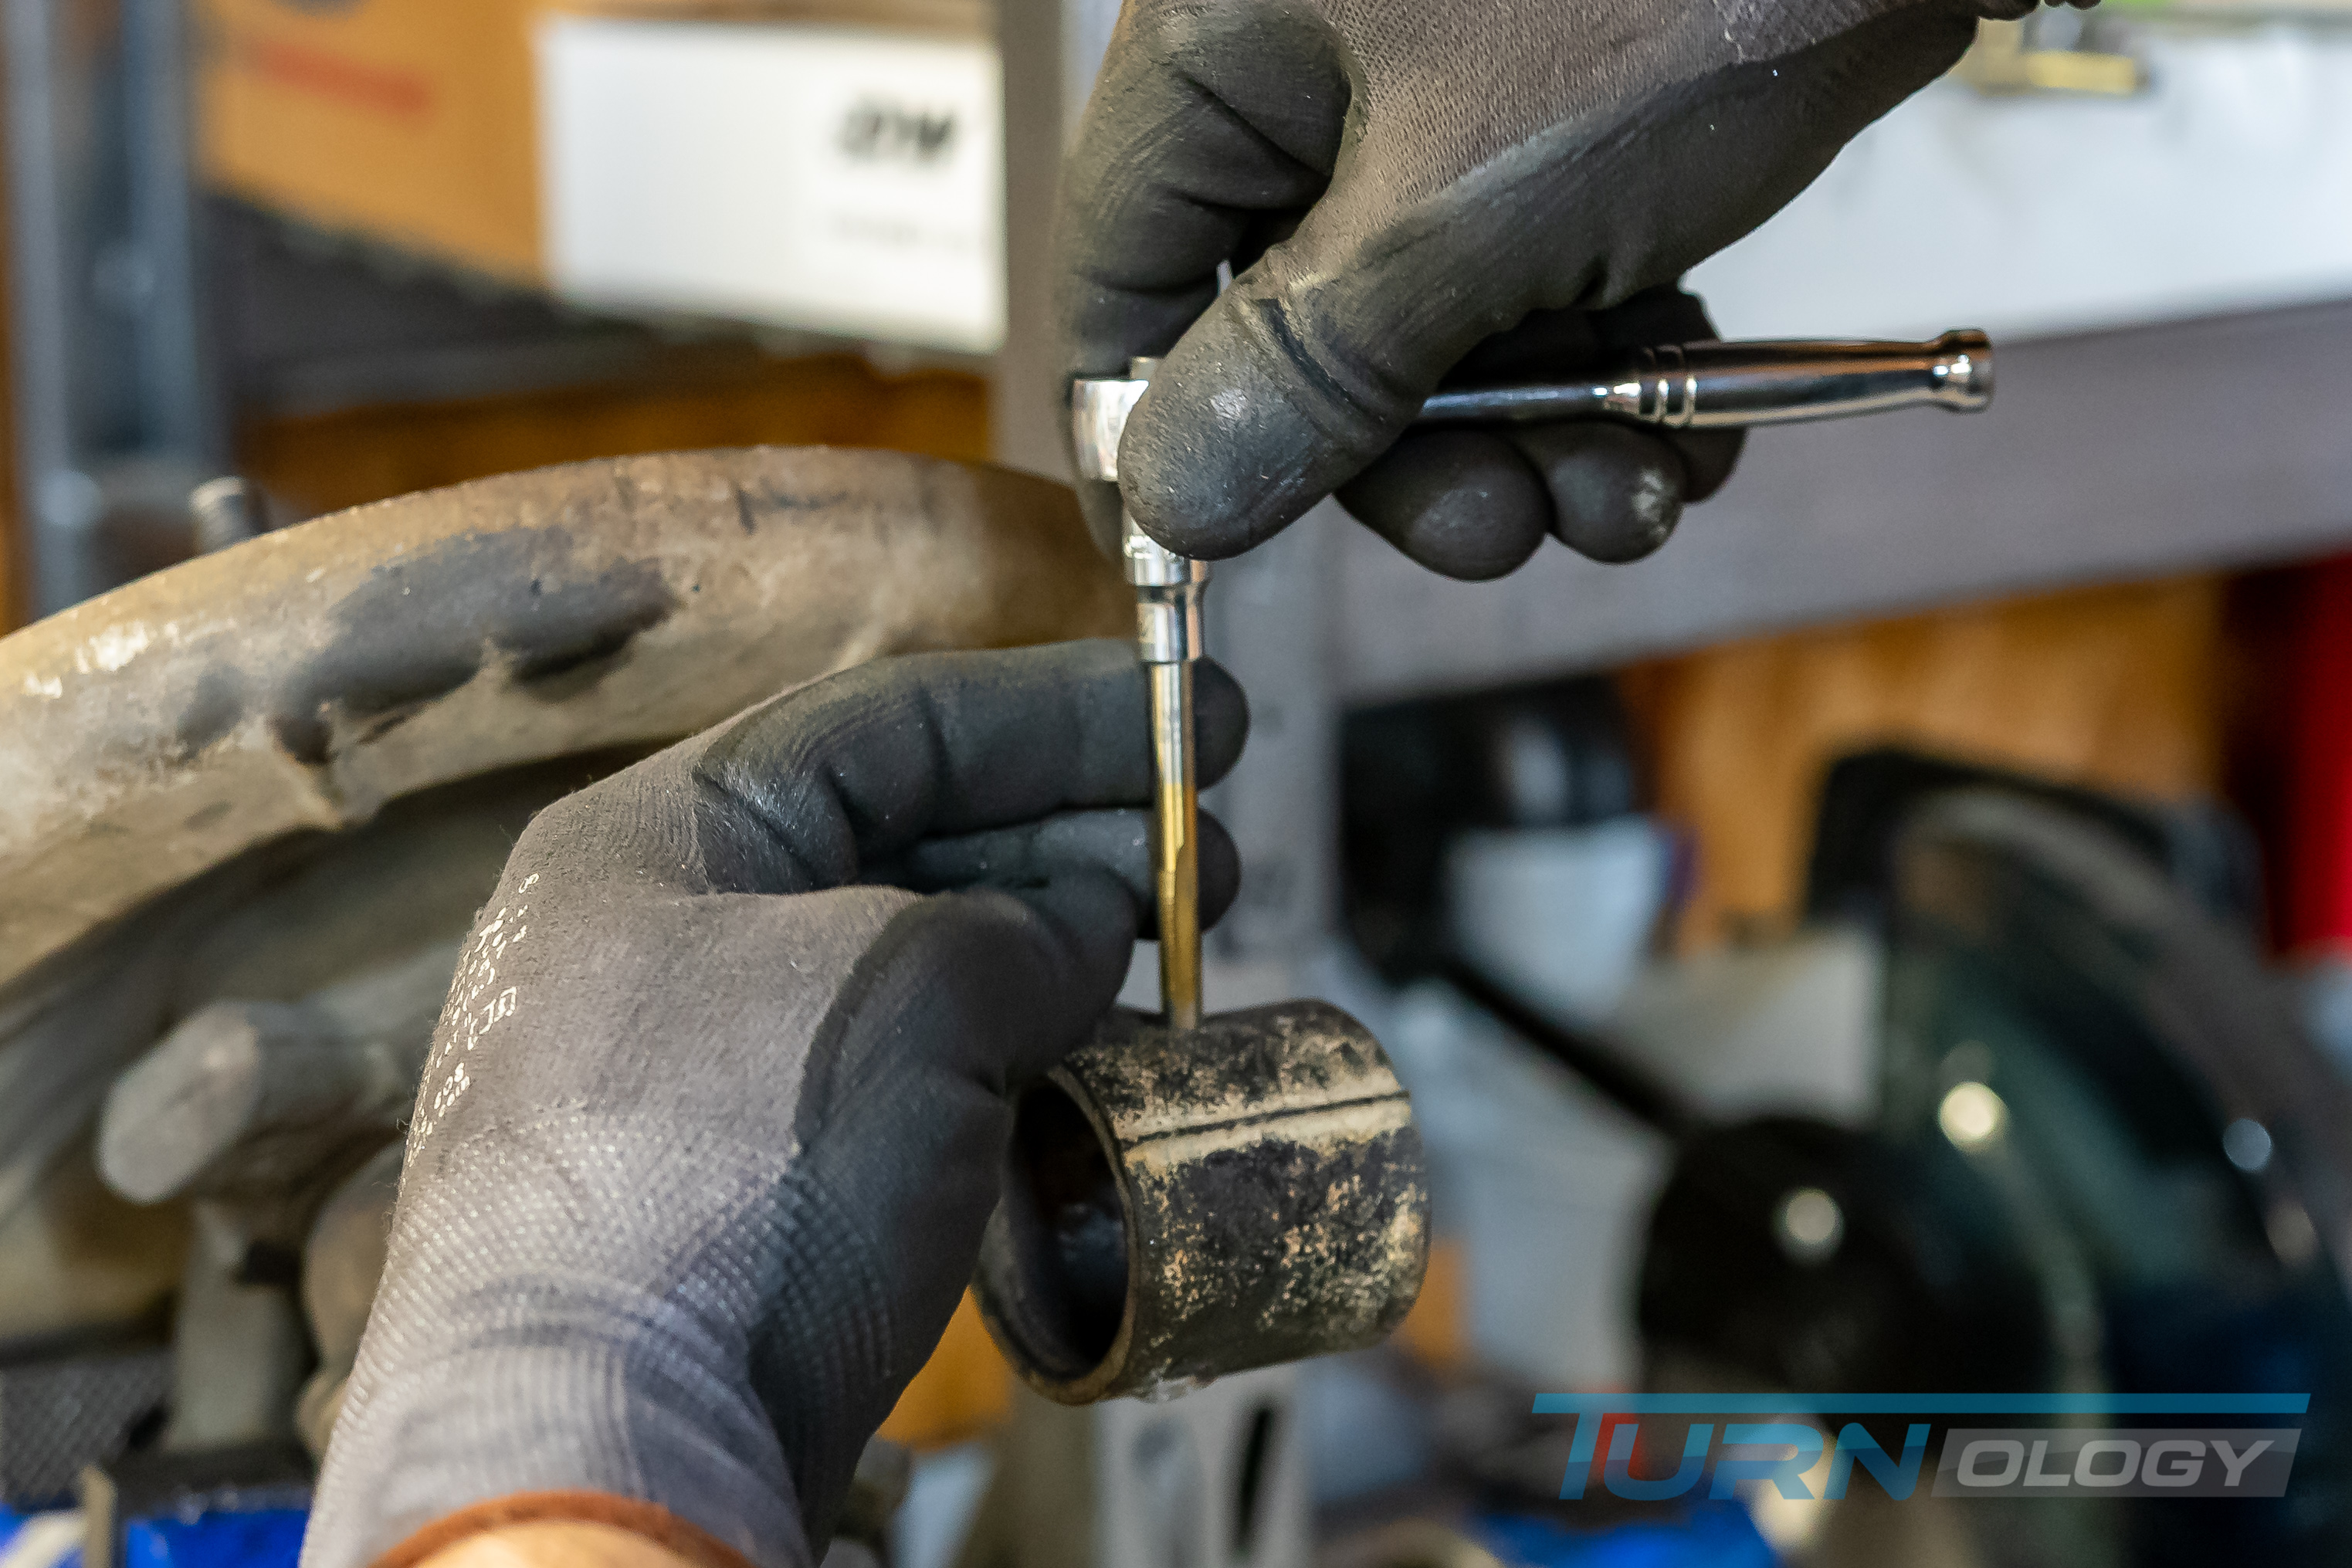
Follow the instructions and note the part numbers for each location. There are two bushings per hole, and they slide in from either side. If the shoulder doesn�t touch the control arm, or it feels like there is a gap between the bushings, you have them in the wrong place. Finally, we tapped the metal sleeves into the bushings � don�t leave these out!

__________________
Keystone Motor Club (Founded 2012)... Free car show Every 3rd Saturday, newsletter is
https://www.tamparacing.com/forums/e...-car-club.html
Keystone picture gallery is here:
https://carstoshow.com/eventdetails.aspx?eventid=93202
Veterans and Friends on First Saturday...Some pictures....
https://carstoshow.com/registerevent...eventid=102331
Port Richey Rod Run at Coast Buick GMC
https://carstoshow.com/registerevent.aspx?eventid=99114
50's Diner US19.... A Florida Attraction.
1730 US-19, Holiday Fl 34691 click: https://www.tamparacing.com/forums/t...-racing.html CHRA sanctioned cruise-in.
Cruise-In; Free; Every Saturday 5-8PM plus 10% off the whole menu to cruisers
50's Diner pictures are here: https://carstoshow.com/eventdetails.aspx?eventid=93194
All Cars Every 2nd Saturday Free Breakfast: Since 2015 and more. click: https://www.tamparacing.com/forums/e...ast-tampa.html
Tampa Racing.com covers the Tampa car scene and supports many fund raisers, worthy causes and events that enrich our community. We hope you enjoy them all.
What do I do? ---- on-site *Aftermarket* spring/suspension installations --- on-site impact wrenching---street lowering with your own stock springs...........True Bi-xenon HID projector headlight conversions........ Much more at Bob's Garage!
https://www.tamparacing.com/forums/b...ontact-us.html
https://www.tamparacing.com/forums/b...e-senor-honda/
Keystone Motor Club (Founded 2012)... Free car show Every 3rd Saturday, newsletter is
https://www.tamparacing.com/forums/e...-car-club.html
Keystone picture gallery is here:
https://carstoshow.com/eventdetails.aspx?eventid=93202
Veterans and Friends on First Saturday...Some pictures....
https://carstoshow.com/registerevent...eventid=102331
Port Richey Rod Run at Coast Buick GMC
https://carstoshow.com/registerevent.aspx?eventid=99114
50's Diner US19.... A Florida Attraction.
1730 US-19, Holiday Fl 34691 click: https://www.tamparacing.com/forums/t...-racing.html CHRA sanctioned cruise-in.
Cruise-In; Free; Every Saturday 5-8PM plus 10% off the whole menu to cruisers
50's Diner pictures are here: https://carstoshow.com/eventdetails.aspx?eventid=93194
All Cars Every 2nd Saturday Free Breakfast: Since 2015 and more. click: https://www.tamparacing.com/forums/e...ast-tampa.html
Tampa Racing.com covers the Tampa car scene and supports many fund raisers, worthy causes and events that enrich our community. We hope you enjoy them all.
What do I do? ---- on-site *Aftermarket* spring/suspension installations --- on-site impact wrenching---street lowering with your own stock springs...........True Bi-xenon HID projector headlight conversions........ Much more at Bob's Garage!
https://www.tamparacing.com/forums/b...ontact-us.html
https://www.tamparacing.com/forums/b...e-senor-honda/
Registered
Thread Starter
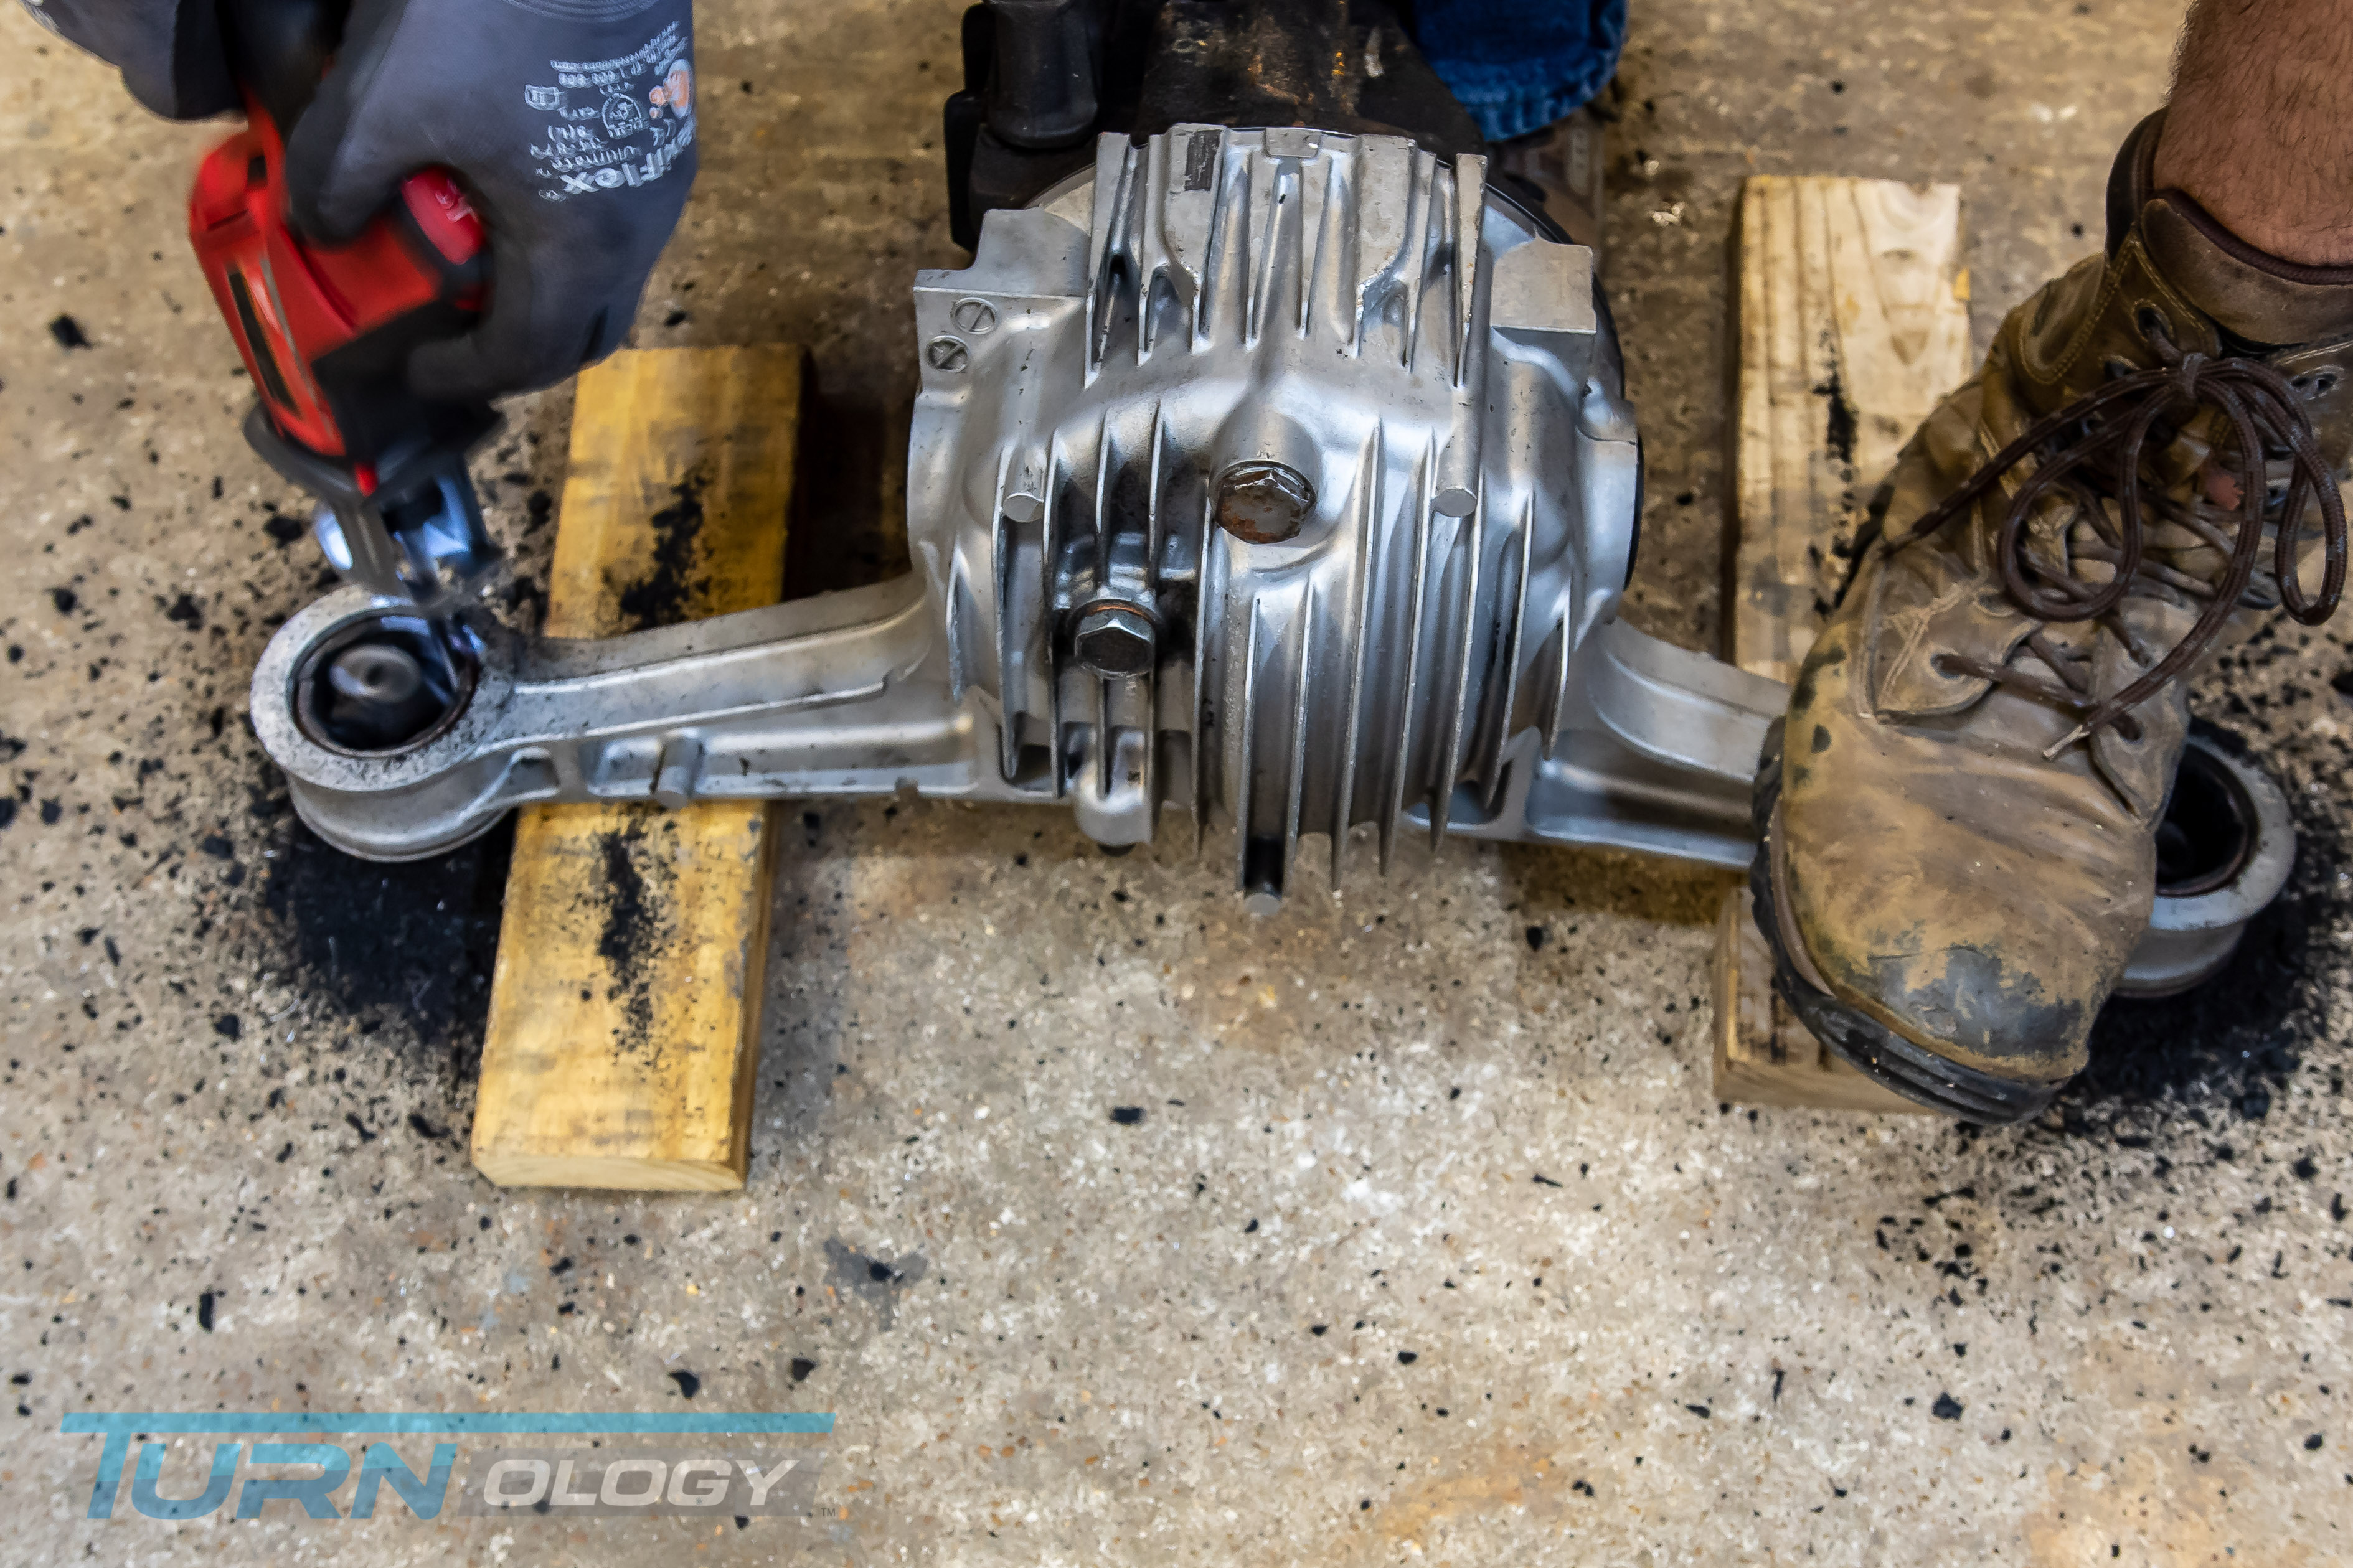
Rear Differential Bushing Removal/Install
The differential on a Miata attaches through two giant bushings to a cradle mounted to the body. The entire rear suspension also mounts to the cradle, so it is best to take care of the differential bushings while you have the control arms removed. To replace these bushings, you must remove the rearend housing. First, you need to detach the PPF and driveshaft.We found it was easiest to remove the entire PPF by removing the three bolts on the transmission and the two long bolts with captured nuts at the top that run through the differential. Also, there is a locking washer on the front bolt of the diff � you will need to pry it out once you remove the bolt, then the PPF should come free. As for the driveshaft, we took out the four bolts mounting it to the pinion and slid it over out of the way (don�t remove it unless you have something to cork the rear of the trans).

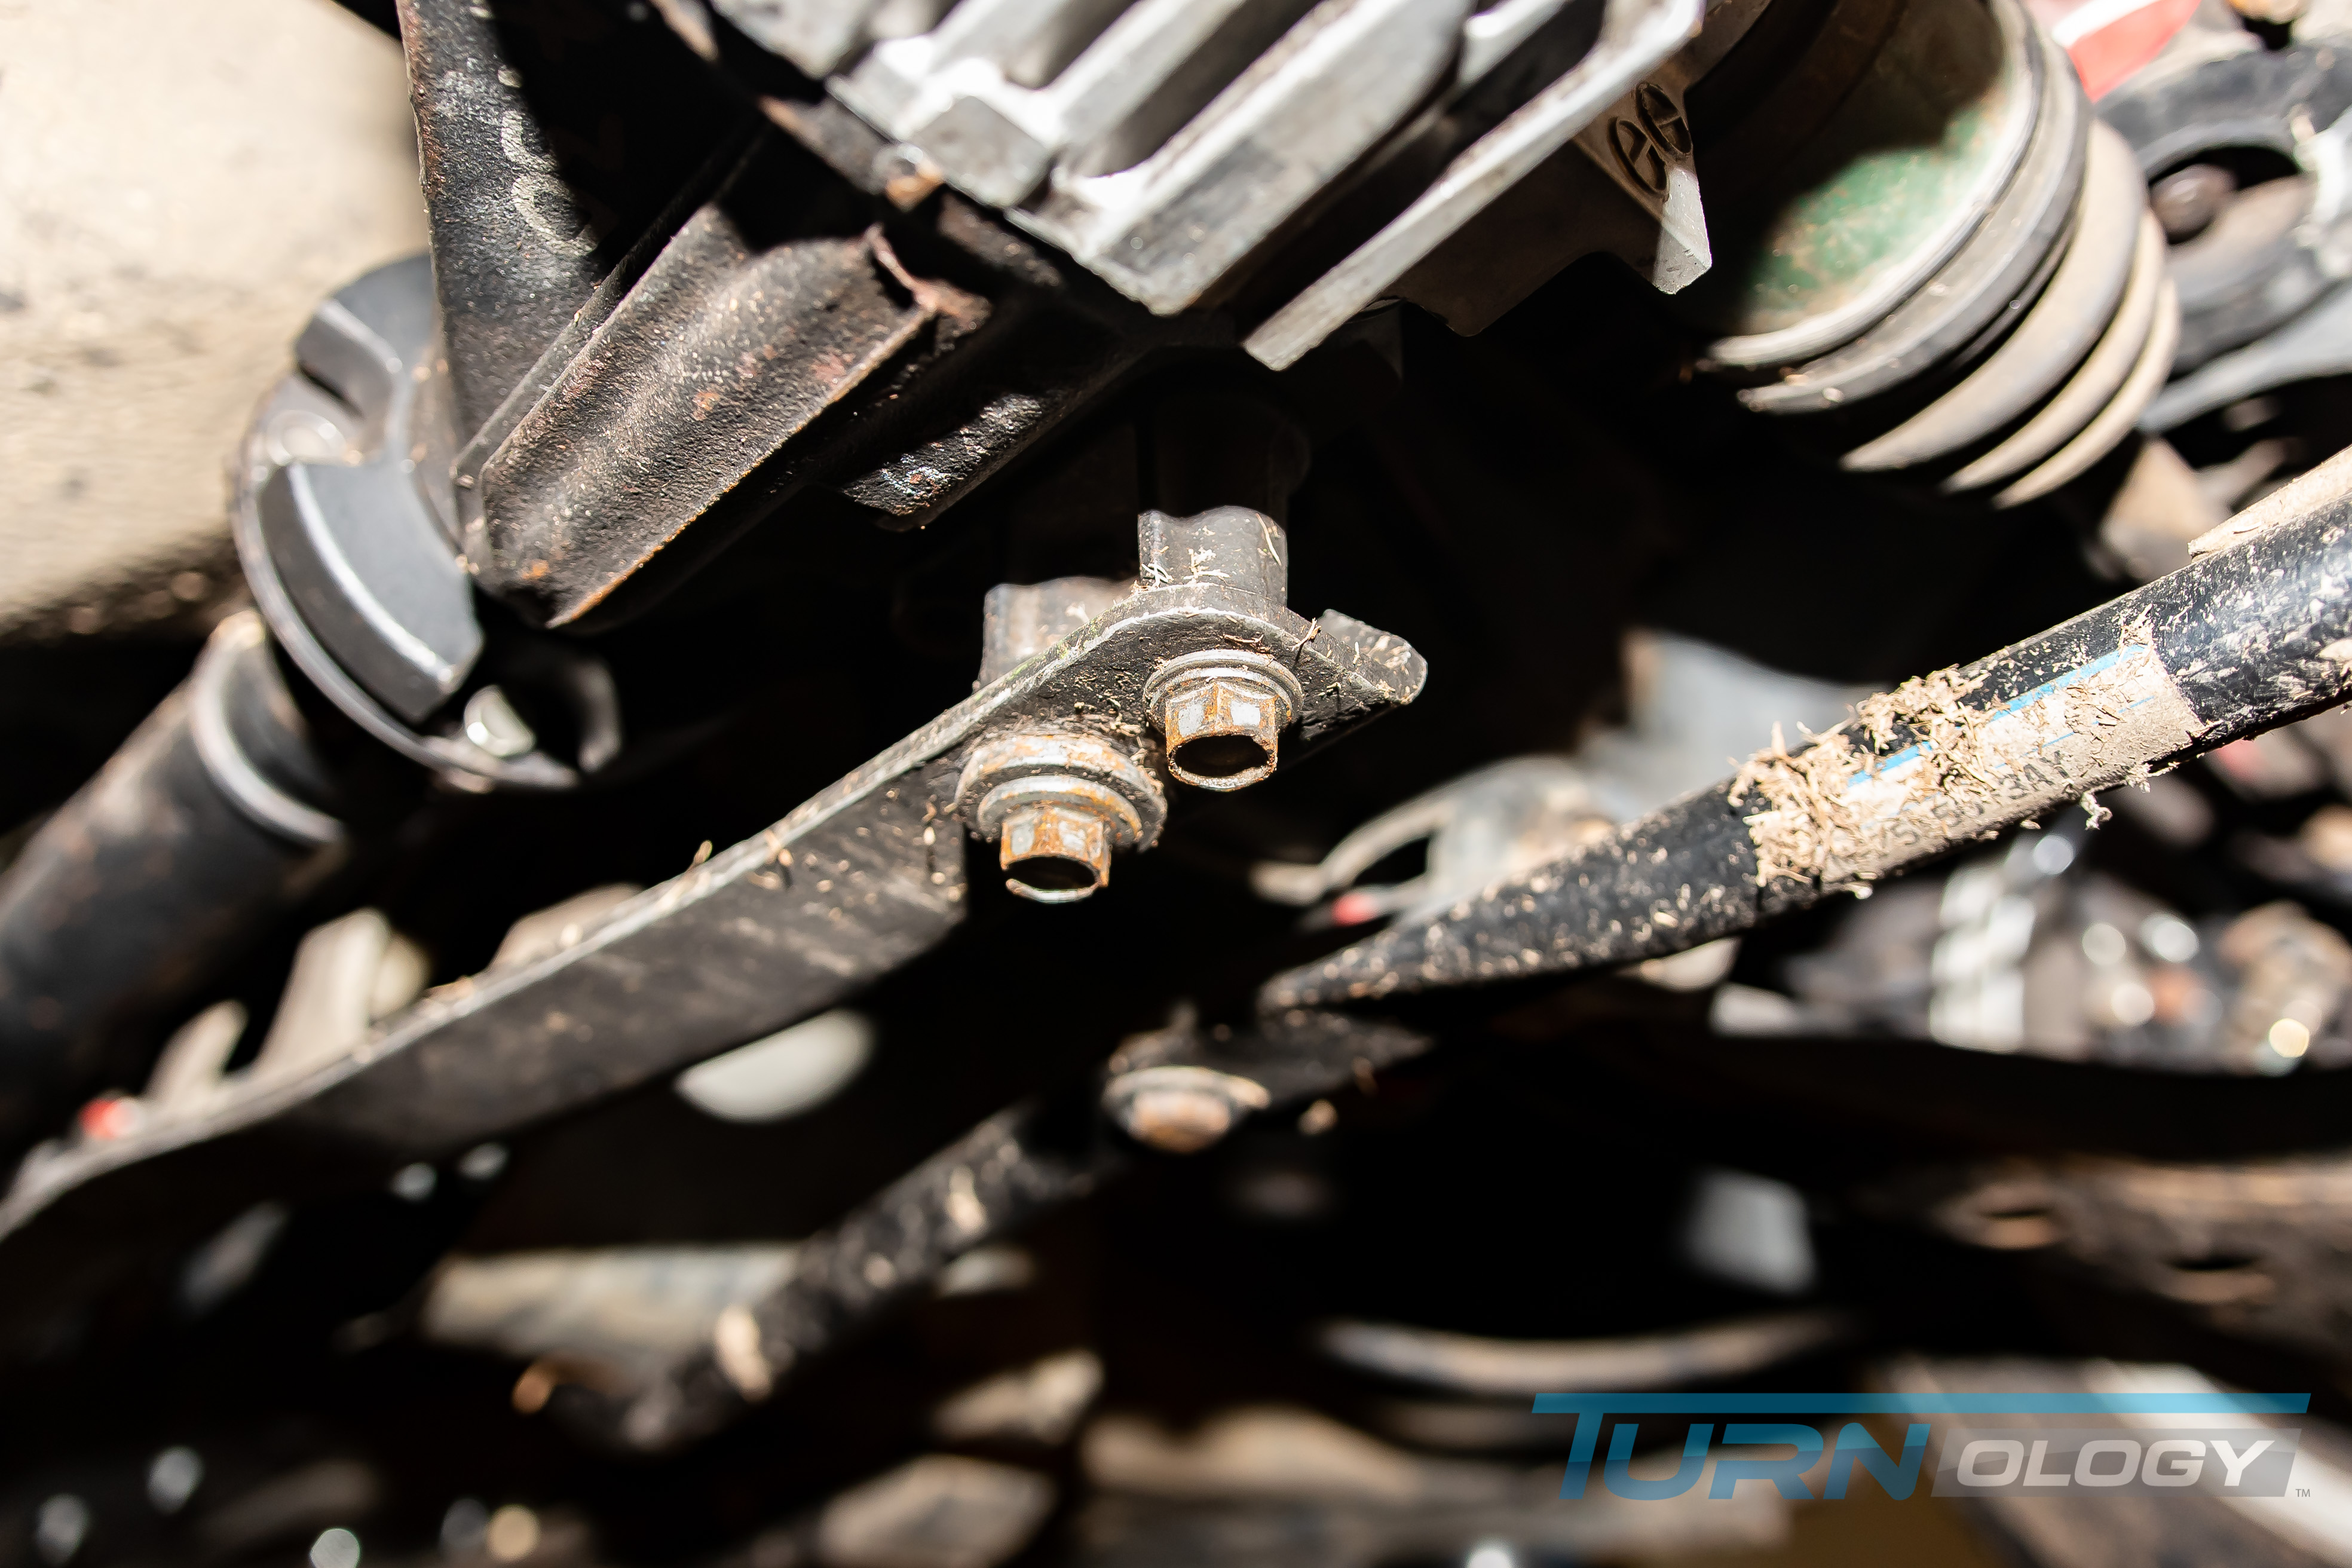
Once that is done, you are ready to remove the differential housing itself. We used some penetrating lube to free up the nuts holding the bushings in place. There are two locating studs and one large bolt that hold each side in place. Once we broke the two little locating nuts free, we used an impact gun with a long extension to break the large bolts loose and out came the rearend.
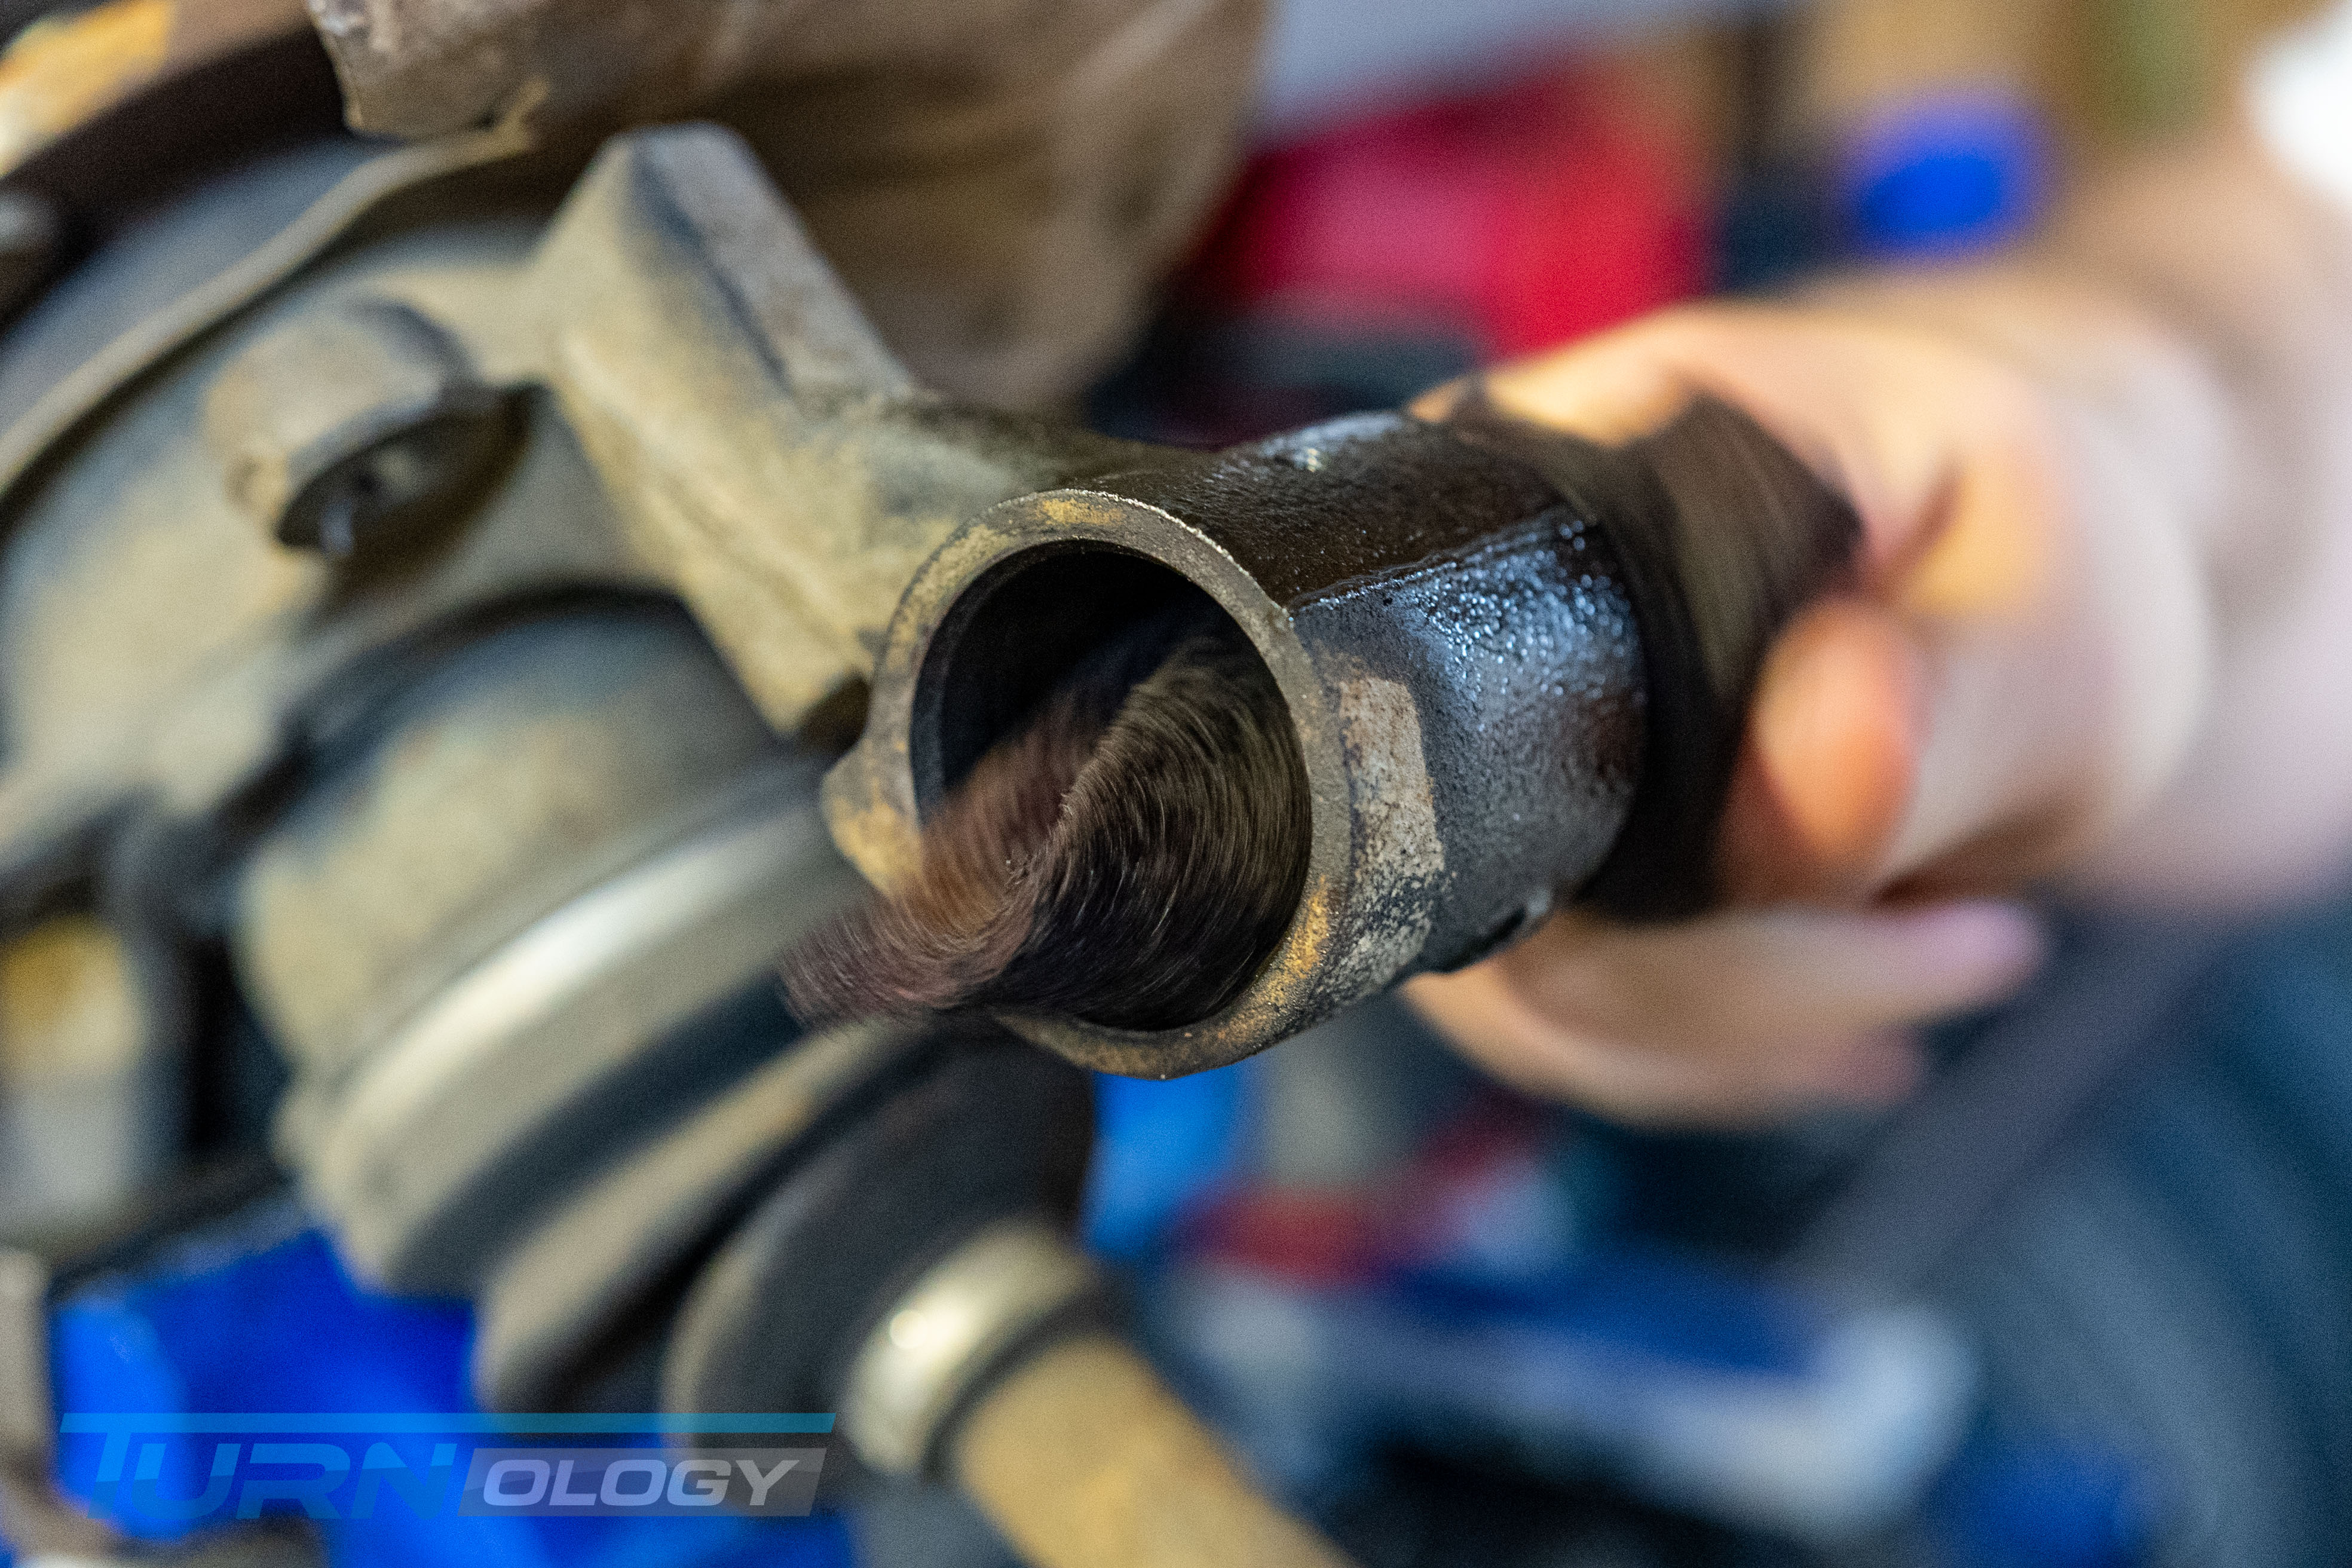
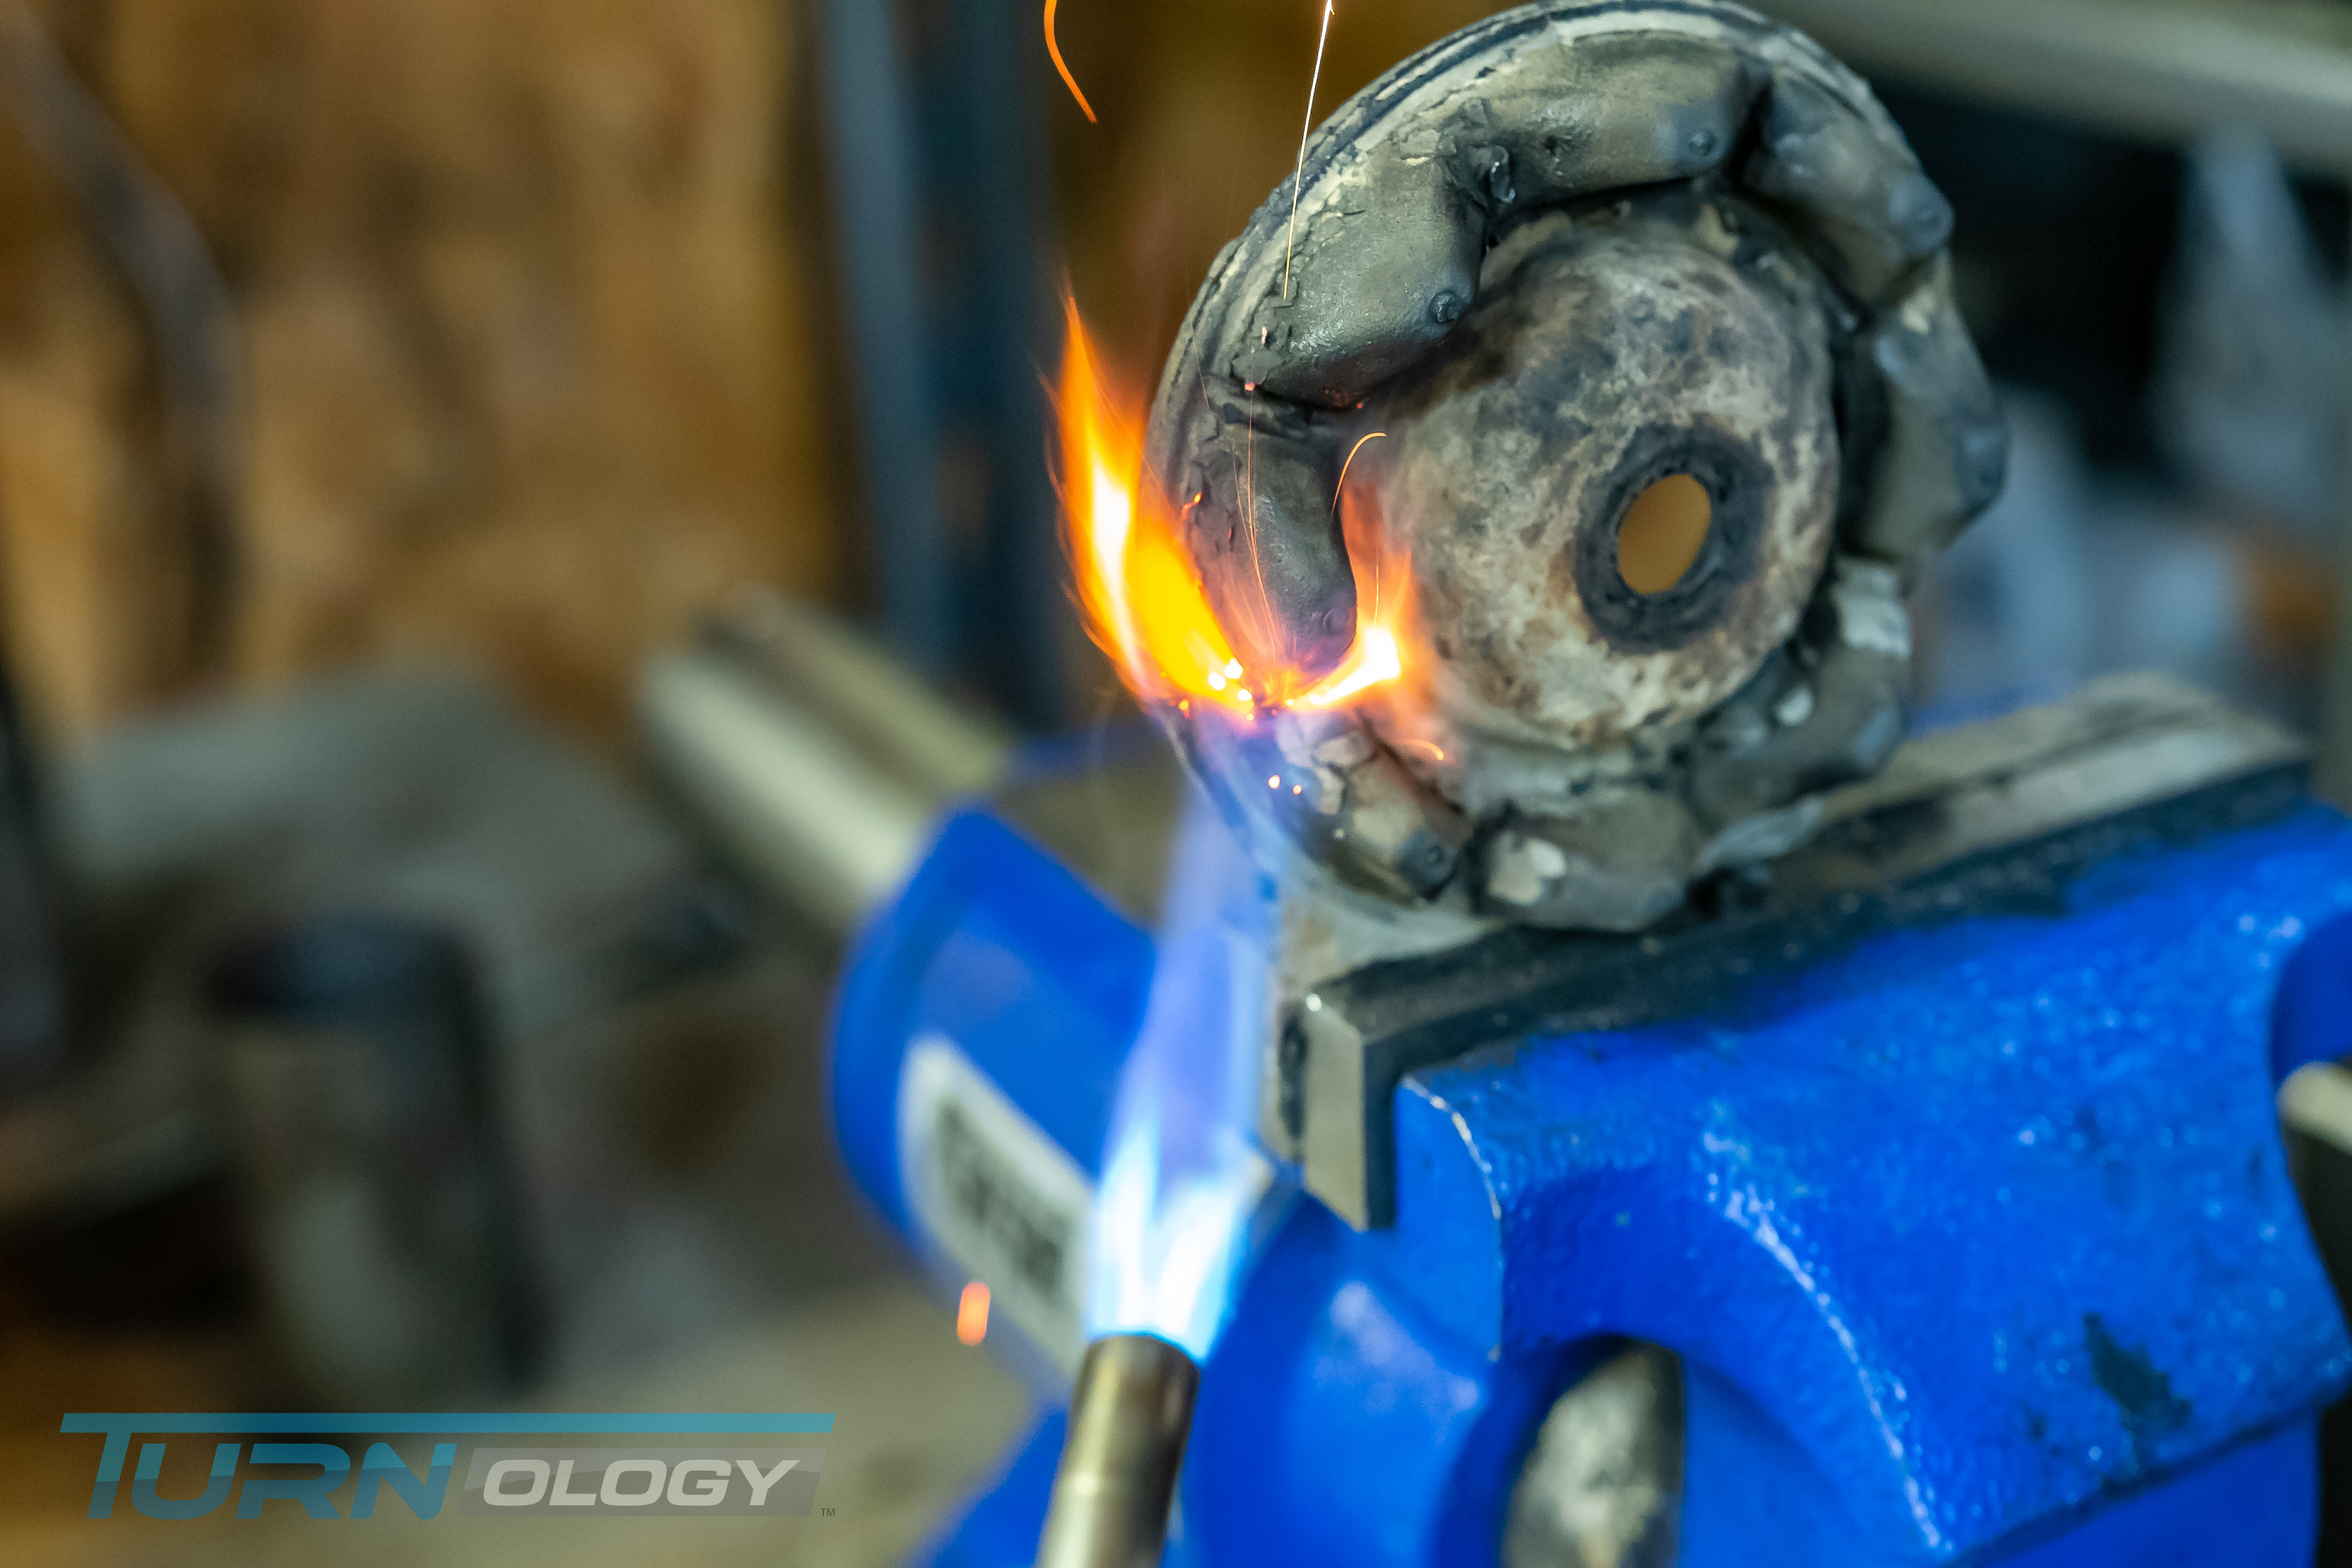
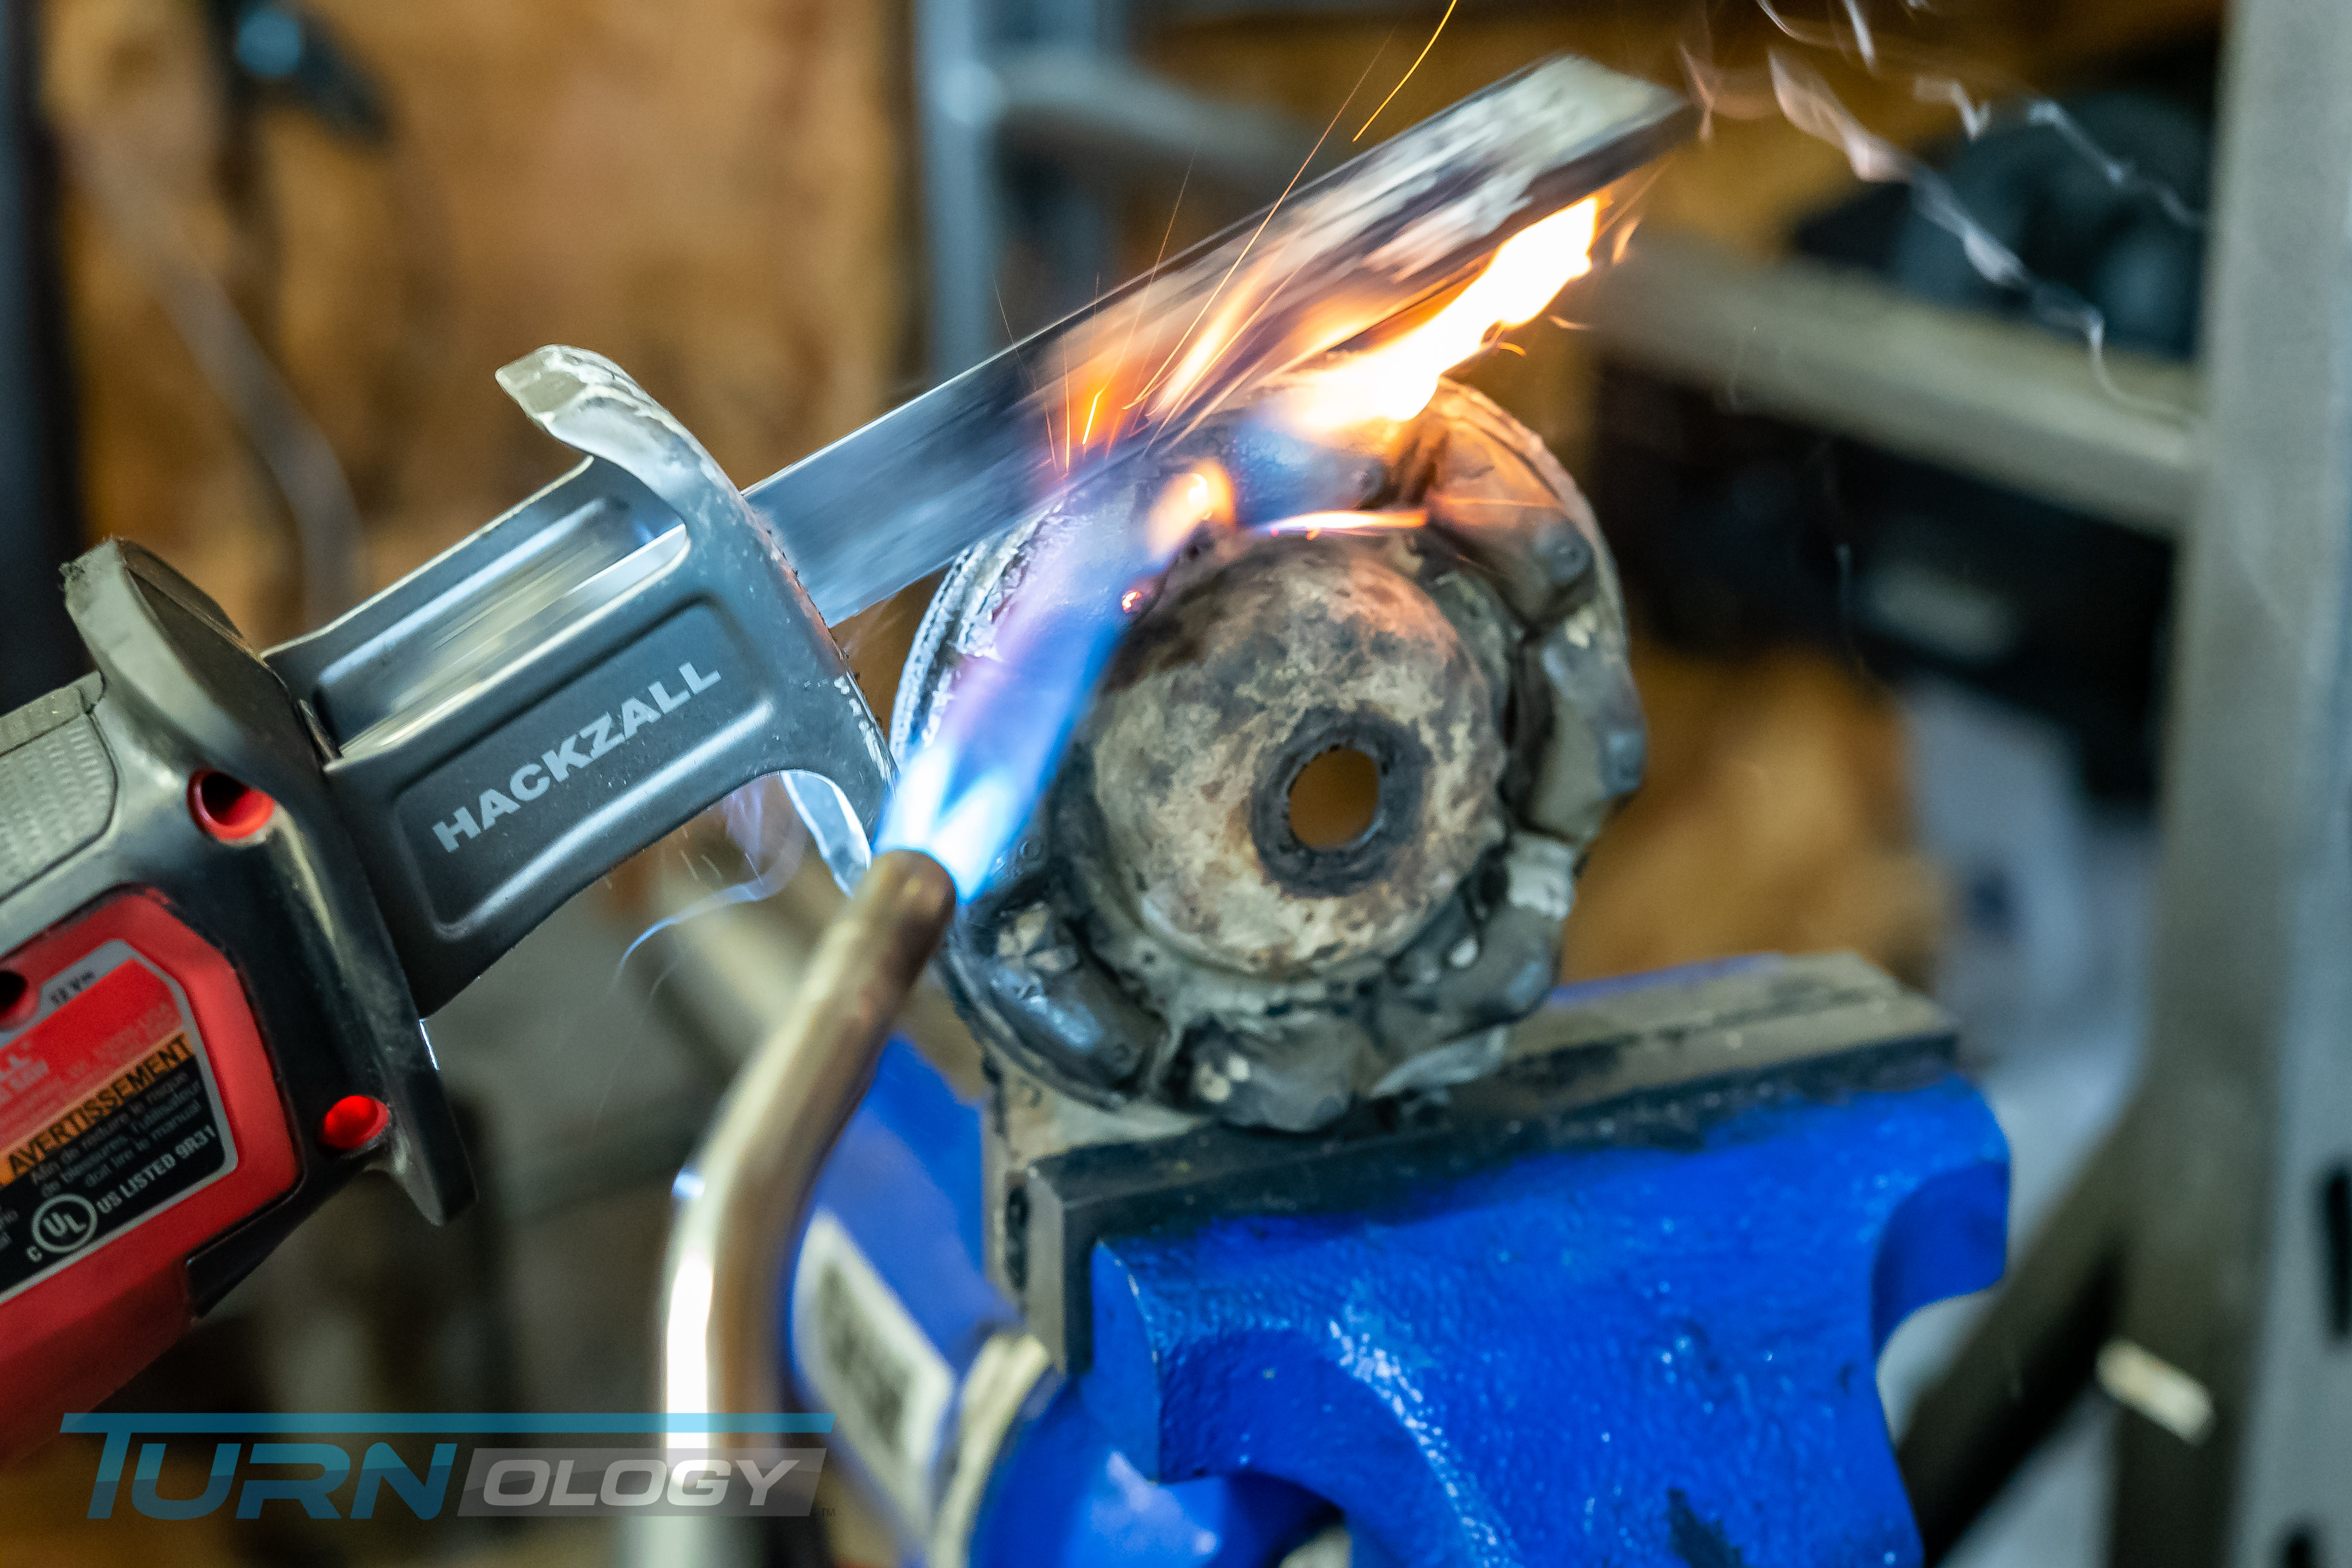
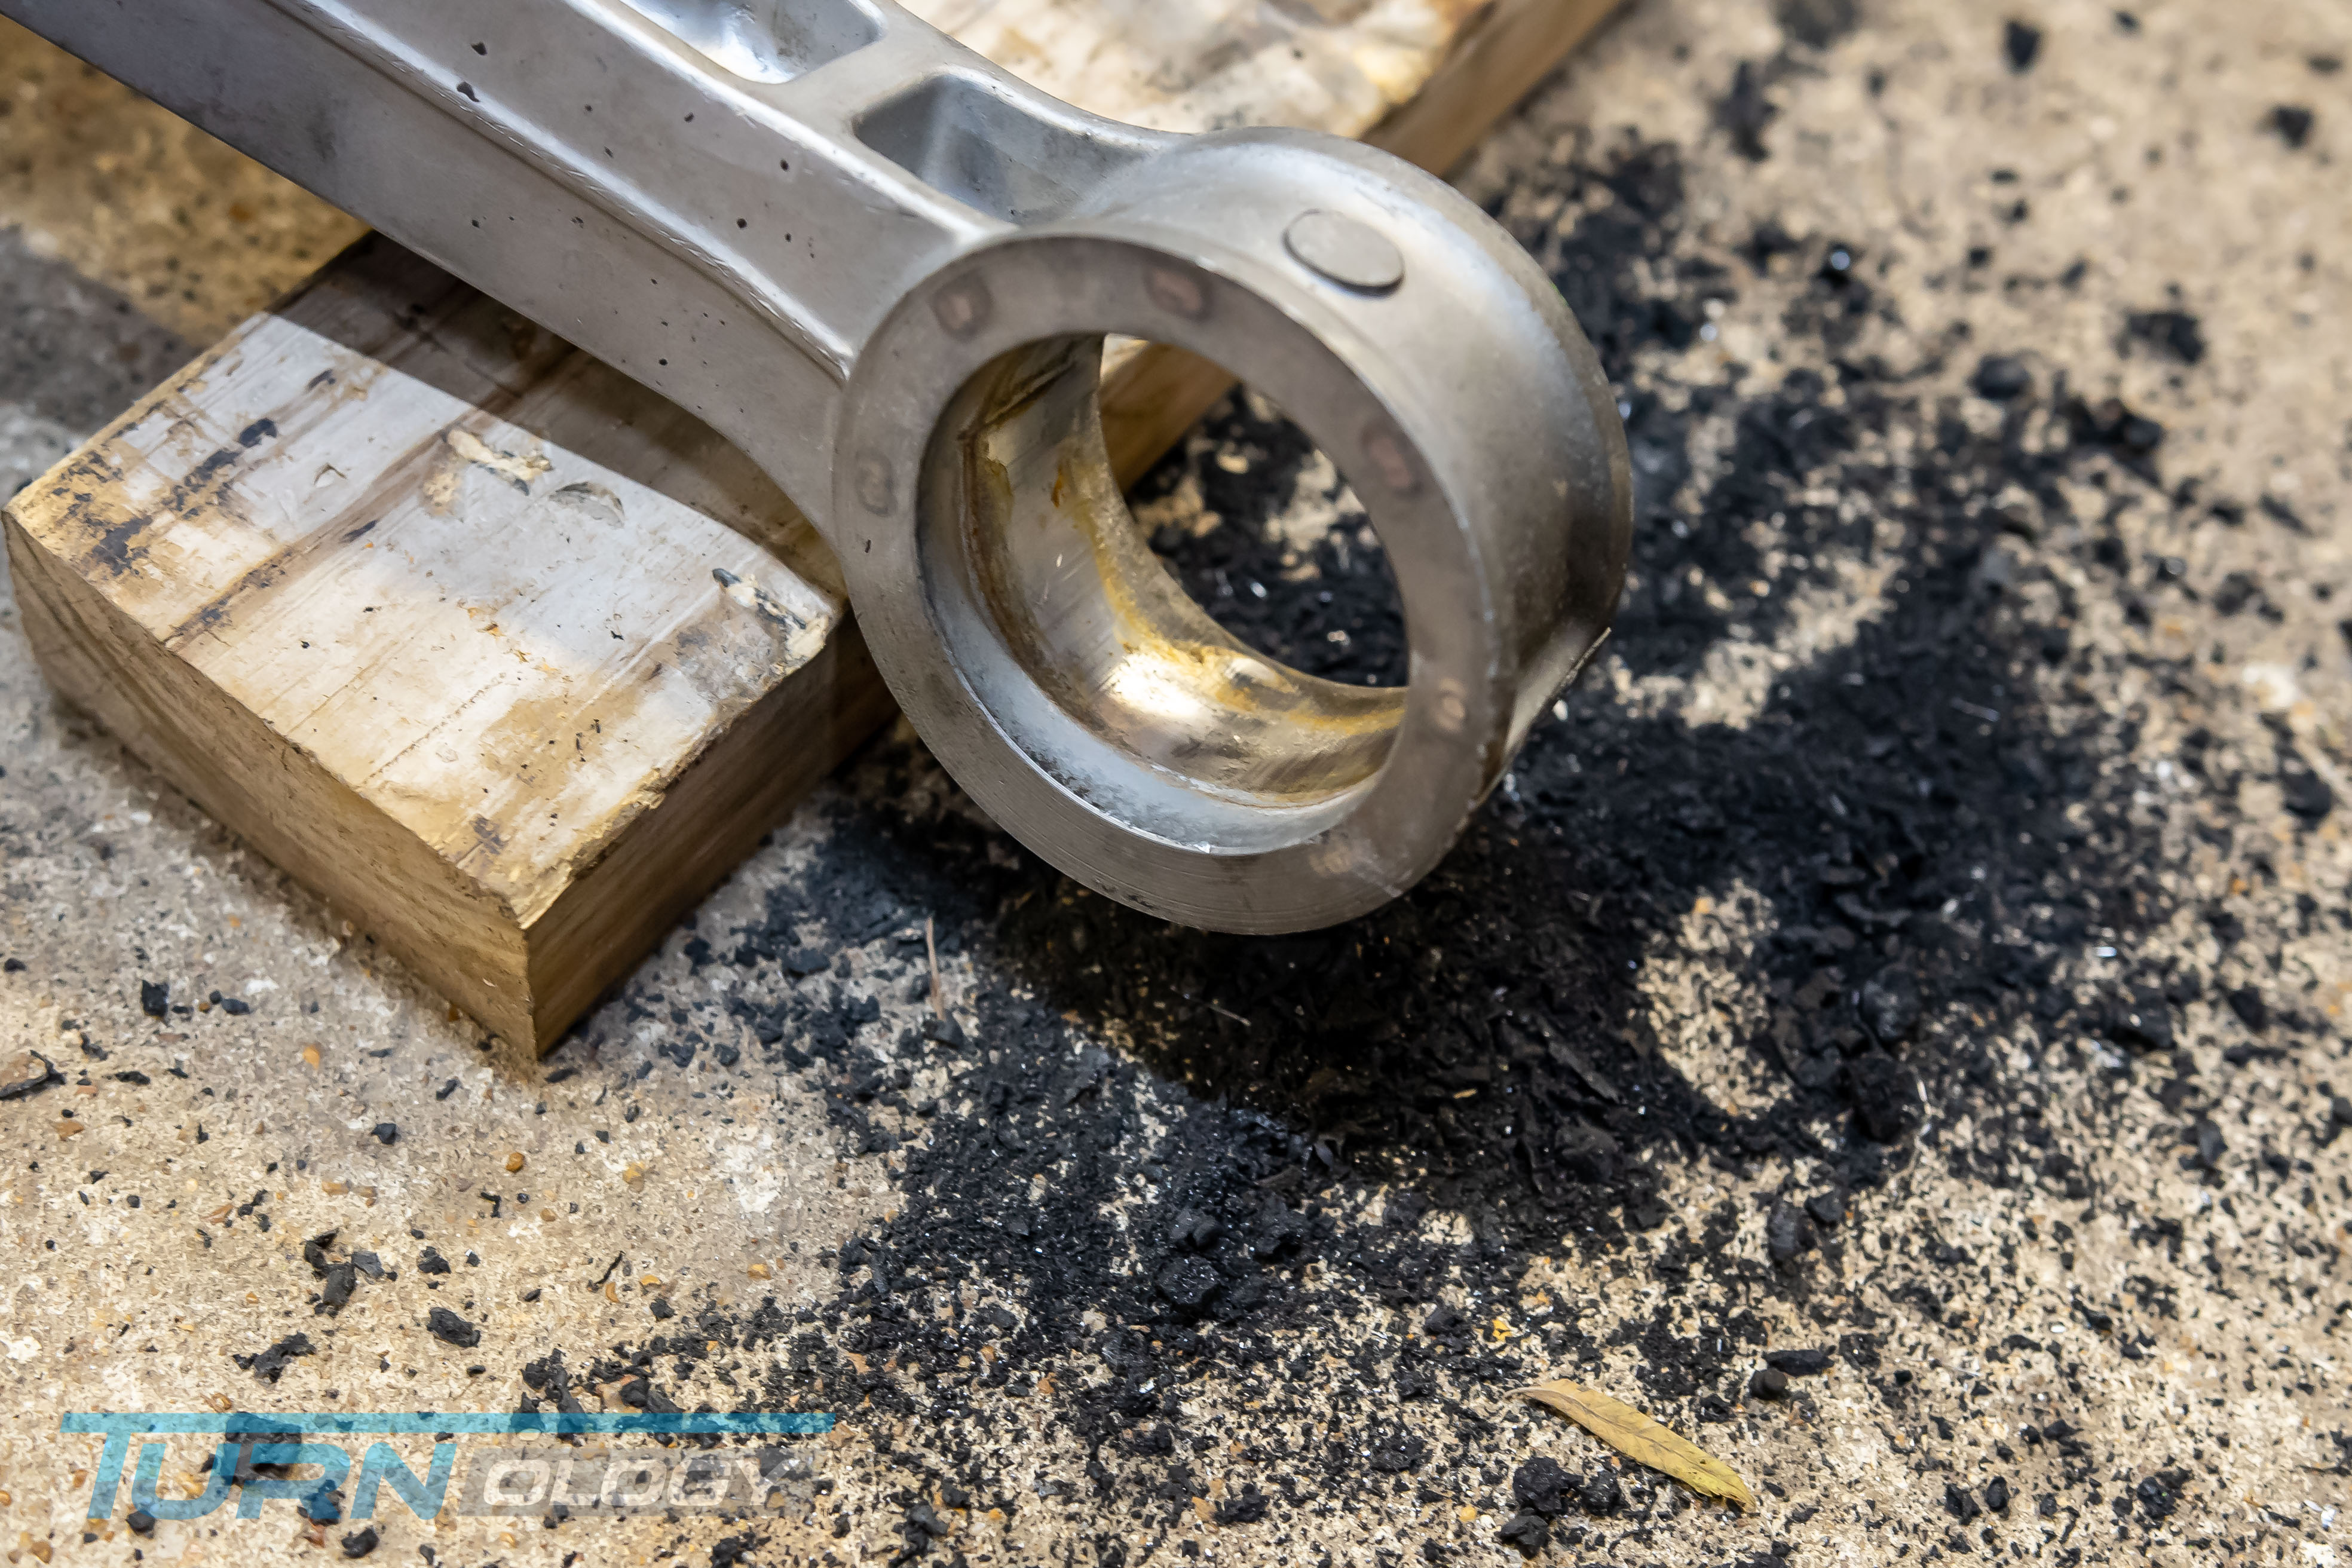
Now the fun begins! You need to reuse the metal part of the lower bushings, so you will have to remove all of the rubber bonded to it. Without a press, it is time-consuming, dirty, messy, and (can be) smelly.
A torch is definitely needed for the lower bushings to debond the glue holding the rubber to the metal surface. Energy�s instructions state to heat the metal until you see light smoke coming from the side of the bushing, signaling the bond is broken. As usual, none of us remembered to read the instructions until we had pretty much cooked all the rubber off of the first bushing � it smelled like the drag strip! After looking at them, we did the second one the correct way, and it was a cinch!
__________________
Keystone Motor Club (Founded 2012)... Free car show Every 3rd Saturday, newsletter is
https://www.tamparacing.com/forums/e...-car-club.html
Keystone picture gallery is here:
https://carstoshow.com/eventdetails.aspx?eventid=93202
Veterans and Friends on First Saturday...Some pictures....
https://carstoshow.com/registerevent...eventid=102331
Port Richey Rod Run at Coast Buick GMC
https://carstoshow.com/registerevent.aspx?eventid=99114
50's Diner US19.... A Florida Attraction.
1730 US-19, Holiday Fl 34691 click: https://www.tamparacing.com/forums/t...-racing.html CHRA sanctioned cruise-in.
Cruise-In; Free; Every Saturday 5-8PM plus 10% off the whole menu to cruisers
50's Diner pictures are here: https://carstoshow.com/eventdetails.aspx?eventid=93194
All Cars Every 2nd Saturday Free Breakfast: Since 2015 and more. click: https://www.tamparacing.com/forums/e...ast-tampa.html
Tampa Racing.com covers the Tampa car scene and supports many fund raisers, worthy causes and events that enrich our community. We hope you enjoy them all.
What do I do? ---- on-site *Aftermarket* spring/suspension installations --- on-site impact wrenching---street lowering with your own stock springs...........True Bi-xenon HID projector headlight conversions........ Much more at Bob's Garage!
https://www.tamparacing.com/forums/b...ontact-us.html
https://www.tamparacing.com/forums/b...e-senor-honda/
Keystone Motor Club (Founded 2012)... Free car show Every 3rd Saturday, newsletter is
https://www.tamparacing.com/forums/e...-car-club.html
Keystone picture gallery is here:
https://carstoshow.com/eventdetails.aspx?eventid=93202
Veterans and Friends on First Saturday...Some pictures....
https://carstoshow.com/registerevent...eventid=102331
Port Richey Rod Run at Coast Buick GMC
https://carstoshow.com/registerevent.aspx?eventid=99114
50's Diner US19.... A Florida Attraction.
1730 US-19, Holiday Fl 34691 click: https://www.tamparacing.com/forums/t...-racing.html CHRA sanctioned cruise-in.
Cruise-In; Free; Every Saturday 5-8PM plus 10% off the whole menu to cruisers
50's Diner pictures are here: https://carstoshow.com/eventdetails.aspx?eventid=93194
All Cars Every 2nd Saturday Free Breakfast: Since 2015 and more. click: https://www.tamparacing.com/forums/e...ast-tampa.html
Tampa Racing.com covers the Tampa car scene and supports many fund raisers, worthy causes and events that enrich our community. We hope you enjoy them all.
What do I do? ---- on-site *Aftermarket* spring/suspension installations --- on-site impact wrenching---street lowering with your own stock springs...........True Bi-xenon HID projector headlight conversions........ Much more at Bob's Garage!
https://www.tamparacing.com/forums/b...ontact-us.html
https://www.tamparacing.com/forums/b...e-senor-honda/
Registered
Thread Starter
The upper bushings are bonded into the differential. Remember, the housing is aluminum, so take your time and try not to mess up the inside of the mounts. We used a drill and a Sawzall to get the rubber out.
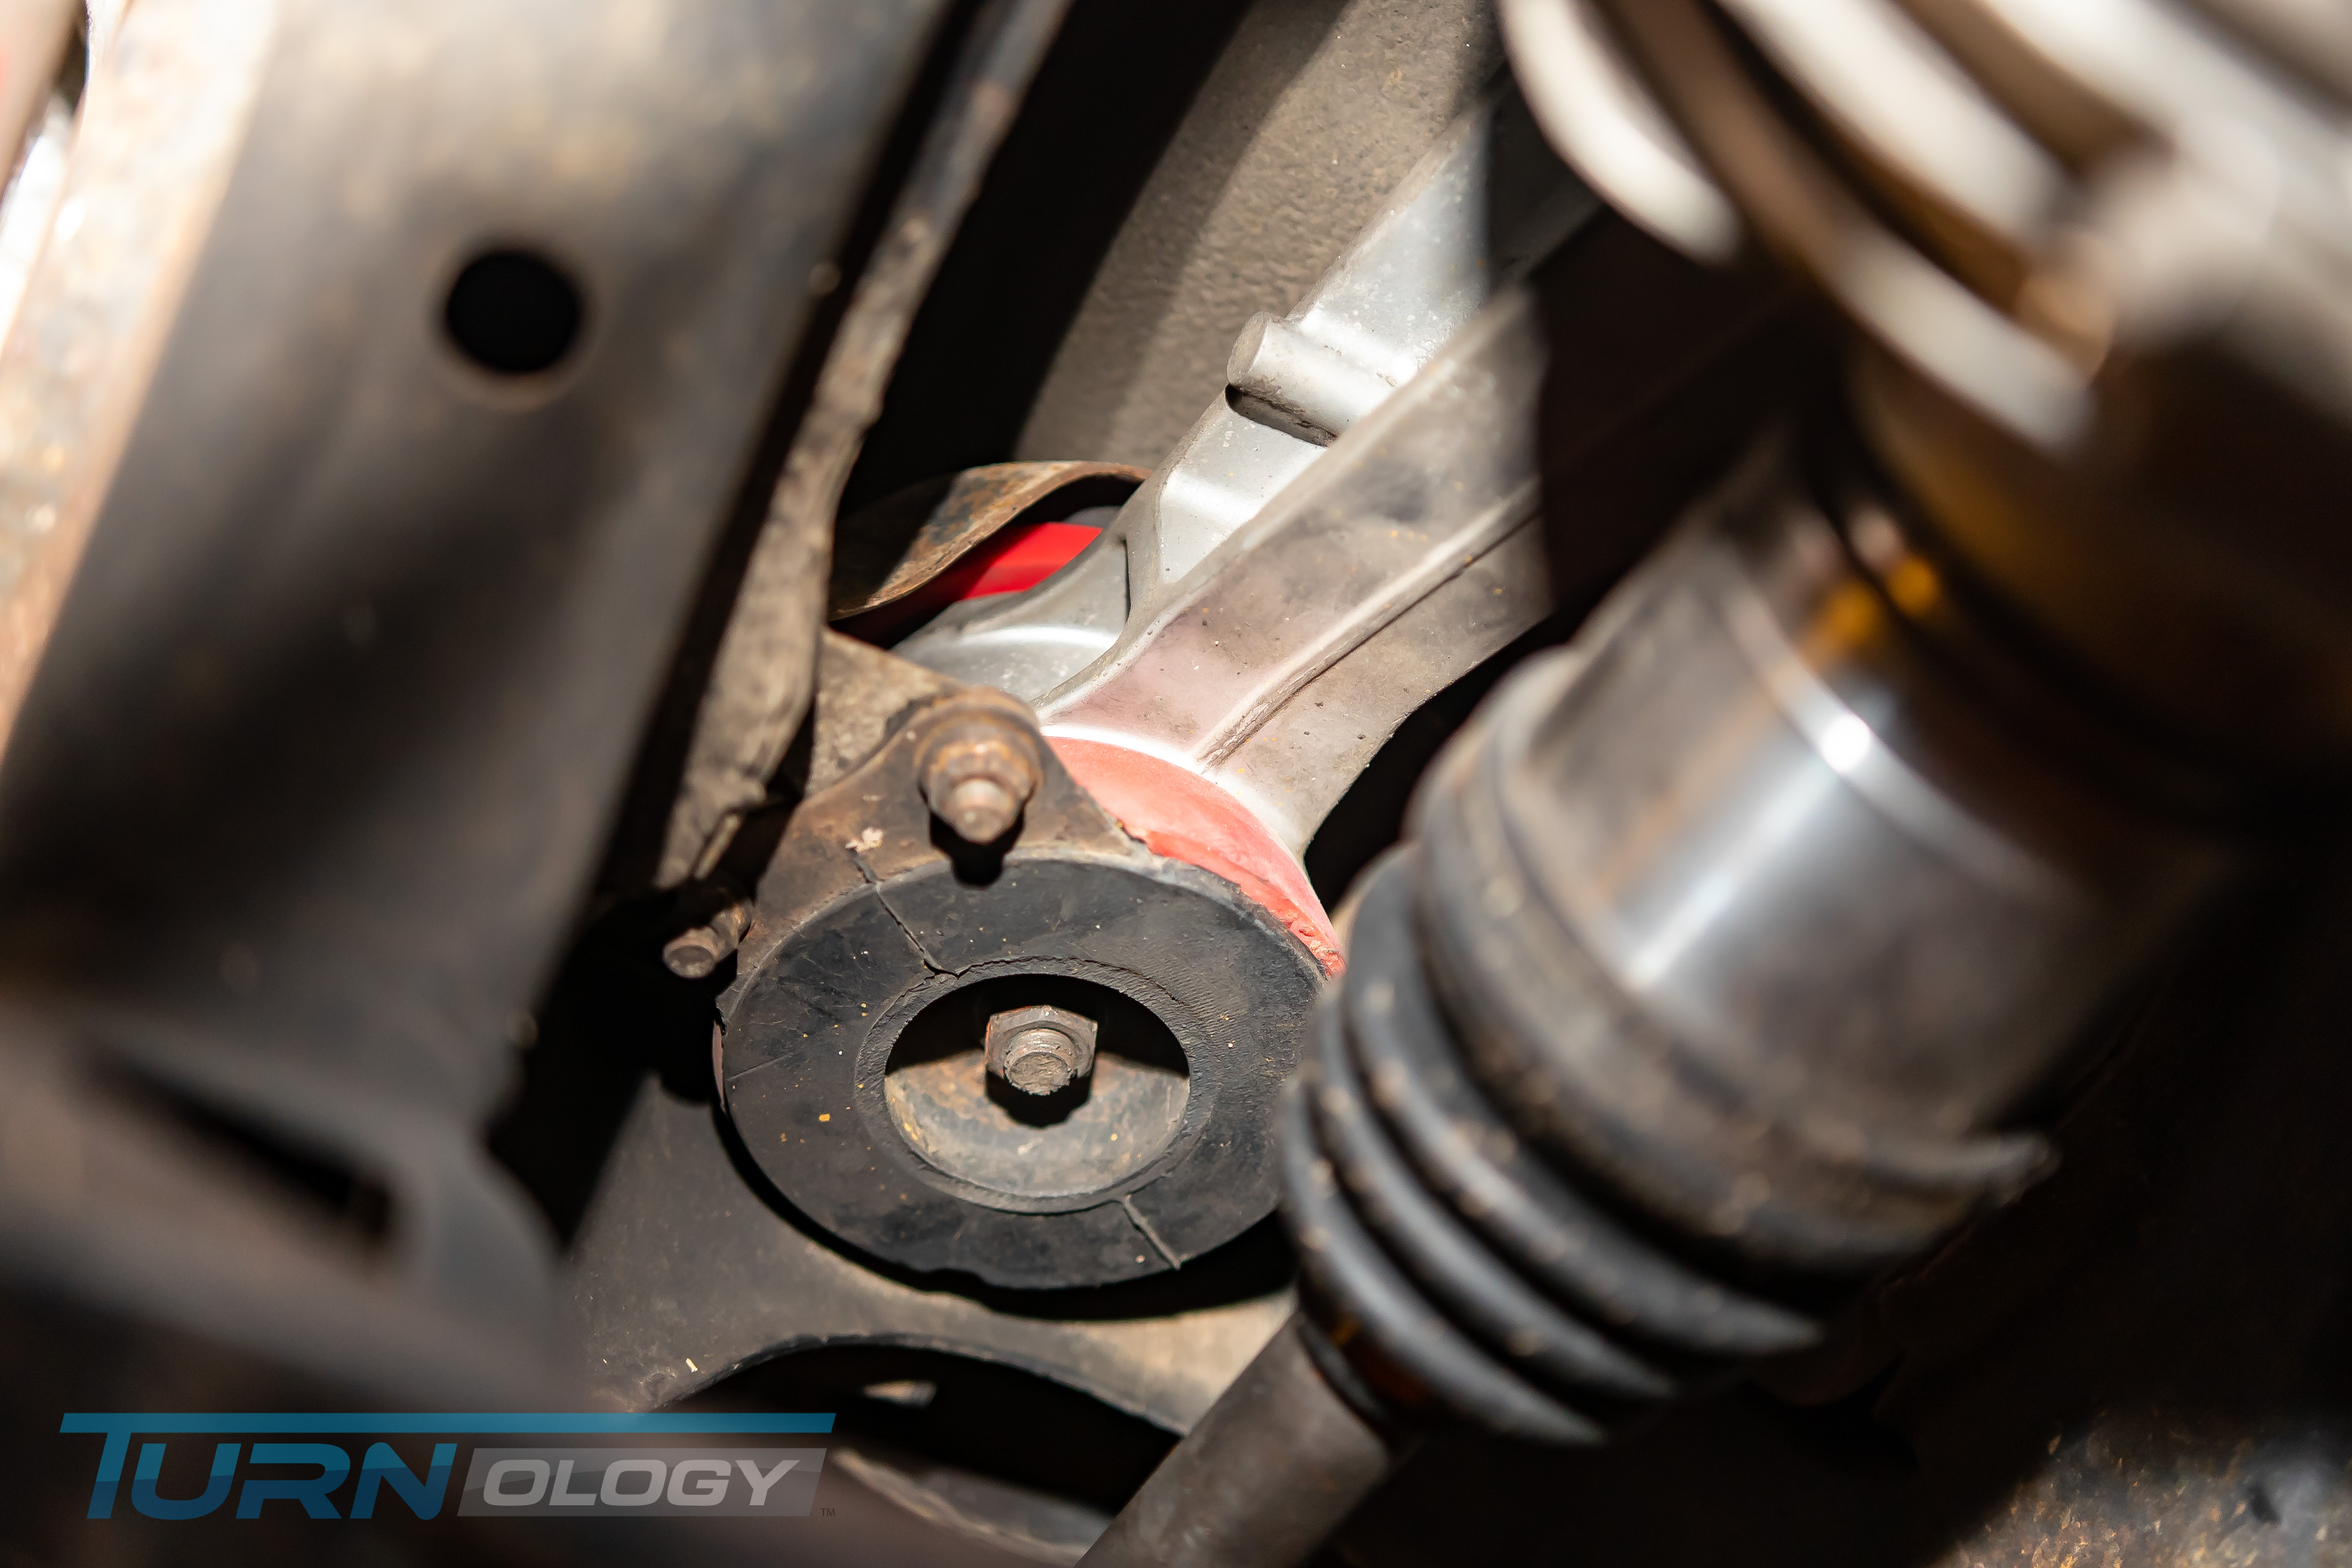
Once you�ve got all the rubber removed and the housing cleaned up, it�s time to install the new Energy bushings, which is way easier than removing them. Luckily, neither bushing needs to be bonded like the original ones. The upper bushing goes into its seat inside the housing, and a metal sleeve is inserted in the middle. The lower bushing will be sandwiched in place when you mount the diff.

Put It All Back Together
Trust me � the hard part is over; putting everything back together is the easy part. I won�t go into too much detail as it is just the reverse of what we just went through. But a few tips we figured out along the way might help.We made sure to install the new bushings into each part as the old ones came out, so we didn�t have to try to remember what went where, later on. All we needed to do at this point was to throw it all back on the car. We started with the rearend first.
It can be a little cumbersome to install the big two-piece bushings that hold the rearend to the cradle if you don�t have some extra hands around. Fortunately, we did, so two guys heaved it up into place with the help of a floor jack to stabilize it, while the other two guys located the bolts.
__________________
Keystone Motor Club (Founded 2012)... Free car show Every 3rd Saturday, newsletter is
https://www.tamparacing.com/forums/e...-car-club.html
Keystone picture gallery is here:
https://carstoshow.com/eventdetails.aspx?eventid=93202
Veterans and Friends on First Saturday...Some pictures....
https://carstoshow.com/registerevent...eventid=102331
Port Richey Rod Run at Coast Buick GMC
https://carstoshow.com/registerevent.aspx?eventid=99114
50's Diner US19.... A Florida Attraction.
1730 US-19, Holiday Fl 34691 click: https://www.tamparacing.com/forums/t...-racing.html CHRA sanctioned cruise-in.
Cruise-In; Free; Every Saturday 5-8PM plus 10% off the whole menu to cruisers
50's Diner pictures are here: https://carstoshow.com/eventdetails.aspx?eventid=93194
All Cars Every 2nd Saturday Free Breakfast: Since 2015 and more. click: https://www.tamparacing.com/forums/e...ast-tampa.html
Tampa Racing.com covers the Tampa car scene and supports many fund raisers, worthy causes and events that enrich our community. We hope you enjoy them all.
What do I do? ---- on-site *Aftermarket* spring/suspension installations --- on-site impact wrenching---street lowering with your own stock springs...........True Bi-xenon HID projector headlight conversions........ Much more at Bob's Garage!
https://www.tamparacing.com/forums/b...ontact-us.html
https://www.tamparacing.com/forums/b...e-senor-honda/
Keystone Motor Club (Founded 2012)... Free car show Every 3rd Saturday, newsletter is
https://www.tamparacing.com/forums/e...-car-club.html
Keystone picture gallery is here:
https://carstoshow.com/eventdetails.aspx?eventid=93202
Veterans and Friends on First Saturday...Some pictures....
https://carstoshow.com/registerevent...eventid=102331
Port Richey Rod Run at Coast Buick GMC
https://carstoshow.com/registerevent.aspx?eventid=99114
50's Diner US19.... A Florida Attraction.
1730 US-19, Holiday Fl 34691 click: https://www.tamparacing.com/forums/t...-racing.html CHRA sanctioned cruise-in.
Cruise-In; Free; Every Saturday 5-8PM plus 10% off the whole menu to cruisers
50's Diner pictures are here: https://carstoshow.com/eventdetails.aspx?eventid=93194
All Cars Every 2nd Saturday Free Breakfast: Since 2015 and more. click: https://www.tamparacing.com/forums/e...ast-tampa.html
Tampa Racing.com covers the Tampa car scene and supports many fund raisers, worthy causes and events that enrich our community. We hope you enjoy them all.
What do I do? ---- on-site *Aftermarket* spring/suspension installations --- on-site impact wrenching---street lowering with your own stock springs...........True Bi-xenon HID projector headlight conversions........ Much more at Bob's Garage!
https://www.tamparacing.com/forums/b...ontact-us.html
https://www.tamparacing.com/forums/b...e-senor-honda/
Registered
Thread Starter
The upper bushing is already seated in the housing. So, we still had to install the fat lower bushing, insert the crossmember washer/mount into the bushing and onto the locating studs, and run the long bolt up through the cradle. I�ll be honest; we didn�t use a torque wrench, we just gave them the ol� ugga-dugga. But, the torque specs for the large bolts are 61-72 ft-lbs, while the studs are only 13-20 ft-lbs.
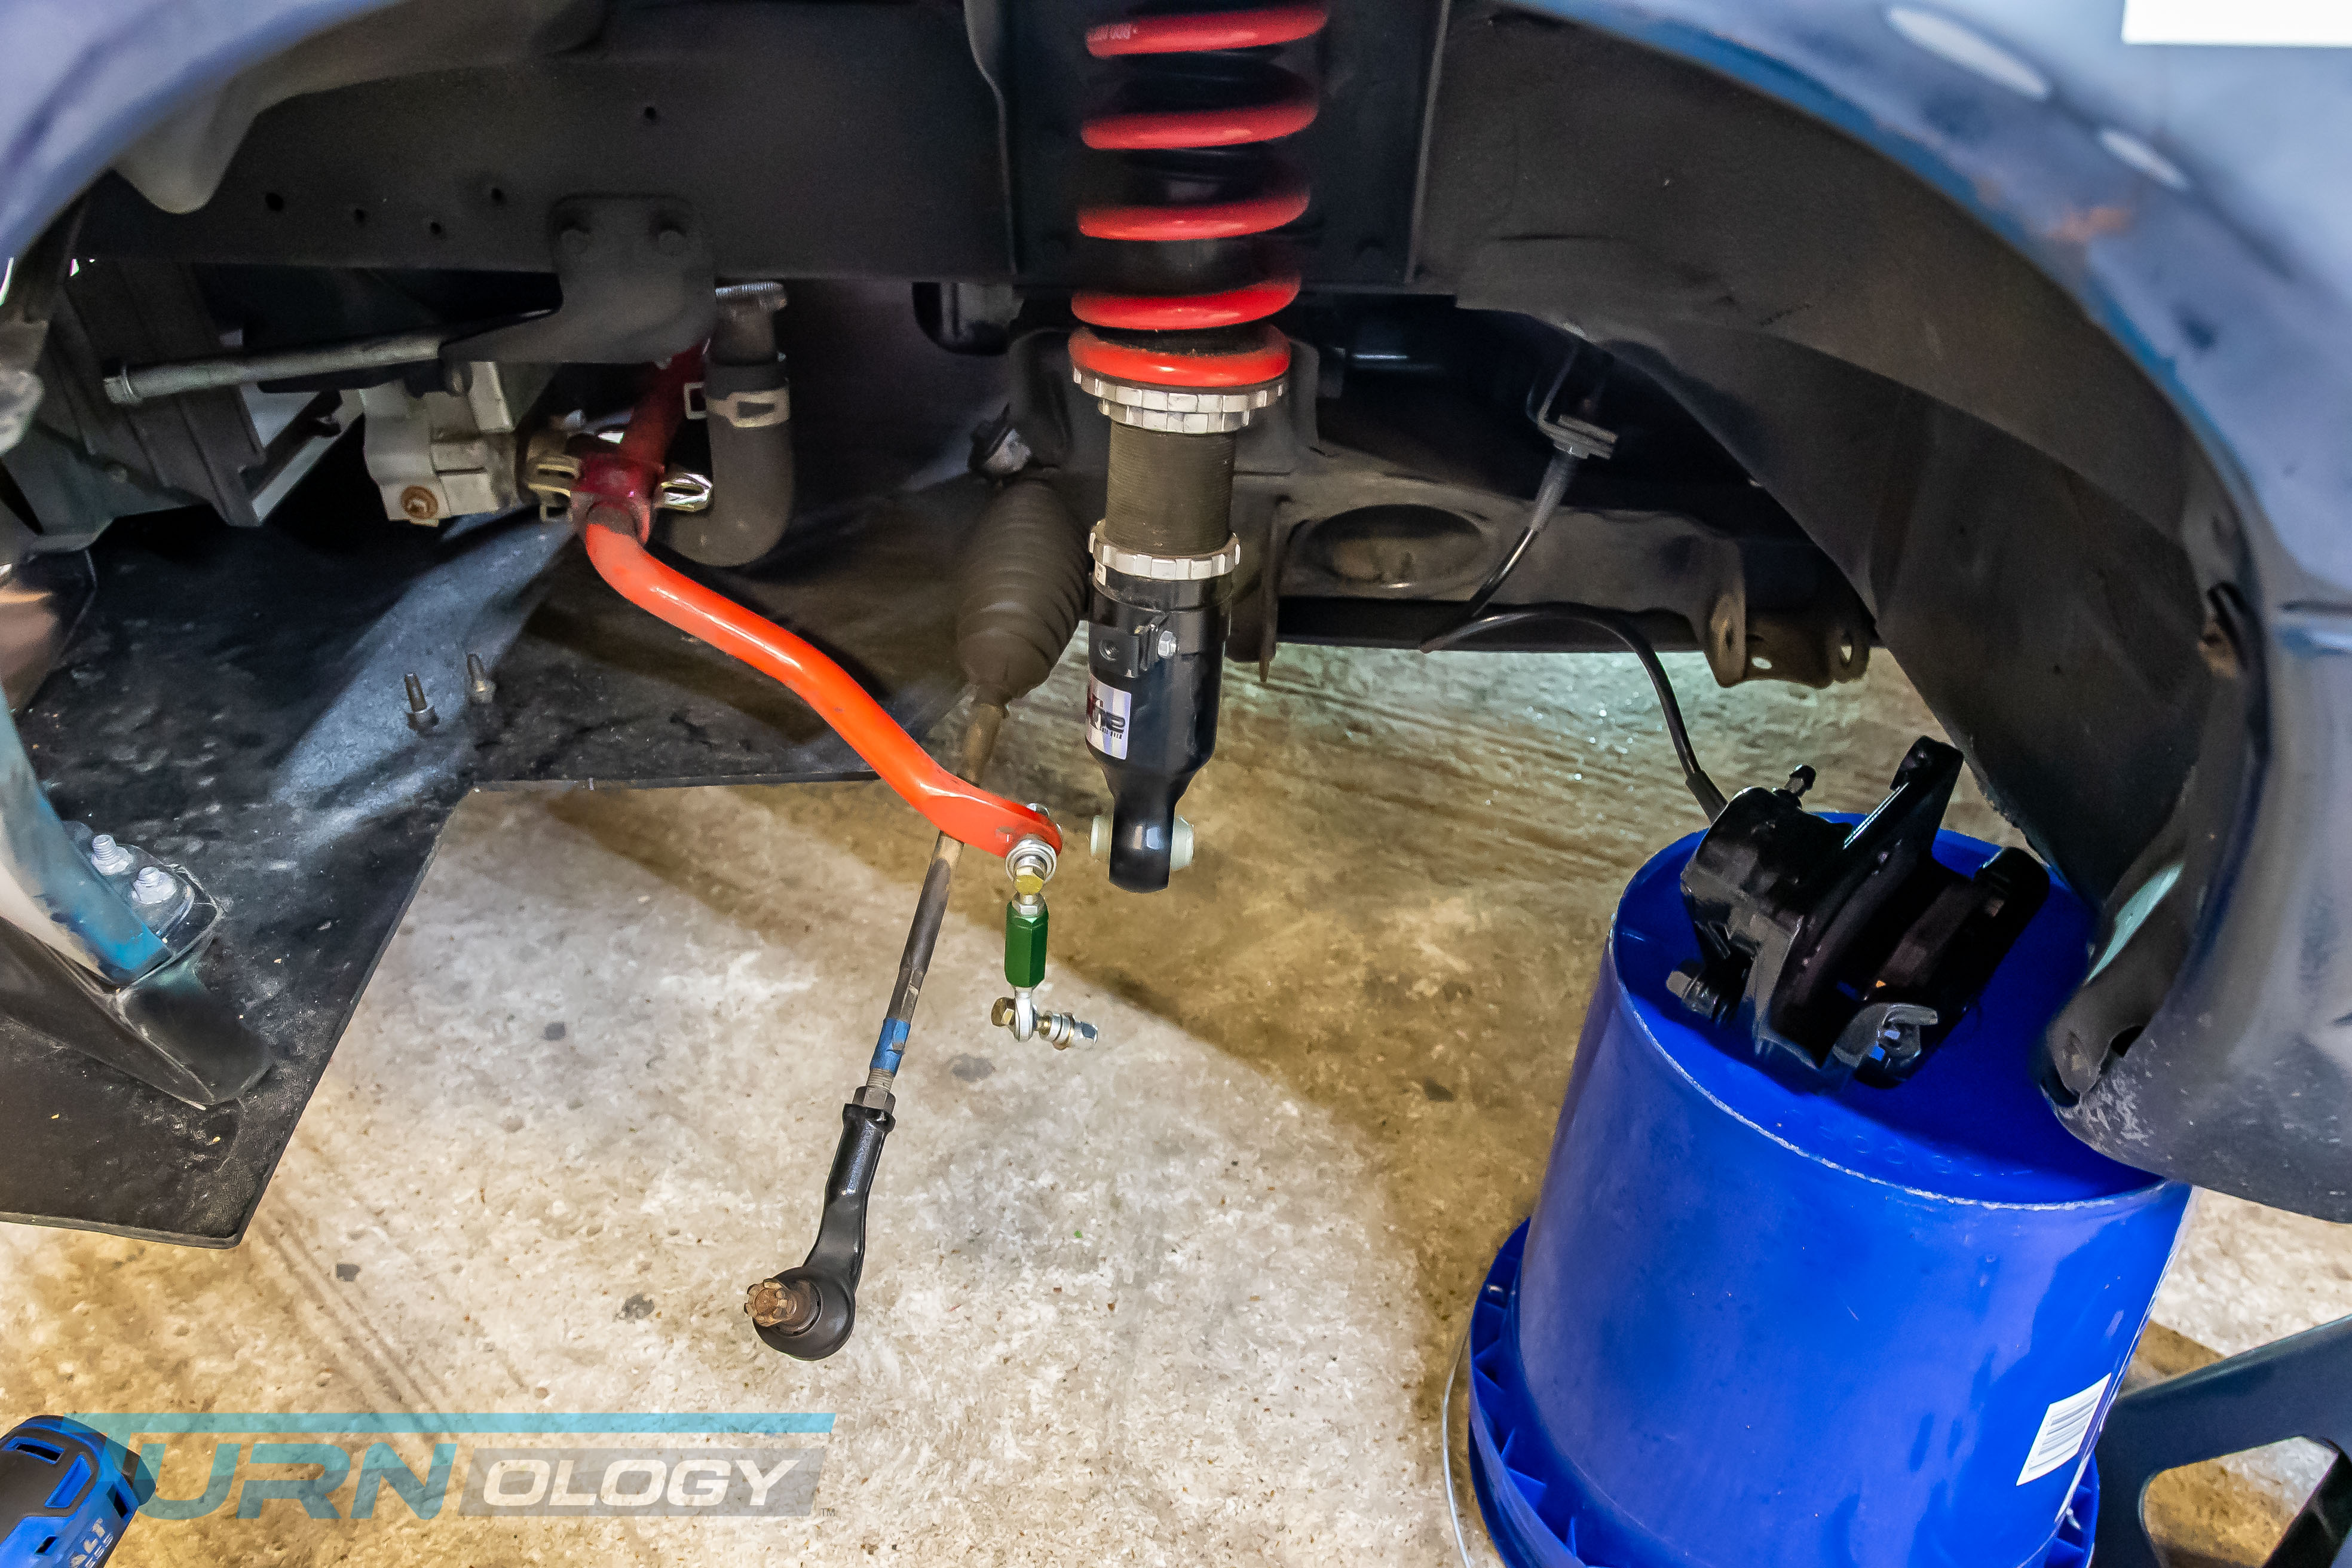
After that, it was on to reinstalling the PPF (77-91 ft-lbs), driveshaft, and subframe connectors. Next were the A-arms. This is the part where you need to pay attention to which side the cammed washer goes on. Hopefully, you heeded my advice earlier and marked both the washer and A-arm so you can get your camber set. If not, just set them straight up, seeing you�ll be going to the alignment shop anyway. Lastly, you�ll reinstall the coilover, slide the axles back in place, then reattach the spindle, rotor, and caliper. Leave the sway bar unattached as you won�t want it connected when aligning it or corner-weighting it anyway.
The front suspension is the same routine as the rear: A-arms, coilover, spindle, rotor, caliper, but you will also need to attach the tie rod. Also, leave the sway bar loose if you are corner weighting it.
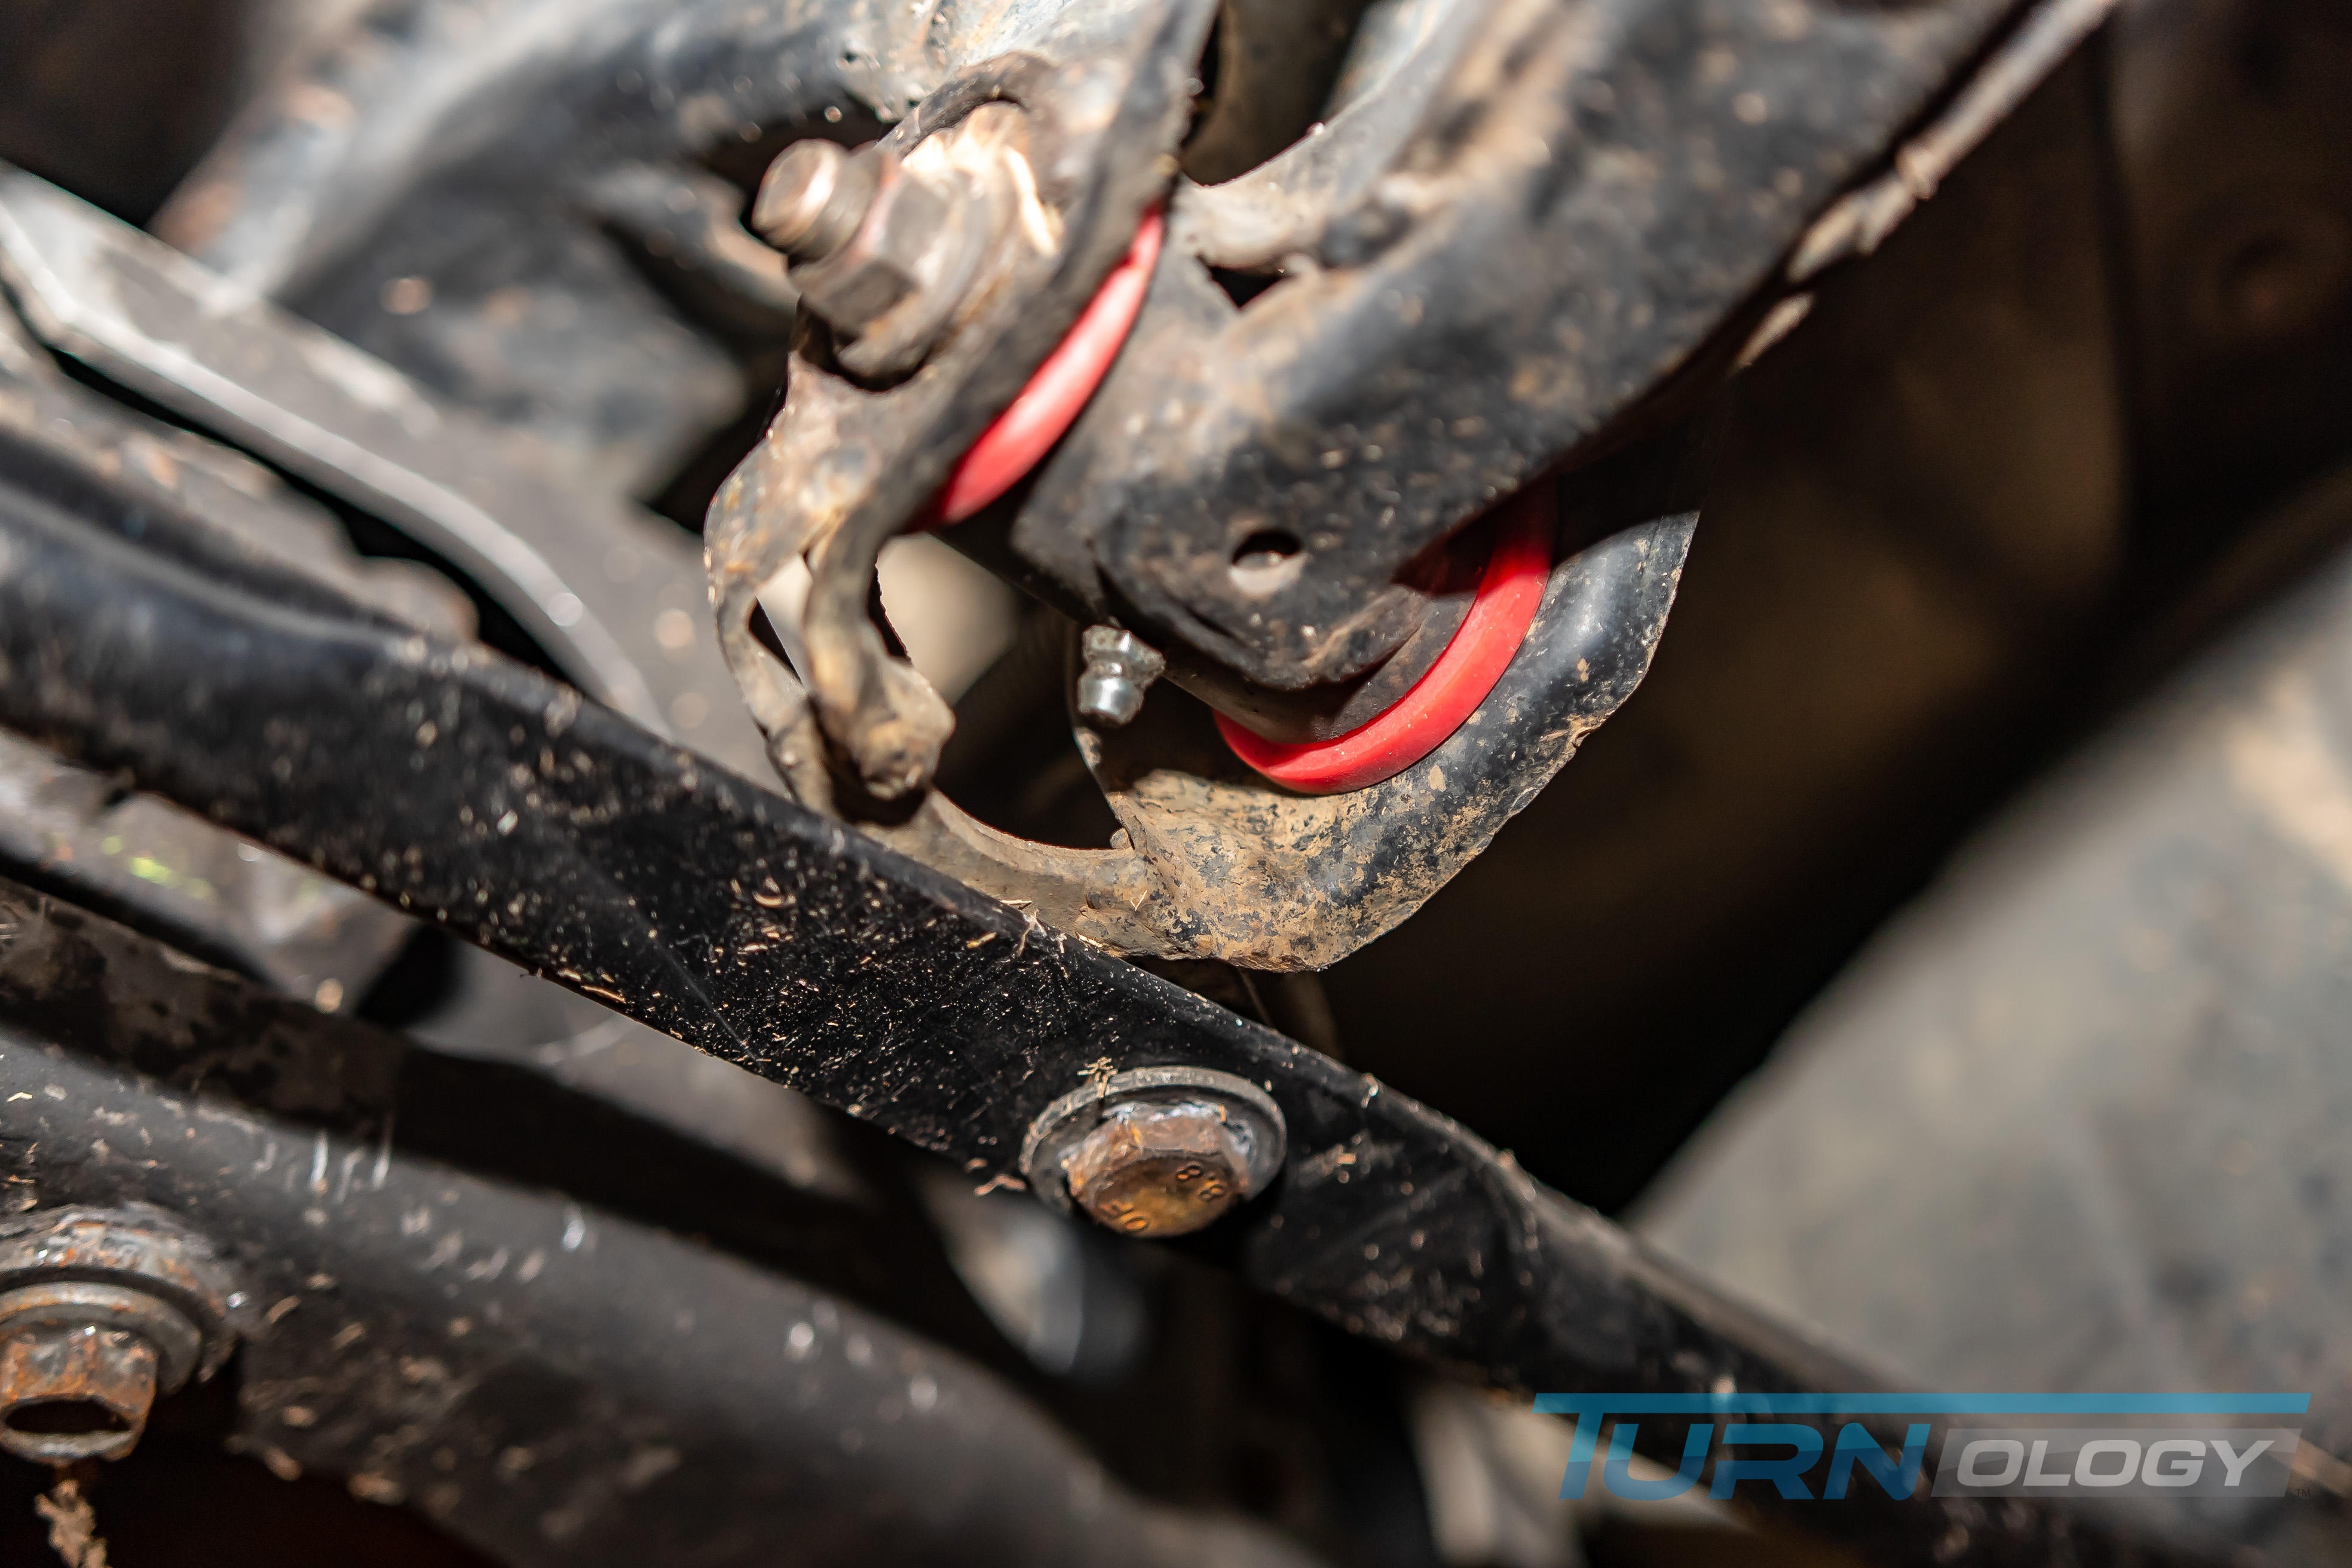
One additional thing we did while the A-arms were out of the car (but is not necessary in most cases) was to install Zerk fittings to grease the bushings later on down the line if needed. For most street applications, this is overkill. The Energy grease does a great job, and it�s so thick, I�m not sure it will ever come off (seriously, what is in that stuff?). But, this car is going to see some tough road racing, so we thought it was better to be safe than sorry.

After that, it was on to reinstalling the PPF (77-91 ft-lbs), driveshaft, and subframe connectors. Next were the A-arms. This is the part where you need to pay attention to which side the cammed washer goes on. Hopefully, you heeded my advice earlier and marked both the washer and A-arm so you can get your camber set. If not, just set them straight up, seeing you�ll be going to the alignment shop anyway. Lastly, you�ll reinstall the coilover, slide the axles back in place, then reattach the spindle, rotor, and caliper. Leave the sway bar unattached as you won�t want it connected when aligning it or corner-weighting it anyway.
The front suspension is the same routine as the rear: A-arms, coilover, spindle, rotor, caliper, but you will also need to attach the tie rod. Also, leave the sway bar loose if you are corner weighting it.
One additional thing we did while the A-arms were out of the car (but is not necessary in most cases) was to install Zerk fittings to grease the bushings later on down the line if needed. For most street applications, this is overkill. The Energy grease does a great job, and it�s so thick, I�m not sure it will ever come off (seriously, what is in that stuff?). But, this car is going to see some tough road racing, so we thought it was better to be safe than sorry.

__________________
Keystone Motor Club (Founded 2012)... Free car show Every 3rd Saturday, newsletter is
https://www.tamparacing.com/forums/e...-car-club.html
Keystone picture gallery is here:
https://carstoshow.com/eventdetails.aspx?eventid=93202
Veterans and Friends on First Saturday...Some pictures....
https://carstoshow.com/registerevent...eventid=102331
Port Richey Rod Run at Coast Buick GMC
https://carstoshow.com/registerevent.aspx?eventid=99114
50's Diner US19.... A Florida Attraction.
1730 US-19, Holiday Fl 34691 click: https://www.tamparacing.com/forums/t...-racing.html CHRA sanctioned cruise-in.
Cruise-In; Free; Every Saturday 5-8PM plus 10% off the whole menu to cruisers
50's Diner pictures are here: https://carstoshow.com/eventdetails.aspx?eventid=93194
All Cars Every 2nd Saturday Free Breakfast: Since 2015 and more. click: https://www.tamparacing.com/forums/e...ast-tampa.html
Tampa Racing.com covers the Tampa car scene and supports many fund raisers, worthy causes and events that enrich our community. We hope you enjoy them all.
What do I do? ---- on-site *Aftermarket* spring/suspension installations --- on-site impact wrenching---street lowering with your own stock springs...........True Bi-xenon HID projector headlight conversions........ Much more at Bob's Garage!
https://www.tamparacing.com/forums/b...ontact-us.html
https://www.tamparacing.com/forums/b...e-senor-honda/
Keystone Motor Club (Founded 2012)... Free car show Every 3rd Saturday, newsletter is
https://www.tamparacing.com/forums/e...-car-club.html
Keystone picture gallery is here:
https://carstoshow.com/eventdetails.aspx?eventid=93202
Veterans and Friends on First Saturday...Some pictures....
https://carstoshow.com/registerevent...eventid=102331
Port Richey Rod Run at Coast Buick GMC
https://carstoshow.com/registerevent.aspx?eventid=99114
50's Diner US19.... A Florida Attraction.
1730 US-19, Holiday Fl 34691 click: https://www.tamparacing.com/forums/t...-racing.html CHRA sanctioned cruise-in.
Cruise-In; Free; Every Saturday 5-8PM plus 10% off the whole menu to cruisers
50's Diner pictures are here: https://carstoshow.com/eventdetails.aspx?eventid=93194
All Cars Every 2nd Saturday Free Breakfast: Since 2015 and more. click: https://www.tamparacing.com/forums/e...ast-tampa.html
Tampa Racing.com covers the Tampa car scene and supports many fund raisers, worthy causes and events that enrich our community. We hope you enjoy them all.
What do I do? ---- on-site *Aftermarket* spring/suspension installations --- on-site impact wrenching---street lowering with your own stock springs...........True Bi-xenon HID projector headlight conversions........ Much more at Bob's Garage!
https://www.tamparacing.com/forums/b...ontact-us.html
https://www.tamparacing.com/forums/b...e-senor-honda/
Registered
Thread Starter
The Final Say
It took a lot of time to change from the 24-year-old bushings to the new Energy Suspension polyurethane bushings. But, was it worth it? My answer is a resounding, YES!The hard part, here, is giving you raw numbers to prove that the change equated to a quantifiable difference. It is not like bolting on a turbo or supercharger, then making more horsepower on a dyno graph or even running a faster lap time (because that difference would be huge on a Miata). The differences are more subtle but undoubtedly for the better.
Have I recorded faster, more consistent lap times with the Energy Suspension bushings? Absolutely! Before I made the change, I was in the 1:22-range around Memphis International Raceway. Since then, I am in the 1:20-range. Can I directly attribute it to changing from old rubber to Energy Suspension bushings? I won�t lie and say I can, but the data from my Racepak CL Vantage seems to back up my theory.
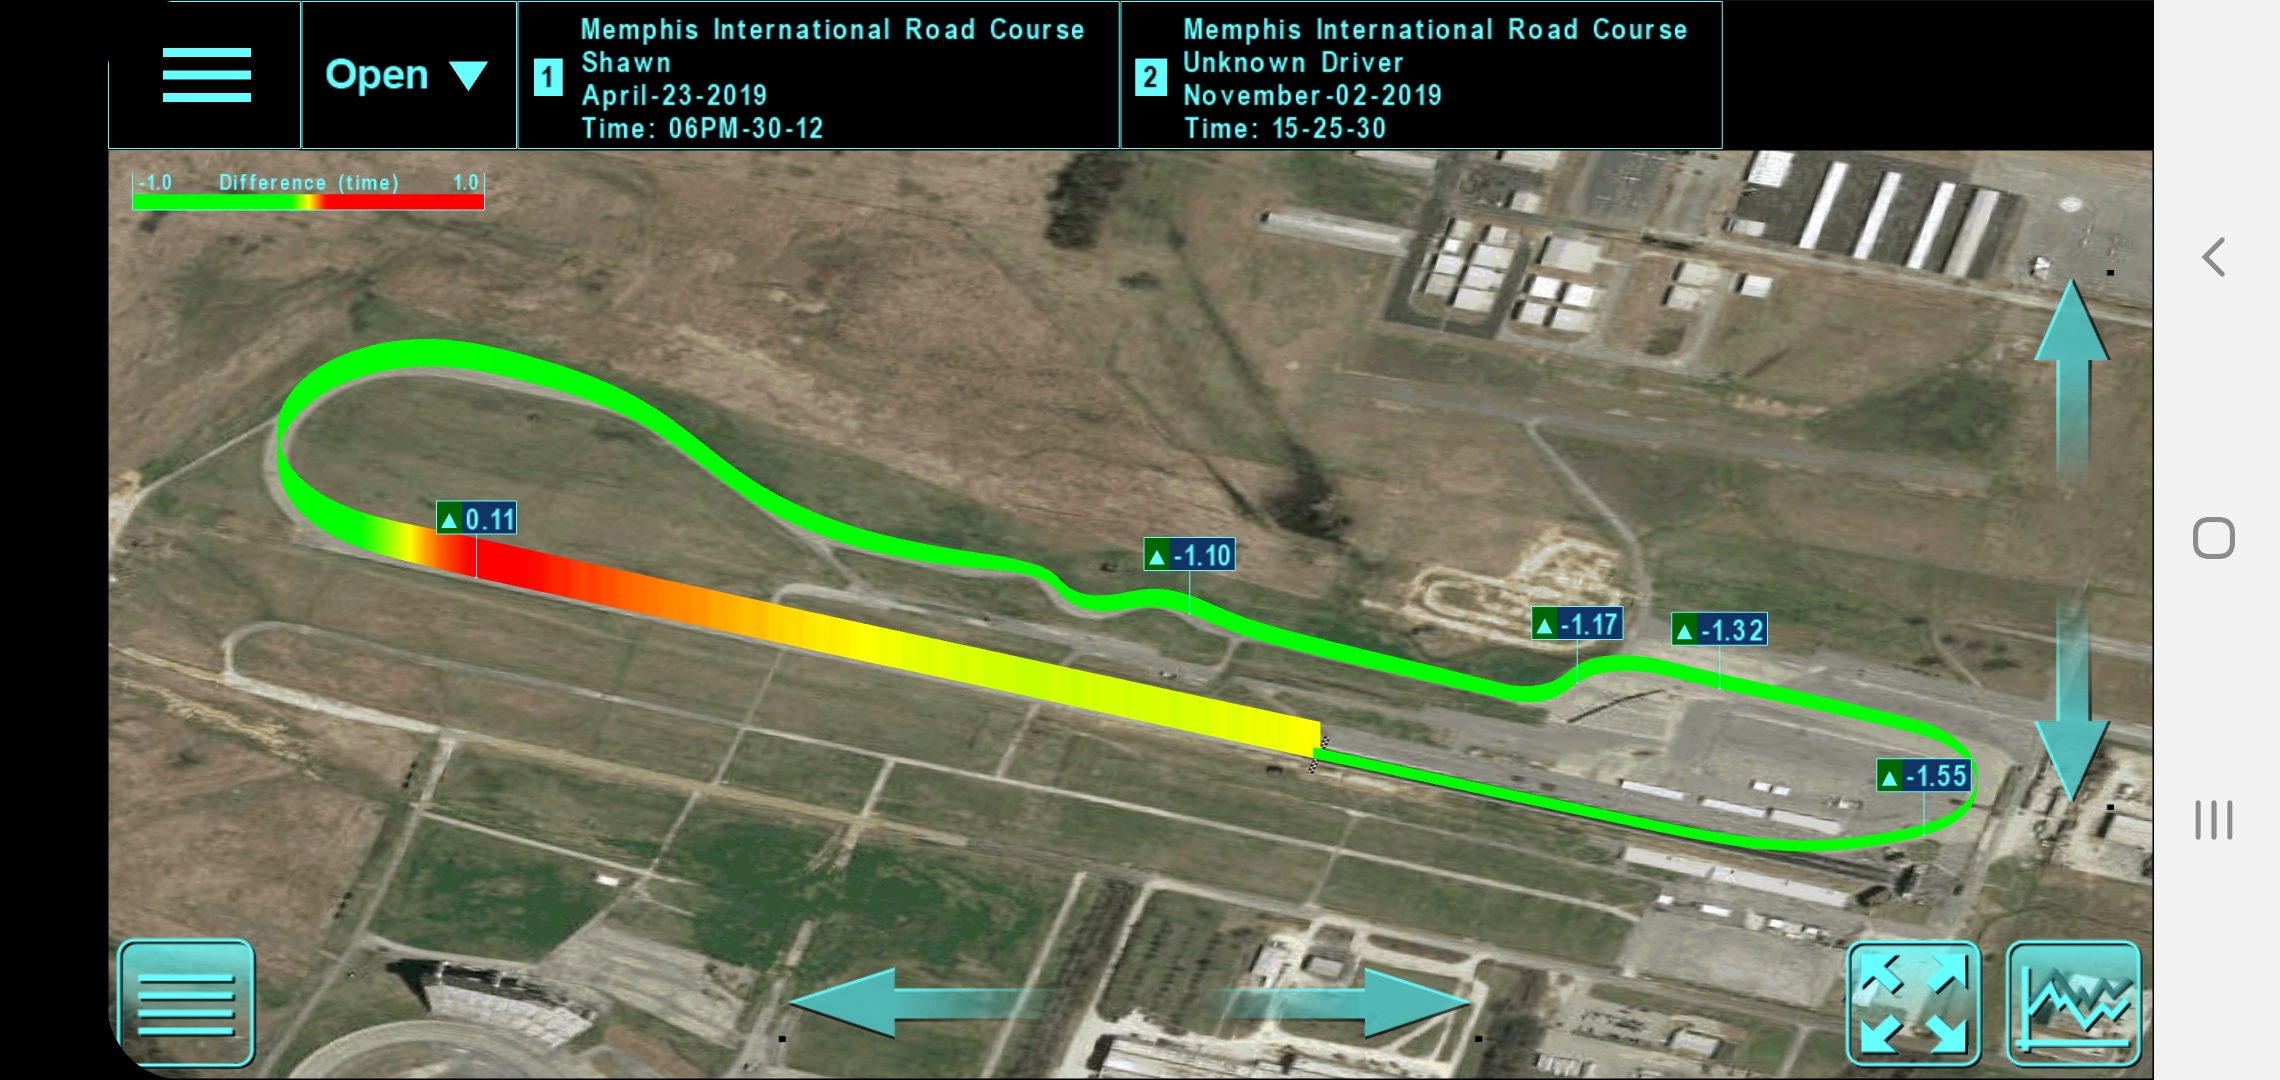 Here is an overlay from my best lap in April (1:22.54) with one in November (1:20.97) from my Racepak CL1 Vantage. As you can see, I gained a lot of time in the twisty sections. Especially coming out of Turn 8, where I carried that speed into Turn 9 and down the straightaway.
But, the one thing I can describe with absolute certainty is what I experience in the car and what my butt-meter says. The car feels stiffer, more solid, and more stable in the corners. It doesn�t roll over on the outside fronts and transitions from one side to the other are more predictable. There are two places where the difference is most noticeable to me: Turn 3, and the 90�s (Turn 8 and 9).
Turn 3 is a flat-out, almost off-camber dogleg to the left with bumps right in the middle, which tend to upset the car. Here the car feels more planted. You can feel the suspension is much tighter from a side-to-side perspective, and I�m more confident of staying on the loud pedal through there. Turns 8 and 9 are two quick left/right 90-degree turns. Coming into 8, the car takes a set sooner and transitions more smoothly into 9, allowing me to get back on the power much faster without shocking the suspension.
__________________
Keystone Motor Club (Founded 2012)... Free car show Every 3rd Saturday, newsletter is
https://www.tamparacing.com/forums/e...-car-club.html
Keystone picture gallery is here:
https://carstoshow.com/eventdetails.aspx?eventid=93202
Veterans and Friends on First Saturday...Some pictures....
https://carstoshow.com/registerevent...eventid=102331
Port Richey Rod Run at Coast Buick GMC
https://carstoshow.com/registerevent.aspx?eventid=99114
50's Diner US19.... A Florida Attraction.
1730 US-19, Holiday Fl 34691 click: https://www.tamparacing.com/forums/t...-racing.html CHRA sanctioned cruise-in.
Cruise-In; Free; Every Saturday 5-8PM plus 10% off the whole menu to cruisers
50's Diner pictures are here: https://carstoshow.com/eventdetails.aspx?eventid=93194
All Cars Every 2nd Saturday Free Breakfast: Since 2015 and more. click: https://www.tamparacing.com/forums/e...ast-tampa.html
Tampa Racing.com covers the Tampa car scene and supports many fund raisers, worthy causes and events that enrich our community. We hope you enjoy them all.
What do I do? ---- on-site *Aftermarket* spring/suspension installations --- on-site impact wrenching---street lowering with your own stock springs...........True Bi-xenon HID projector headlight conversions........ Much more at Bob's Garage!
https://www.tamparacing.com/forums/b...ontact-us.html
https://www.tamparacing.com/forums/b...e-senor-honda/
Keystone Motor Club (Founded 2012)... Free car show Every 3rd Saturday, newsletter is
https://www.tamparacing.com/forums/e...-car-club.html
Keystone picture gallery is here:
https://carstoshow.com/eventdetails.aspx?eventid=93202
Veterans and Friends on First Saturday...Some pictures....
https://carstoshow.com/registerevent...eventid=102331
Port Richey Rod Run at Coast Buick GMC
https://carstoshow.com/registerevent.aspx?eventid=99114
50's Diner US19.... A Florida Attraction.
1730 US-19, Holiday Fl 34691 click: https://www.tamparacing.com/forums/t...-racing.html CHRA sanctioned cruise-in.
Cruise-In; Free; Every Saturday 5-8PM plus 10% off the whole menu to cruisers
50's Diner pictures are here: https://carstoshow.com/eventdetails.aspx?eventid=93194
All Cars Every 2nd Saturday Free Breakfast: Since 2015 and more. click: https://www.tamparacing.com/forums/e...ast-tampa.html
Tampa Racing.com covers the Tampa car scene and supports many fund raisers, worthy causes and events that enrich our community. We hope you enjoy them all.
What do I do? ---- on-site *Aftermarket* spring/suspension installations --- on-site impact wrenching---street lowering with your own stock springs...........True Bi-xenon HID projector headlight conversions........ Much more at Bob's Garage!
https://www.tamparacing.com/forums/b...ontact-us.html
https://www.tamparacing.com/forums/b...e-senor-honda/
Registered
Thread Starter

The last noticeable thing is the rearend bushings. I have a SPEC Stage-3 clutch, which is a three-puck race clutch with no springs � it�s essentially on or off. With the old bushings, the Miata would wheel hop fiercely as the rearend tried to accept full-engagement with little horsepower. From a dead stop, it would rattle the teeth out of my head, and I feared something was going to break until I could fully engage the clutch. The Energy bushings haven�t wholly stopped that issue, but it is light years better than it was.
For approximately $320 at your favorite retailer, I think the Energy Suspension bushings are money well spent for peace of mind alone. If you�ve ever had a bushing fail, you know what it can do to the handling of your car. There is no reason to continue risking it with a 20-plus-year-old car. Grab a couple of buddies, fill them with pizza and beer, and you�ll have the Energy Suspension bushings installed in no time!
Article Sources
Energy Suspension
https://energysuspension.com/
(949) 361-3935
More Sources
Eibach
https://eibach.com
(800) 507-2338
Racepak
https://store.racepak.com
(866) 464-6553
Pedders Suspension
https://pedders.com
(909) 476-6068
Spec Clutch
https://specclutch.com
(800) 828-4379
__________________
Keystone Motor Club (Founded 2012)... Free car show Every 3rd Saturday, newsletter is
https://www.tamparacing.com/forums/e...-car-club.html
Keystone picture gallery is here:
https://carstoshow.com/eventdetails.aspx?eventid=93202
Veterans and Friends on First Saturday...Some pictures....
https://carstoshow.com/registerevent...eventid=102331
Port Richey Rod Run at Coast Buick GMC
https://carstoshow.com/registerevent.aspx?eventid=99114
50's Diner US19.... A Florida Attraction.
1730 US-19, Holiday Fl 34691 click: https://www.tamparacing.com/forums/t...-racing.html CHRA sanctioned cruise-in.
Cruise-In; Free; Every Saturday 5-8PM plus 10% off the whole menu to cruisers
50's Diner pictures are here: https://carstoshow.com/eventdetails.aspx?eventid=93194
All Cars Every 2nd Saturday Free Breakfast: Since 2015 and more. click: https://www.tamparacing.com/forums/e...ast-tampa.html
Tampa Racing.com covers the Tampa car scene and supports many fund raisers, worthy causes and events that enrich our community. We hope you enjoy them all.
What do I do? ---- on-site *Aftermarket* spring/suspension installations --- on-site impact wrenching---street lowering with your own stock springs...........True Bi-xenon HID projector headlight conversions........ Much more at Bob's Garage!
https://www.tamparacing.com/forums/b...ontact-us.html
https://www.tamparacing.com/forums/b...e-senor-honda/
Keystone Motor Club (Founded 2012)... Free car show Every 3rd Saturday, newsletter is
https://www.tamparacing.com/forums/e...-car-club.html
Keystone picture gallery is here:
https://carstoshow.com/eventdetails.aspx?eventid=93202
Veterans and Friends on First Saturday...Some pictures....
https://carstoshow.com/registerevent...eventid=102331
Port Richey Rod Run at Coast Buick GMC
https://carstoshow.com/registerevent.aspx?eventid=99114
50's Diner US19.... A Florida Attraction.
1730 US-19, Holiday Fl 34691 click: https://www.tamparacing.com/forums/t...-racing.html CHRA sanctioned cruise-in.
Cruise-In; Free; Every Saturday 5-8PM plus 10% off the whole menu to cruisers
50's Diner pictures are here: https://carstoshow.com/eventdetails.aspx?eventid=93194
All Cars Every 2nd Saturday Free Breakfast: Since 2015 and more. click: https://www.tamparacing.com/forums/e...ast-tampa.html
Tampa Racing.com covers the Tampa car scene and supports many fund raisers, worthy causes and events that enrich our community. We hope you enjoy them all.
What do I do? ---- on-site *Aftermarket* spring/suspension installations --- on-site impact wrenching---street lowering with your own stock springs...........True Bi-xenon HID projector headlight conversions........ Much more at Bob's Garage!
https://www.tamparacing.com/forums/b...ontact-us.html
https://www.tamparacing.com/forums/b...e-senor-honda/

Thread
Thread Starter
Forum
Replies
Last Post
senor honda
Chassis & Suspension Tech
0
04-03-2019 06:27 AM


