
The highly informal strictly voluntary humble newsletter of the Keystone Motor Club

Registered
Thread Starter

Veterans First Saturday Car Show and Dinner
Putting Veterans First on First Saturday
Each month. Drop in 4PM-8PM 1600Hours-2000Hours
Veterans and friends are invited to a car show and dinner at the 50's Diner
1730 US19 and ALT 19. 34691 Holiday FL, Next to Winn Dixie.
Take a look here:
https://carstoshow.com/registerevent...eventid=102331
If you have a hat, a shirt, a military vehicle, or just want some good conversation, we're not checking ID's. We're not charging dues. You paid your dues when you joined the military. We're not charging admission. Freedom isn't free. We know that and appreciate you. Stop by and see us. Any branch of service is welcome. Any Veterans organization is welcome. Any Veterans relative is welcome to bring your Veteran hero. You are not alone buddy. We meet every First Saturday and you are invited. There are Veteran special themes coming up monthly and we don't want you missing out.
Let us know you are coming and we can get you a card for a free BBQ sandwich on your Birthday.
Email Bobfixesitup@yahoo.com ....Mention Veterans First.
First Saturday is Veterans First at Americana 50's Diner! 10% off menu at the checkout register.
and Elvis, himself an Army Veteran, talks to you when you leave. LOL
MILITARY APPRECIATION DAYS At Mission BBQ
FREE SANDWICH for all active duty service members and veterans.
Army.............................................. .......................Monday, 5/13
Marine Corps............................................. ..........Tuesday, 5/14
Navy.............................................. ..................Wednesday, 5/15
Air Force & Space Force..................................Thursday, 5/16
Coast Guard............................................. ...............Friday, 5/17
__________________
Keystone Motor Club (Founded 2012)... Free car show Every 3rd Saturday, newsletter is
https://www.tamparacing.com/forums/e...-car-club.html
Keystone picture gallery is here:
https://carstoshow.com/eventdetails.aspx?eventid=93202
Veterans and Friends on First Saturday...Some pictures....
https://carstoshow.com/registerevent...eventid=102331
Port Richey Rod Run at Coast Buick GMC
https://carstoshow.com/registerevent.aspx?eventid=99114
50's Diner US19.... A Florida Attraction.
1730 US-19, Holiday Fl 34691 click: https://www.tamparacing.com/forums/t...-racing.html CHRA sanctioned cruise-in.
Cruise-In; Free; Every Saturday 5-8PM plus 10% off the whole menu to cruisers
50's Diner pictures are here: https://carstoshow.com/eventdetails.aspx?eventid=93194
All Cars Every 2nd Saturday Free Breakfast: Since 2015 and more. click: https://www.tamparacing.com/forums/e...ast-tampa.html
Tampa Racing.com covers the Tampa car scene and supports many fund raisers, worthy causes and events that enrich our community. We hope you enjoy them all.
What do I do? ---- on-site *Aftermarket* spring/suspension installations --- on-site impact wrenching---street lowering with your own stock springs...........True Bi-xenon HID projector headlight conversions........ Much more at Bob's Garage!
https://www.tamparacing.com/forums/b...ontact-us.html
https://www.tamparacing.com/forums/b...e-senor-honda/
Last edited by senor honda; 07-11-2024 at 02:00 PM.

Registered
Thread Starter
Win a FREE Smoker for Father's Day!
Is this email not displaying properly?
View it in your browser


It�s Dad�s big day, so get him what he wants: The chance to be a backyard pit boss with his own home smoker! We�re giving one away at each MISSION BBQ location. Just be sure to enter by June 15, 9:00pm EDT / 8:00pm CDT / 7:00pm MDT.
Click Here to Enter
https://mission-bbq.com/dads/?vgo_ee...Tbnz5j6cM4w3NS
We picked out a genuine heavy-gauge smoker, the next best thing to being here for authentic slow-smoked BBQ. Built to last, it�s our favorite American-made, premium grade smoker. And sure to be your Dad�s favorite gift, too.
(Just in case you�re a �do-it-yourselfer Dad,� it�s ok to enter to win one for yourself.)
Good Luck and Happy Father�s Day!
Your Friends at MISSION BBQ
Is this email not displaying properly?
View it in your browser
It�s Dad�s big day, so get him what he wants: The chance to be a backyard pit boss with his own home smoker! We�re giving one away at each MISSION BBQ location. Just be sure to enter by June 15, 9:00pm EDT / 8:00pm CDT / 7:00pm MDT.
Click Here to Enter
https://mission-bbq.com/dads/?vgo_ee...Tbnz5j6cM4w3NS
We picked out a genuine heavy-gauge smoker, the next best thing to being here for authentic slow-smoked BBQ. Built to last, it�s our favorite American-made, premium grade smoker. And sure to be your Dad�s favorite gift, too.
(Just in case you�re a �do-it-yourselfer Dad,� it�s ok to enter to win one for yourself.)
Good Luck and Happy Father�s Day!
Your Friends at MISSION BBQ
__________________
Keystone Motor Club (Founded 2012)... Free car show Every 3rd Saturday, newsletter is
https://www.tamparacing.com/forums/e...-car-club.html
Keystone picture gallery is here:
https://carstoshow.com/eventdetails.aspx?eventid=93202
Veterans and Friends on First Saturday...Some pictures....
https://carstoshow.com/registerevent...eventid=102331
Port Richey Rod Run at Coast Buick GMC
https://carstoshow.com/registerevent.aspx?eventid=99114
50's Diner US19.... A Florida Attraction.
1730 US-19, Holiday Fl 34691 click: https://www.tamparacing.com/forums/t...-racing.html CHRA sanctioned cruise-in.
Cruise-In; Free; Every Saturday 5-8PM plus 10% off the whole menu to cruisers
50's Diner pictures are here: https://carstoshow.com/eventdetails.aspx?eventid=93194
All Cars Every 2nd Saturday Free Breakfast: Since 2015 and more. click: https://www.tamparacing.com/forums/e...ast-tampa.html
Tampa Racing.com covers the Tampa car scene and supports many fund raisers, worthy causes and events that enrich our community. We hope you enjoy them all.
What do I do? ---- on-site *Aftermarket* spring/suspension installations --- on-site impact wrenching---street lowering with your own stock springs...........True Bi-xenon HID projector headlight conversions........ Much more at Bob's Garage!
https://www.tamparacing.com/forums/b...ontact-us.html
https://www.tamparacing.com/forums/b...e-senor-honda/
Keystone Motor Club (Founded 2012)... Free car show Every 3rd Saturday, newsletter is
https://www.tamparacing.com/forums/e...-car-club.html
Keystone picture gallery is here:
https://carstoshow.com/eventdetails.aspx?eventid=93202
Veterans and Friends on First Saturday...Some pictures....
https://carstoshow.com/registerevent...eventid=102331
Port Richey Rod Run at Coast Buick GMC
https://carstoshow.com/registerevent.aspx?eventid=99114
50's Diner US19.... A Florida Attraction.
1730 US-19, Holiday Fl 34691 click: https://www.tamparacing.com/forums/t...-racing.html CHRA sanctioned cruise-in.
Cruise-In; Free; Every Saturday 5-8PM plus 10% off the whole menu to cruisers
50's Diner pictures are here: https://carstoshow.com/eventdetails.aspx?eventid=93194
All Cars Every 2nd Saturday Free Breakfast: Since 2015 and more. click: https://www.tamparacing.com/forums/e...ast-tampa.html
Tampa Racing.com covers the Tampa car scene and supports many fund raisers, worthy causes and events that enrich our community. We hope you enjoy them all.
What do I do? ---- on-site *Aftermarket* spring/suspension installations --- on-site impact wrenching---street lowering with your own stock springs...........True Bi-xenon HID projector headlight conversions........ Much more at Bob's Garage!
https://www.tamparacing.com/forums/b...ontact-us.html
https://www.tamparacing.com/forums/b...e-senor-honda/
Registered
Thread Starter
Cutting Threads: An Introduction to Using a Tap to Thread Bolt Holes
 Recently while beneath a friend�s car, I noticed an abundance of zip ties used to secure everything from battery cables to taillight wires to brake lines, and everything was hanging off the fuel line. After a little arm-twisting, I convinced him we should drill and tap some holes to attach line clamps to the frame and take the stress off of his fuel line. His hesitation at first in doing so revolved around a few bad experiences with breaking taps off and holes and bolts that wouldn�t tighten up. I assured him we could get the job done without any pitfalls if we followed a few simple steps.
Threading a drilled hole may seem like an easy task, but plenty can go wrong if you don�t take the proper precautions when using hand taps. Knowing how to use a tap properly will reduce the risk of tap breakage and make the process more enjoyable.
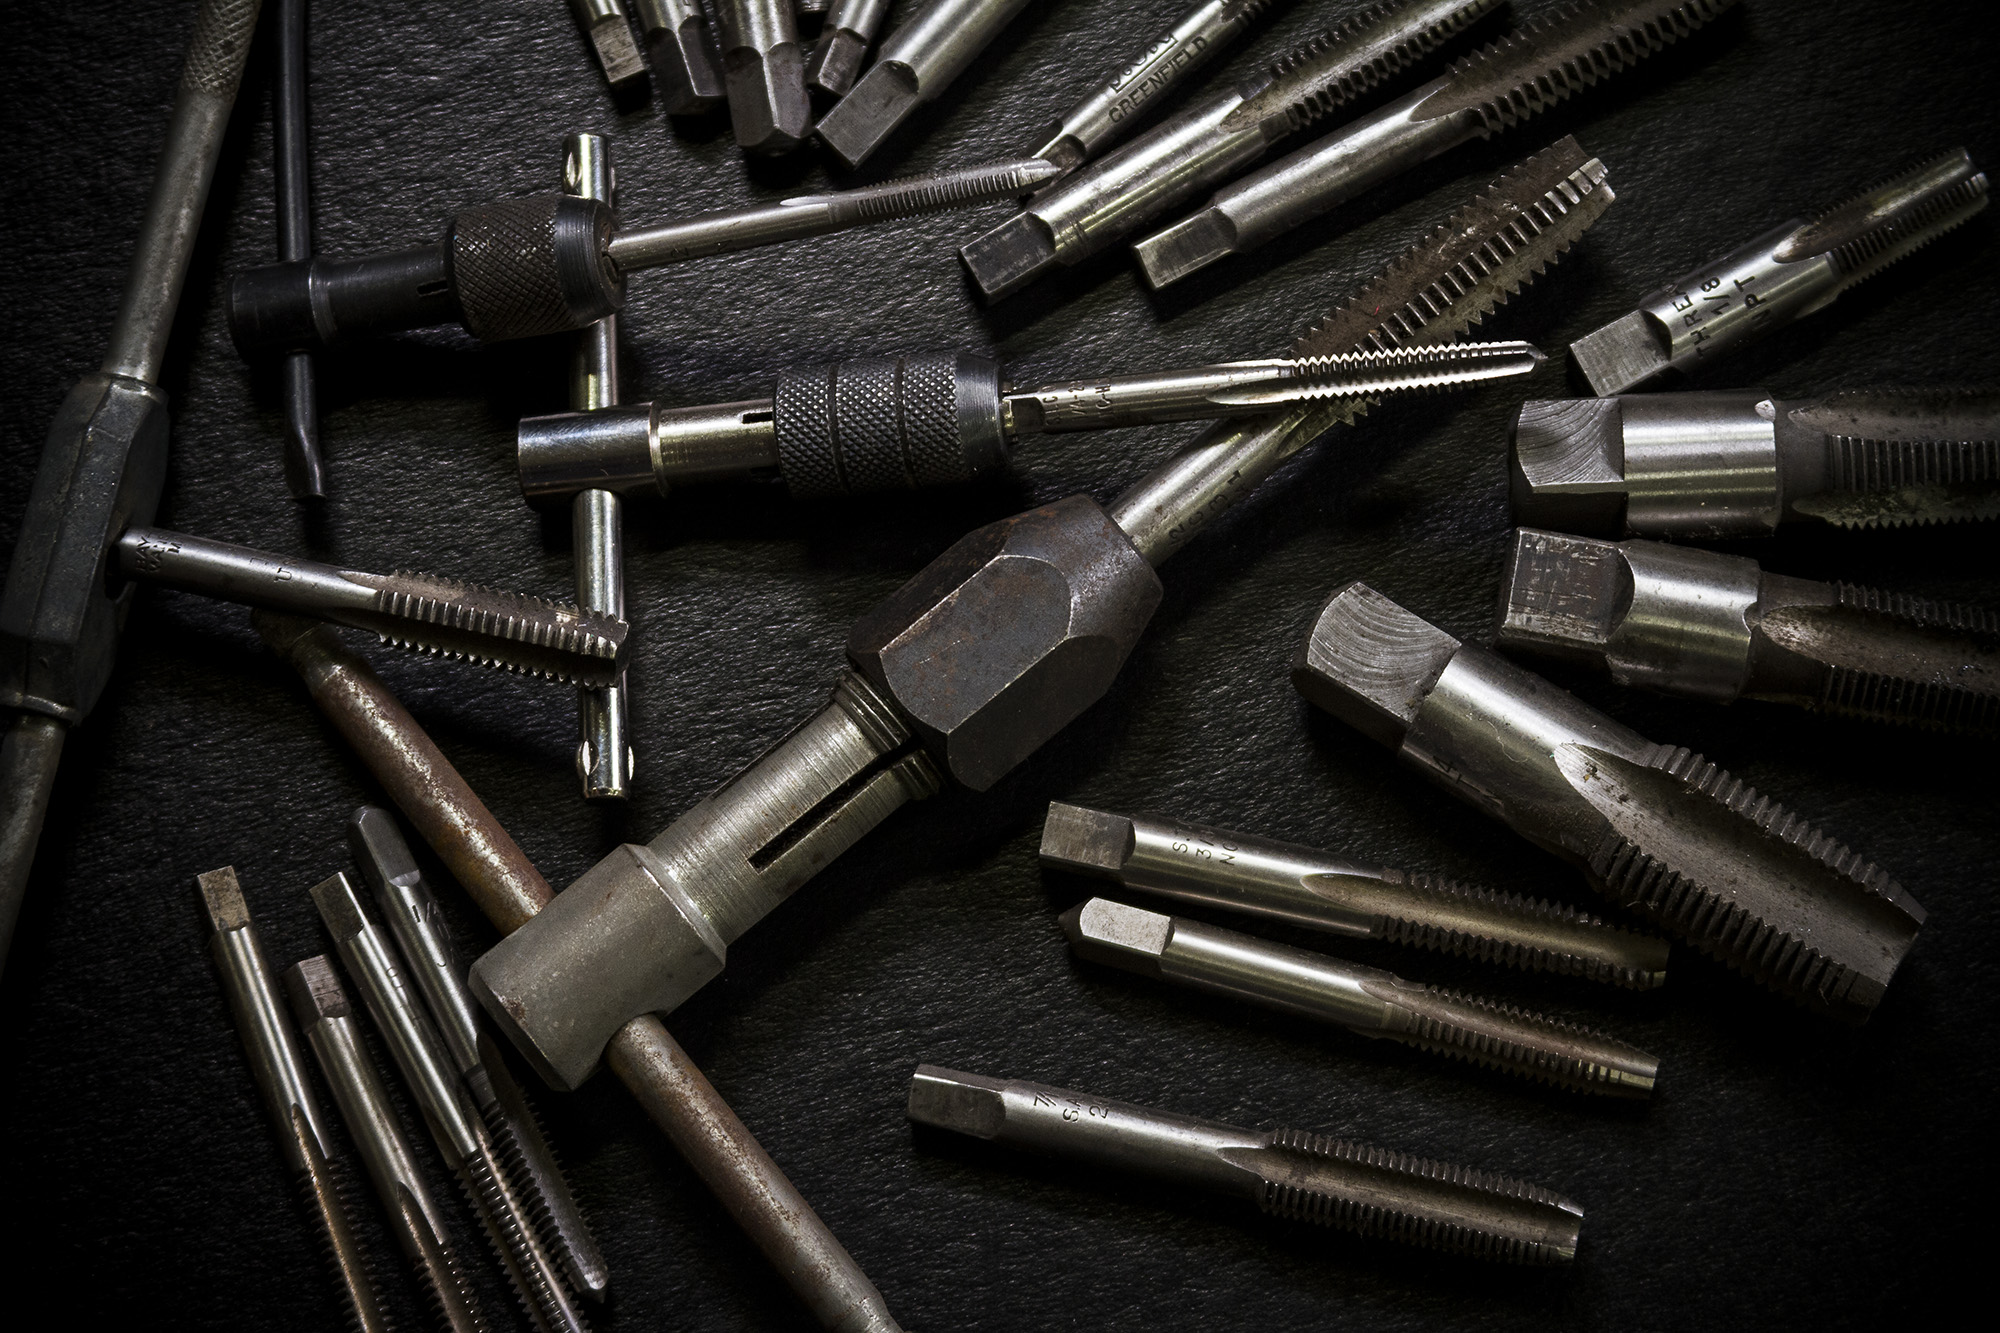
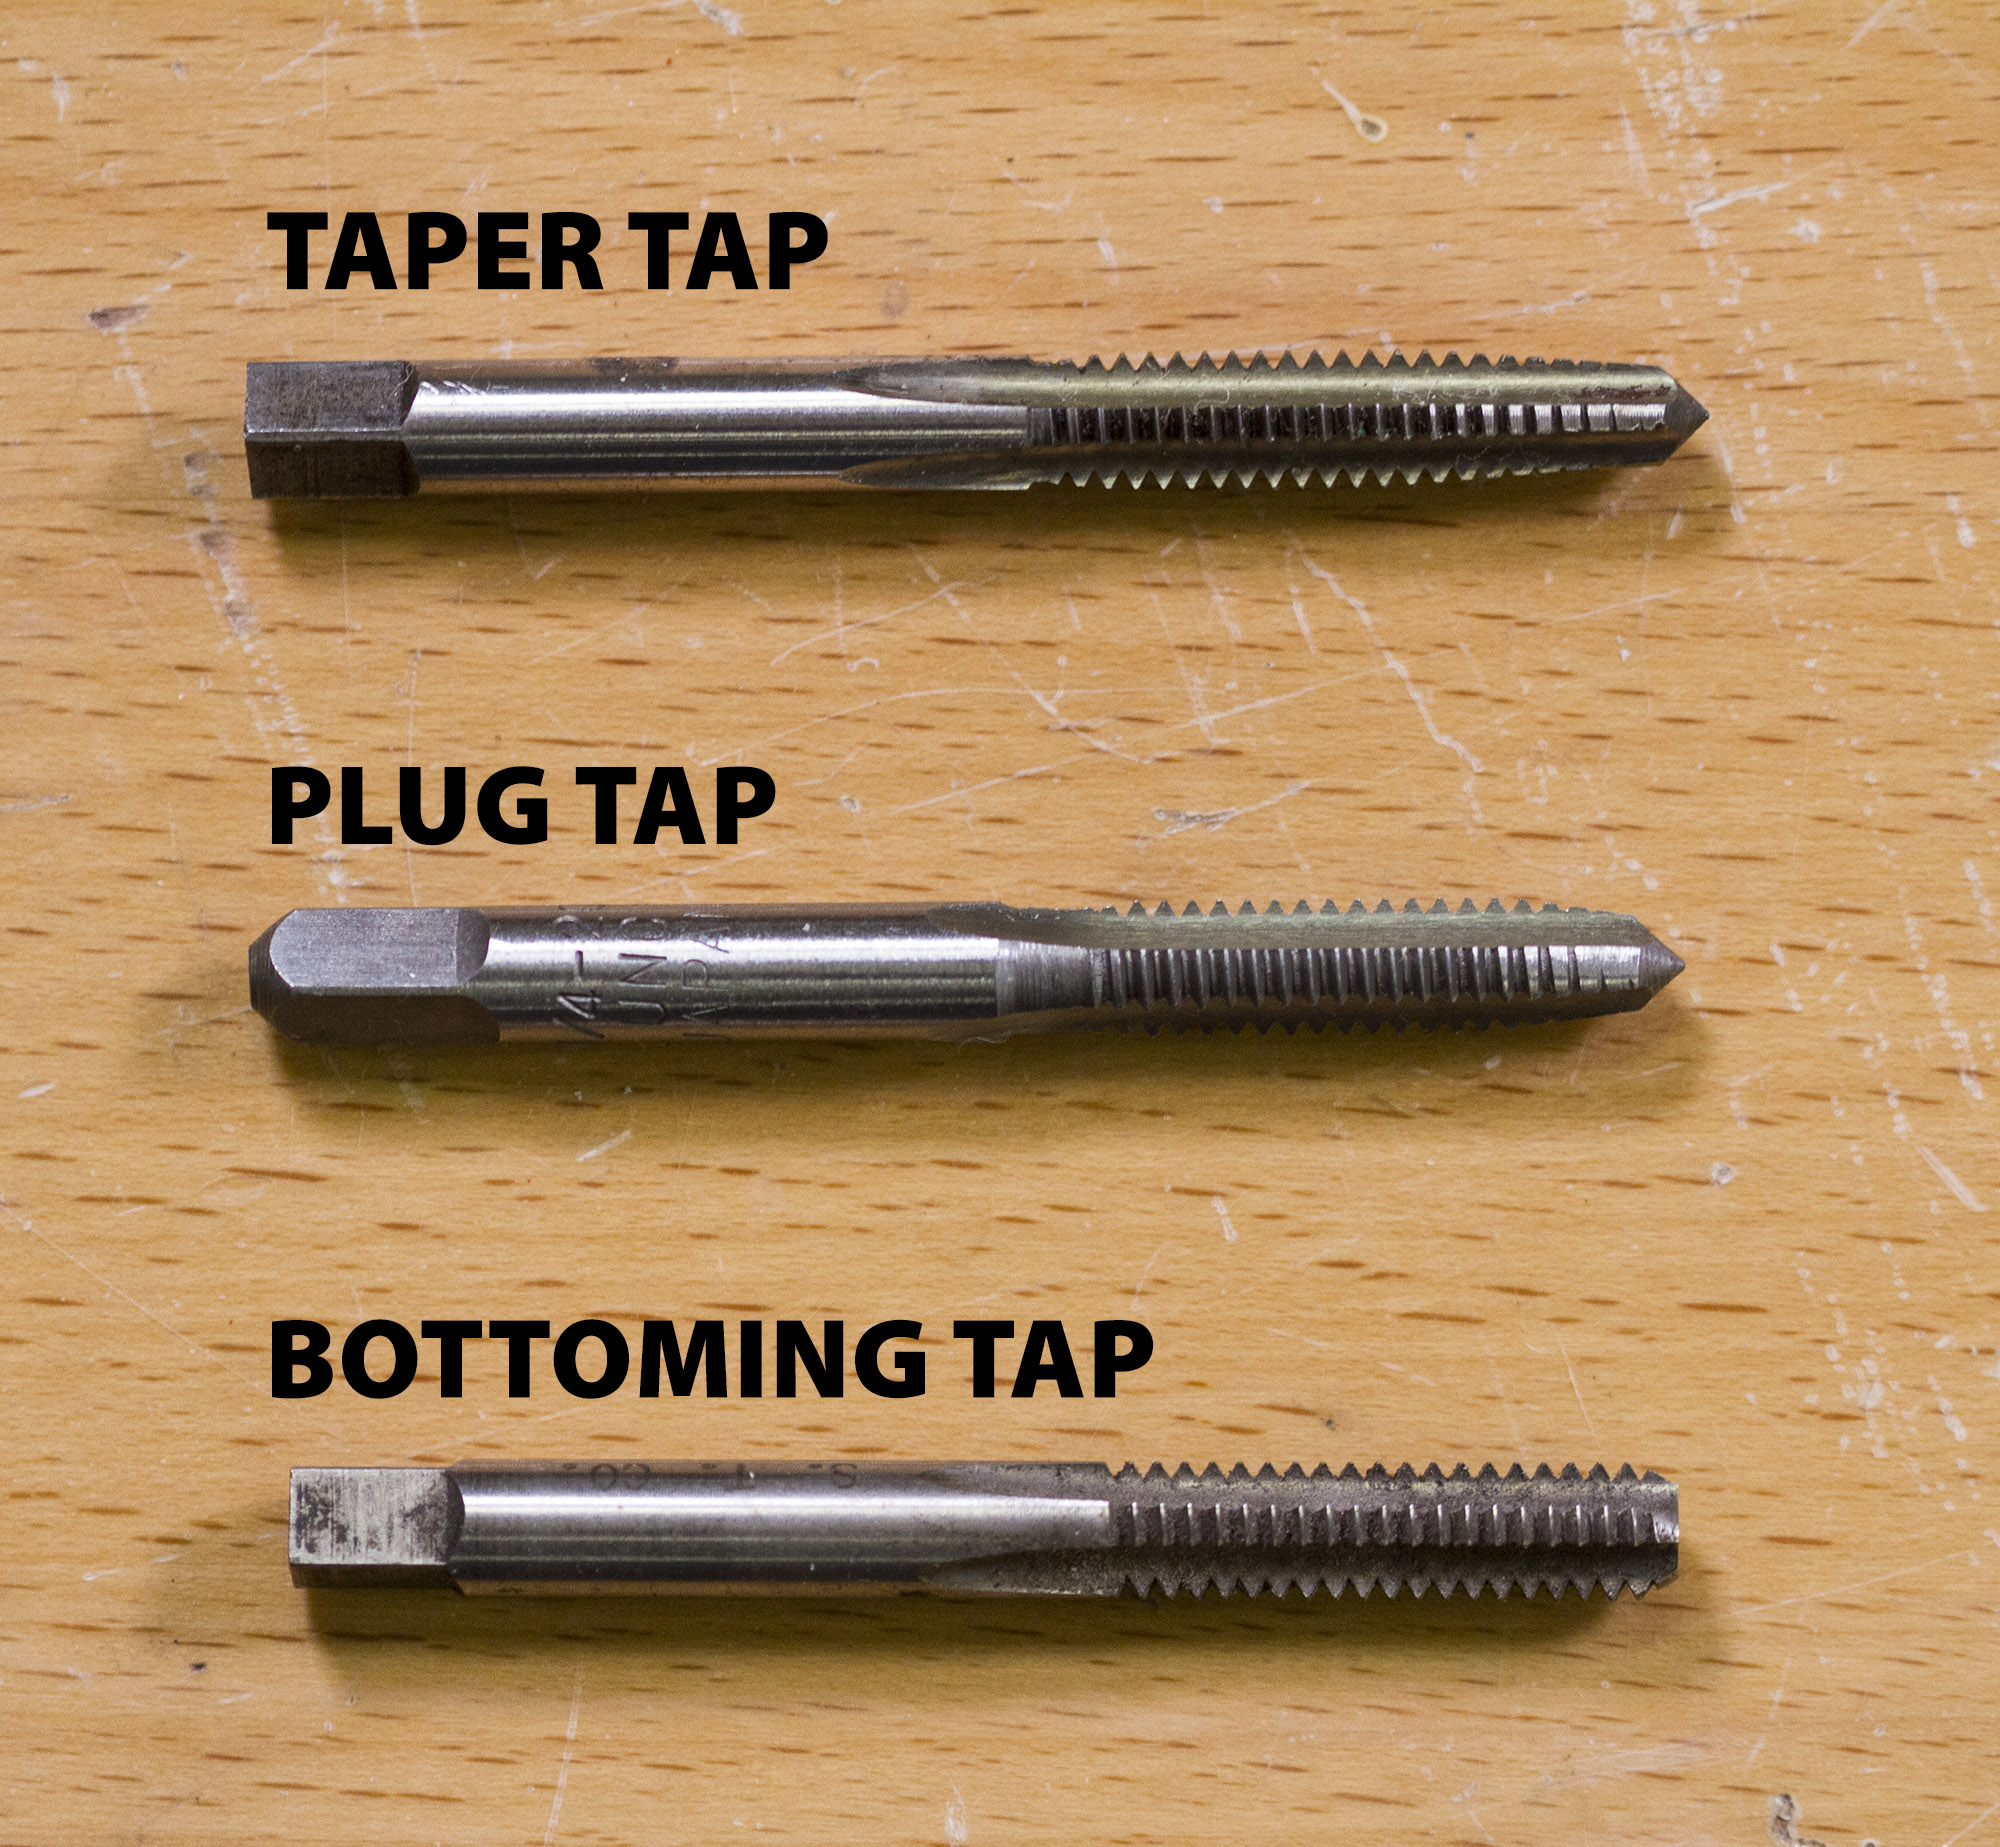 Types of Taps
There are three common types of hand taps: taper, plug, and bottoming. The difference between them refers to the number of chamfered threads on the tap before a full-width thread on the tap. Taper taps have from eight to ten chamfered threads, whereas Plug taps have three to five threads, and bottoming taps have only one to two threads.Taper and plug taps are most commonly used for tapping holes that go completely through the metal, and bottoming taps are used to tap �blind� holes that do not go all the way through. Plug taps are the most commonly found taps at local hardware stores and building supply centers.
What to Buy
Taps are expensive, and they are one place you should NEVER try to save a buck. Almost every car enthusiast is guilty of finding that great deal on a set of import taps, then dreading them every time a tap breaks. Here�s a few quick tips: Carbon steel taps are slightly harder than HSS (high-speed steel), although they are also more brittle and tend to dull faster. Buy high-quality USA-made taps. Most car enthusiasts should choose HSS or better. Depending on your budget, most classic car enthusiasts don�t need a full set of taps, but rather 1⁄4� to 9⁄16� in coarse and fine thread are the most common for automotive. When your taps become dull, throw them away; no good has ever come from a dull tap. I prefer taper taps over plug taps, as I can get more of the tap started in the hole and it�s easier to see that I am tapping straight into the hole.Drilling a Hole
To create proper threads in metal, you need to first drill the correct size hole in the metal. To determine the correct-size hole to drill into the metal, you can reference the drill and tap chart at the bottom of this web page. Another method to determine the approximate size of the drill bit is to use this calculation: Subtract 1/Pitch (threads per inch) from the major diameter. That�s the tap drill size. For example: 1 / 4 � 20: 1⁄4� = 0.250. 1/20= 0.050. 0.250-0.050=0.200. You need a drill bit that is about .200″ diameter. (In this case, either a #7 or a 13/64�, which is 0.203�, will work.) An additional example is: 3 / 8 � 16: 3 / 8 � 1⁄16= 5⁄16.Oftentimes when drilling and tapping holes on classic cars, we�re doing it in less-than-ideal circumstances, like on a car frame. But it is important to make every effort to drill the hole as squarely as possible. Often if we�ve drilled the hole crooked, we try to square it up with the tap, which results in reduced potential clamping load and holes that are bigger than the fastener. If you�re drilling and tapping smaller objects on the bench, ALWAYS secure them to the bench or use a vice.
Drill the hole into or through the metal or part while liberally applying cutting fluid to the drill bit�this will lubricate and cool the drill bit. Remember that slower RPM rates are better than faster ones. Too fast and you will damage the drill bit or maybe even your part. Next, chamfer the hole opening with a countersink. This reduces the stress on the tap and helps keep your tap starting straight. Nothing is worse for a tapped hole than starting the tap crooked. And often as not, you wobble around for a few turns. If the hole is started crooked, the hole itself will eventually try to straighten the threads. This causes more friction and increases the likelihood that the tap will break. When drilling the hole using a hand drill, always sight the drill bit from a couple different sides to get it as close to going in straight as possible.
Tapping a Hole
Select the tap that matches the size of the fastener you will be installing into the metal and secure the tap in the tee-handle tap wrench. Lubricate the tap with cutting/tapping fluid. Then place a bit of fluid on and in the hole to be tapped. Align the tap with the drilled hole and view from a couple different angles to ensure the tap is going in straight. Start threading the hole in the metal by turning the tee-handle tap wrench clockwise for a right-hand threads. Continue checking the tap to ensure it is straight with the hole. Reverse course regularly to break the swarf into manageable pieces and keep the hole clear of chips. As soon as you begin to feel resistance, back the tap out. Clearing the chips is especially important in thick material. Steel and brass form chips easily, so deep in these materials may require the tap to be backed completely out a time or two. Softer materials such as aluminum, on the other hand, can create longer swarf that must be sheared off the work piece, and may require as much as half a �back turn� for every forward turn of the tap in order to cut the pieces off short enough to be evacuated out of the hole through the flutes. During the backward action, it is often possible to hear or feel the cut piece breaking off the work piece. The smaller the tap, the more frequent reversals will be required. Ignoring this step can clog the flutes and bind the tap. Continuing forward often will break the tap.While the slow action of hand tapping does not produce enough heat to be concerned about, lubrication is still important. Depending on the materials, using commercial tapping oil, machine oil, ATF, even water, makes a huge difference in reducing friction and stress on the taps. Sulpherized cutting oil offered at many hardware stores for pipe threading works well for tapping fluid too. For aluminum, WD40, kerosene, or fuel oil works well for threading. Added slickness will prevent binding as the tap goes in and assist evacuation of chips along the flutes.
IMPORTANT: Make sure to keep any and all pressure on the tap to a minimum. You only want to press down when starting the tap. From that point forward, you want to make sure you are only turning the tap and not leaning it from side to side or pressing down. Some taps are hard and brittle to cut difficult metals. This means that they will snap very easily�especially smaller-diameter taps.
Bolt It Up
If the threaded fastener will not thread into the hole, look for debris or metal shavings in the hole and clean them out. It is almost never necessary to re-cut the threads unless your tap is the wrong size or extremely damaged.Tapping mounting holes is a great way to secure lines, brackets, and accessories on your classic car, and it speaks to the quality of the build. Whether they�re in the engine compartment or along the frame rail or even under the dash, a properly drilled and tapped hole is one of those details others will respect, especially when compared to the assortments of zip ties, safety wire, and even tape I�ve seen used on some cars. Take the time to do it right and you�ll never have to do it twice.
Download Your Drill and Tap Chart Guide Here:
Metric sizes Standard sizes
__________________
Keystone Motor Club (Founded 2012)... Free car show Every 3rd Saturday, newsletter is
https://www.tamparacing.com/forums/e...-car-club.html
Keystone picture gallery is here:
https://carstoshow.com/eventdetails.aspx?eventid=93202
Veterans and Friends on First Saturday...Some pictures....
https://carstoshow.com/registerevent...eventid=102331
Port Richey Rod Run at Coast Buick GMC
https://carstoshow.com/registerevent.aspx?eventid=99114
50's Diner US19.... A Florida Attraction.
1730 US-19, Holiday Fl 34691 click: https://www.tamparacing.com/forums/t...-racing.html CHRA sanctioned cruise-in.
Cruise-In; Free; Every Saturday 5-8PM plus 10% off the whole menu to cruisers
50's Diner pictures are here: https://carstoshow.com/eventdetails.aspx?eventid=93194
All Cars Every 2nd Saturday Free Breakfast: Since 2015 and more. click: https://www.tamparacing.com/forums/e...ast-tampa.html
Tampa Racing.com covers the Tampa car scene and supports many fund raisers, worthy causes and events that enrich our community. We hope you enjoy them all.
What do I do? ---- on-site *Aftermarket* spring/suspension installations --- on-site impact wrenching---street lowering with your own stock springs...........True Bi-xenon HID projector headlight conversions........ Much more at Bob's Garage!
https://www.tamparacing.com/forums/b...ontact-us.html
https://www.tamparacing.com/forums/b...e-senor-honda/
Keystone Motor Club (Founded 2012)... Free car show Every 3rd Saturday, newsletter is
https://www.tamparacing.com/forums/e...-car-club.html
Keystone picture gallery is here:
https://carstoshow.com/eventdetails.aspx?eventid=93202
Veterans and Friends on First Saturday...Some pictures....
https://carstoshow.com/registerevent...eventid=102331
Port Richey Rod Run at Coast Buick GMC
https://carstoshow.com/registerevent.aspx?eventid=99114
50's Diner US19.... A Florida Attraction.
1730 US-19, Holiday Fl 34691 click: https://www.tamparacing.com/forums/t...-racing.html CHRA sanctioned cruise-in.
Cruise-In; Free; Every Saturday 5-8PM plus 10% off the whole menu to cruisers
50's Diner pictures are here: https://carstoshow.com/eventdetails.aspx?eventid=93194
All Cars Every 2nd Saturday Free Breakfast: Since 2015 and more. click: https://www.tamparacing.com/forums/e...ast-tampa.html
Tampa Racing.com covers the Tampa car scene and supports many fund raisers, worthy causes and events that enrich our community. We hope you enjoy them all.
What do I do? ---- on-site *Aftermarket* spring/suspension installations --- on-site impact wrenching---street lowering with your own stock springs...........True Bi-xenon HID projector headlight conversions........ Much more at Bob's Garage!
https://www.tamparacing.com/forums/b...ontact-us.html
https://www.tamparacing.com/forums/b...e-senor-honda/
Registered
Thread Starter
Carburetor Tuning Tips
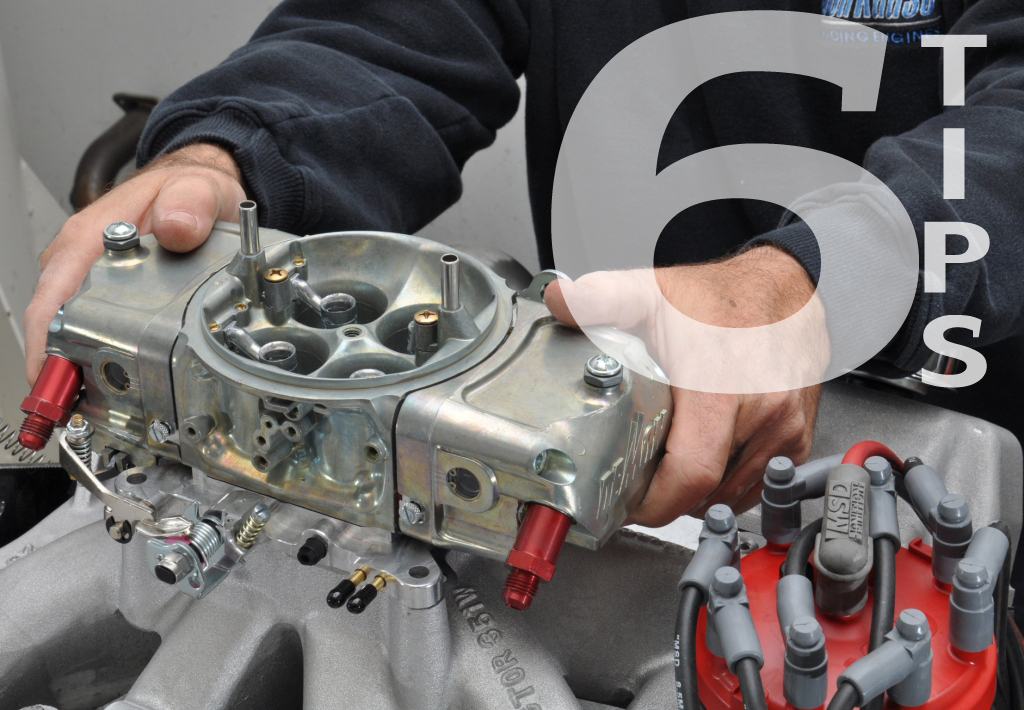
1.) How do I select the right size of carburetor?
Carburetor performance is largely based on the air speed traveling through its venturis. If they are too big, the air speed will be reduced; too small and vice versa. Probably the best instruction on carburetor choice is found in the Demon Carburetor Selection guide. It is based on camshaft duration at 0.050in of valve lift, the type of intake manifold (dual plane or single plane), and the type of transmission (manual or automatic) and stall speed. Beyond this, it is always best to discuss carburetor selection with a qualified technician.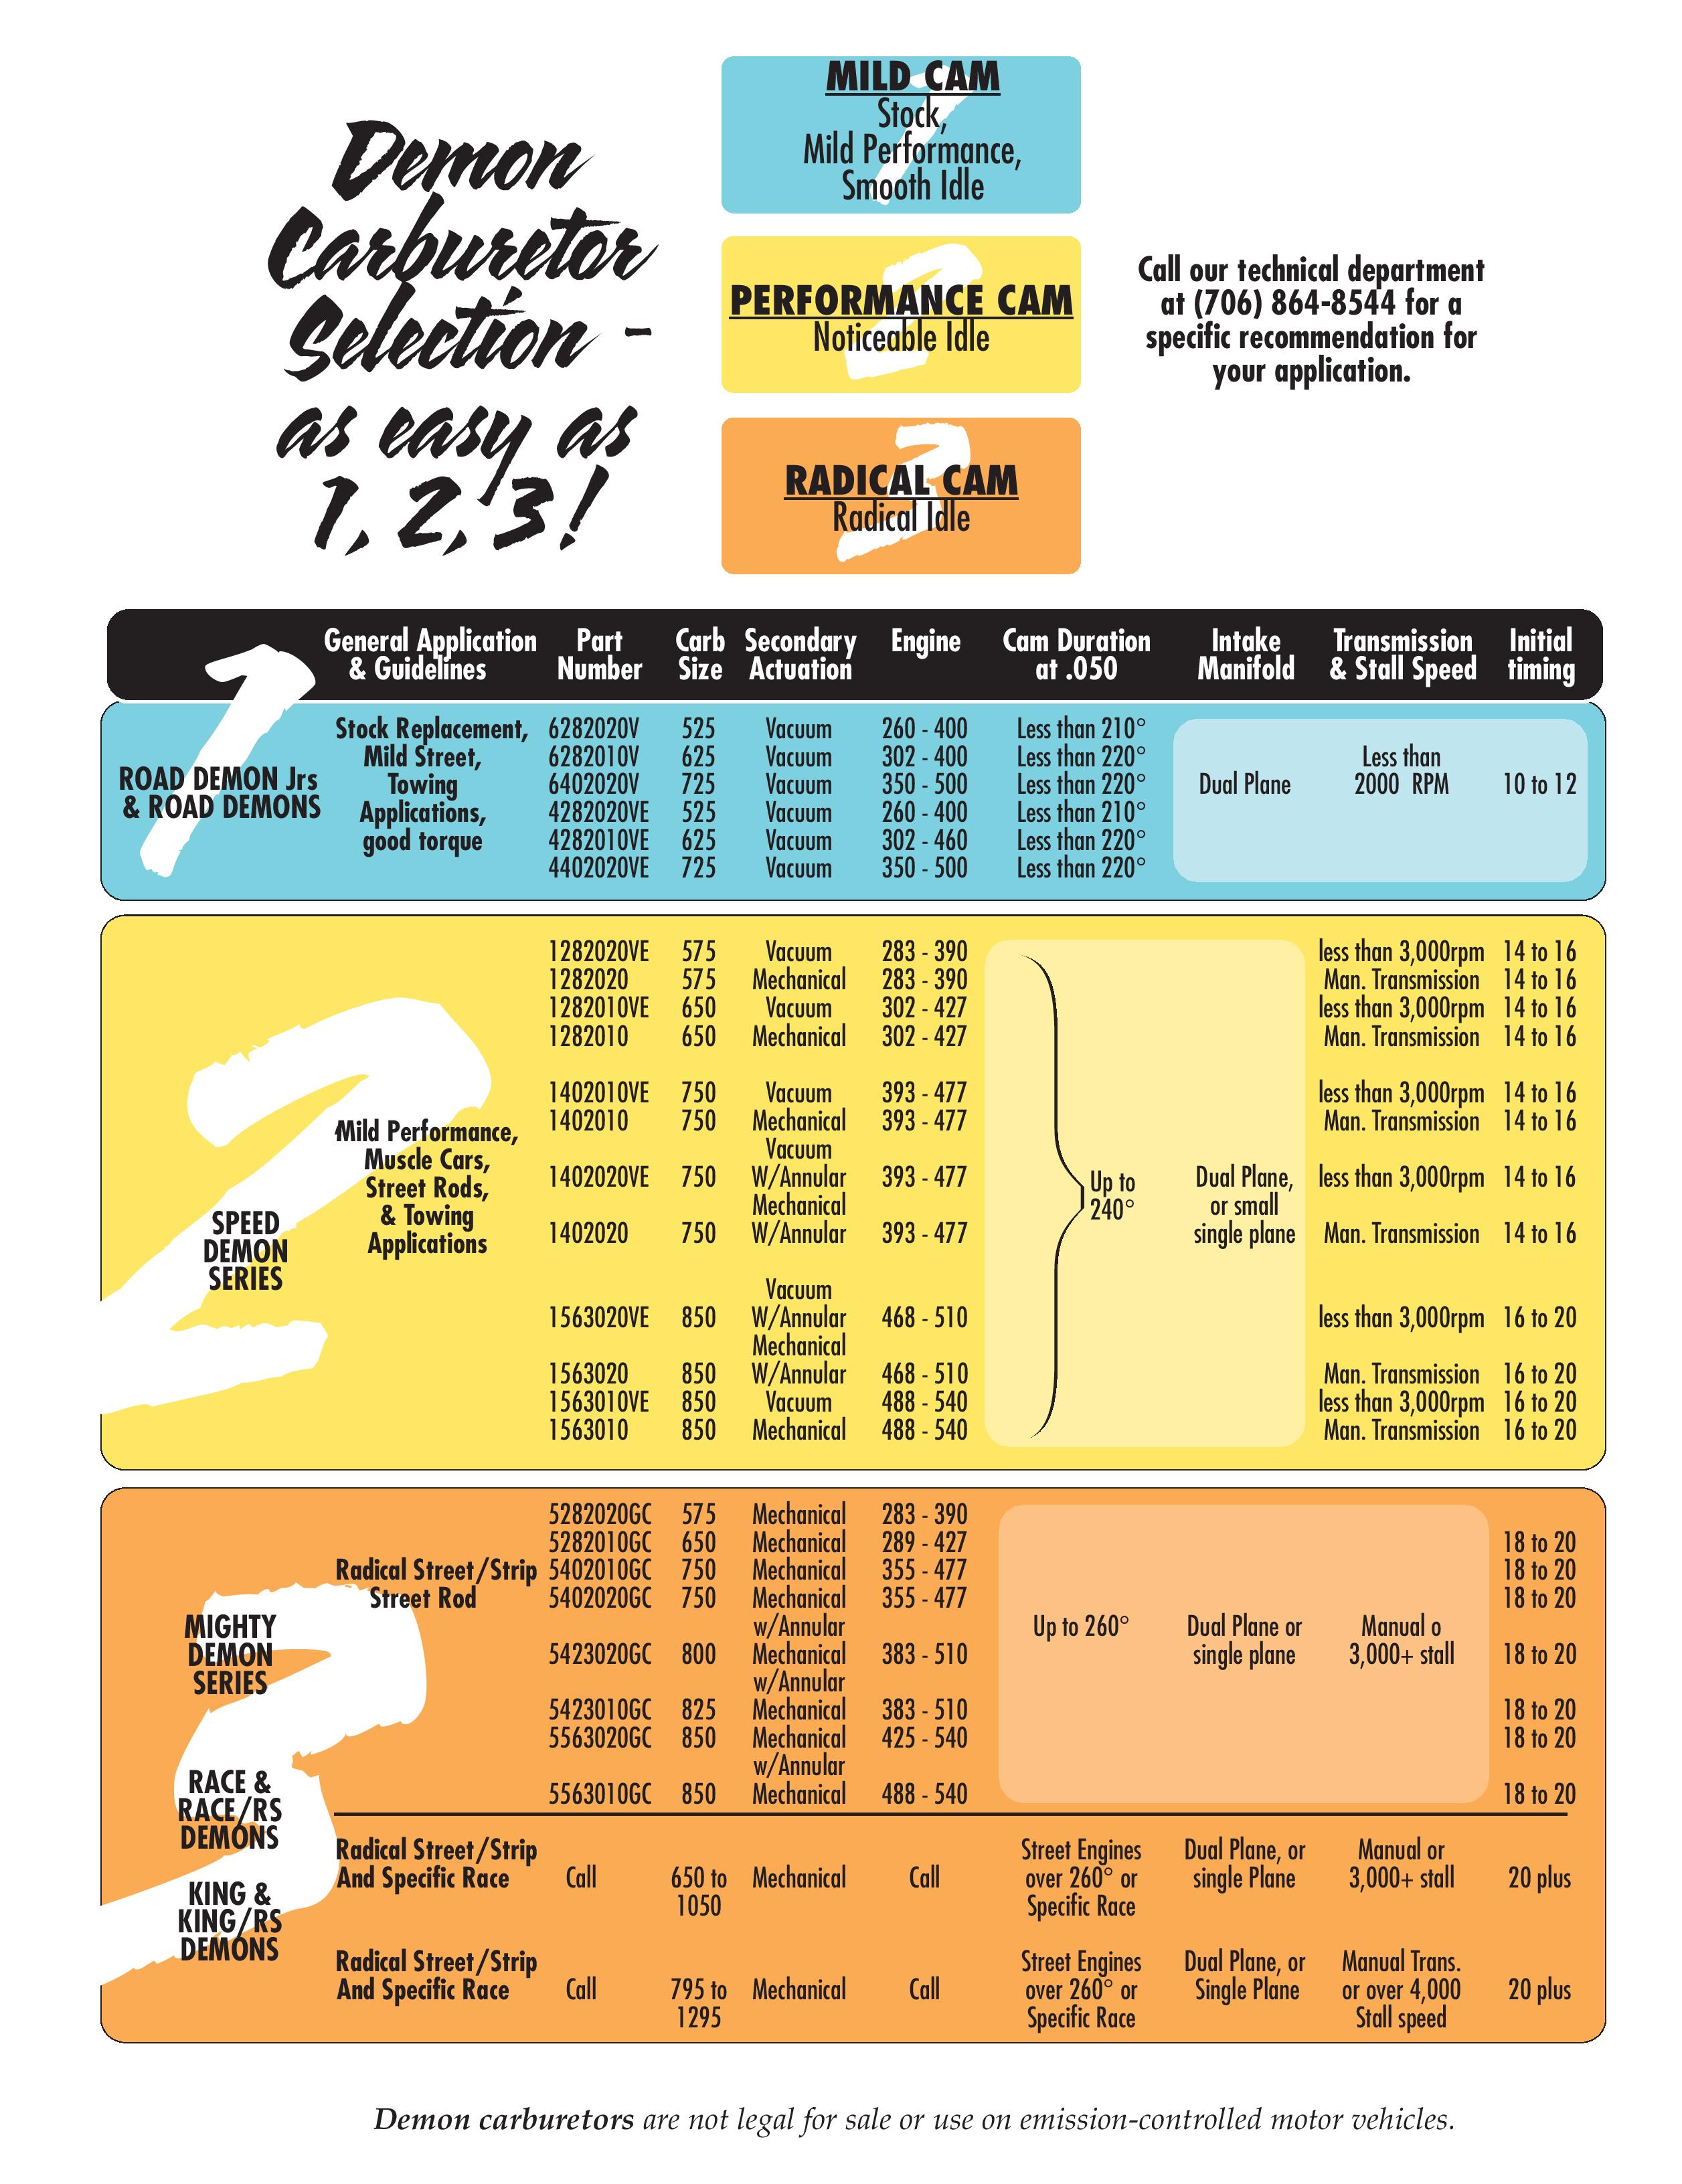
2.) What is one of the most commonly overlooked carburetor-tuning issues?
One of the greatest obstacles faced by amateur carburetor tuners is failing to understand the essentials of initial ignition timing. Ignition timing is affected by a host of elements including fuel type, mixture strength, combustion chamber shape, compression ratio, temperature, and humidity. Bigger camshafts and larger cylinder heads with matched intake manifolds require increased ignition timing to promote better air velocity and maintain efficiency.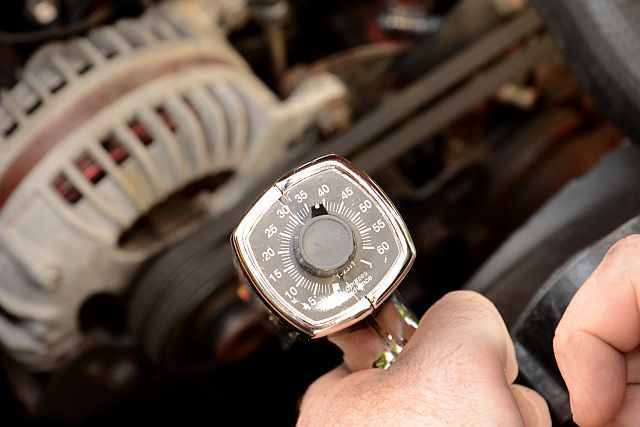 Thus the carburetor is helpless in its plight if the initial timing is late or the timing advance curve is slow. These two potential timing impediments frequently exhibit poorer starting and drivability troubles. The ignition is always timed to fire the spark plug before the piston reaches Top Dead Center (TDC) in the cylinder. Firing before TDC is necessary because of the time it takes for the flame front to ignite the air-fuel mixture in the cylinder. Demon�s carburetor selection guide consists of helpful recommendations on ignition timing settings with consideration to things such as camshaft duration, valve lift, and other contributing factors to assist in the timing process.
When carburetor or drivability complications occur under 3,000 rpms, improper timing is usually contributing to issues such as rich idle, hesitation, or dying when switching gears and stopping.
3.) What carburetor tuning myths do tuners frequently fall victim to?
In carburetor mythology, probably the most misleading dogma involves changing jets in order to cure a rich idle setting. Carburetor main jets are tuned solely to achieve one thing: the best performance at fully open throttle. Jets should never be changed to correct an idle impediment. Instead, the idle circuit should be adjusted and the initial ignition timing re-checked. Setting the idle mixture to the highest vacuum can be achieved by using a vacuum gauge connected to the constant-vacuum port of the carburetor base plate. Slowly adjust the first idle-mixture screw. Make one adjustment only to the first screw. The adjustment should be no more than an eighth- or quarter-turn. Then leave sufficient time for the carburetor to respond and move to the next adjuster screw. Gradually work your way around the carburetor, making just one small, slow adjustment to each screw. Sloppy idle-speed adjustment is the carburetor�s number-one tuning problem. It causes the transfer slot to be overexposed and creates mayhem.
__________________
Keystone Motor Club (Founded 2012)... Free car show Every 3rd Saturday, newsletter is
https://www.tamparacing.com/forums/e...-car-club.html
Keystone picture gallery is here:
https://carstoshow.com/eventdetails.aspx?eventid=93202
Veterans and Friends on First Saturday...Some pictures....
https://carstoshow.com/registerevent...eventid=102331
Port Richey Rod Run at Coast Buick GMC
https://carstoshow.com/registerevent.aspx?eventid=99114
50's Diner US19.... A Florida Attraction.
1730 US-19, Holiday Fl 34691 click: https://www.tamparacing.com/forums/t...-racing.html CHRA sanctioned cruise-in.
Cruise-In; Free; Every Saturday 5-8PM plus 10% off the whole menu to cruisers
50's Diner pictures are here: https://carstoshow.com/eventdetails.aspx?eventid=93194
All Cars Every 2nd Saturday Free Breakfast: Since 2015 and more. click: https://www.tamparacing.com/forums/e...ast-tampa.html
Tampa Racing.com covers the Tampa car scene and supports many fund raisers, worthy causes and events that enrich our community. We hope you enjoy them all.
What do I do? ---- on-site *Aftermarket* spring/suspension installations --- on-site impact wrenching---street lowering with your own stock springs...........True Bi-xenon HID projector headlight conversions........ Much more at Bob's Garage!
https://www.tamparacing.com/forums/b...ontact-us.html
https://www.tamparacing.com/forums/b...e-senor-honda/
Keystone Motor Club (Founded 2012)... Free car show Every 3rd Saturday, newsletter is
https://www.tamparacing.com/forums/e...-car-club.html
Keystone picture gallery is here:
https://carstoshow.com/eventdetails.aspx?eventid=93202
Veterans and Friends on First Saturday...Some pictures....
https://carstoshow.com/registerevent...eventid=102331
Port Richey Rod Run at Coast Buick GMC
https://carstoshow.com/registerevent.aspx?eventid=99114
50's Diner US19.... A Florida Attraction.
1730 US-19, Holiday Fl 34691 click: https://www.tamparacing.com/forums/t...-racing.html CHRA sanctioned cruise-in.
Cruise-In; Free; Every Saturday 5-8PM plus 10% off the whole menu to cruisers
50's Diner pictures are here: https://carstoshow.com/eventdetails.aspx?eventid=93194
All Cars Every 2nd Saturday Free Breakfast: Since 2015 and more. click: https://www.tamparacing.com/forums/e...ast-tampa.html
Tampa Racing.com covers the Tampa car scene and supports many fund raisers, worthy causes and events that enrich our community. We hope you enjoy them all.
What do I do? ---- on-site *Aftermarket* spring/suspension installations --- on-site impact wrenching---street lowering with your own stock springs...........True Bi-xenon HID projector headlight conversions........ Much more at Bob's Garage!
https://www.tamparacing.com/forums/b...ontact-us.html
https://www.tamparacing.com/forums/b...e-senor-honda/
Registered
Thread Starter
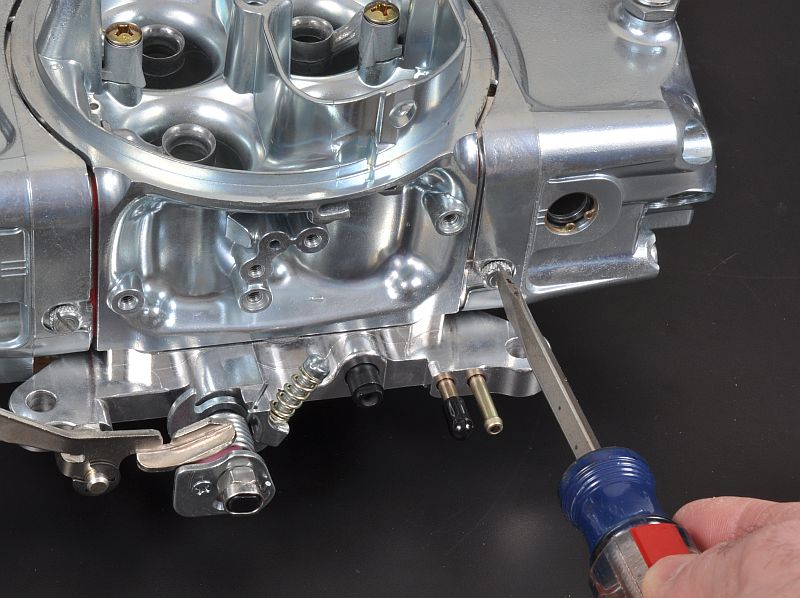
Setting the idle mixture to the highest vacuum can be achieved using a vacuum gauge connected to the constant-vacuum port of the carburetor base plate to adjust each idle-mixture screw to its highest value. Keep moving around the carburetor, adjusting each screw an eighth- to a quarter-turn and waiting for the carburetor to respond.
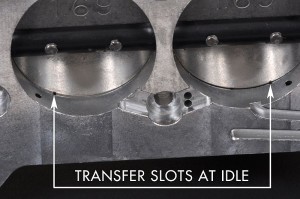 Overexposure of the transfer slot at idle and insufficient initial ignition timing are the two chief causes of carburetor troubles. In the idle condition, the transfer slots should give the appearance of a small square when viewed from underneath the base plate, and ignition timing should be double-checked prior to any carburetor adjustments.
4.) Clogged jets or sloppy idle mixtures are often accused for hesitation or flooding under driving conditions, or starting and idling issues, but are there other things that could contribute to these issues?
Float adjustments are often a disregarded step of carburetor tuning, even though hesitation or an excess of black smoke from the exhaust could be the result of an improperly adjusted float level. After the idle mixture and ignition timing have been properly set, it is time to check the float levels.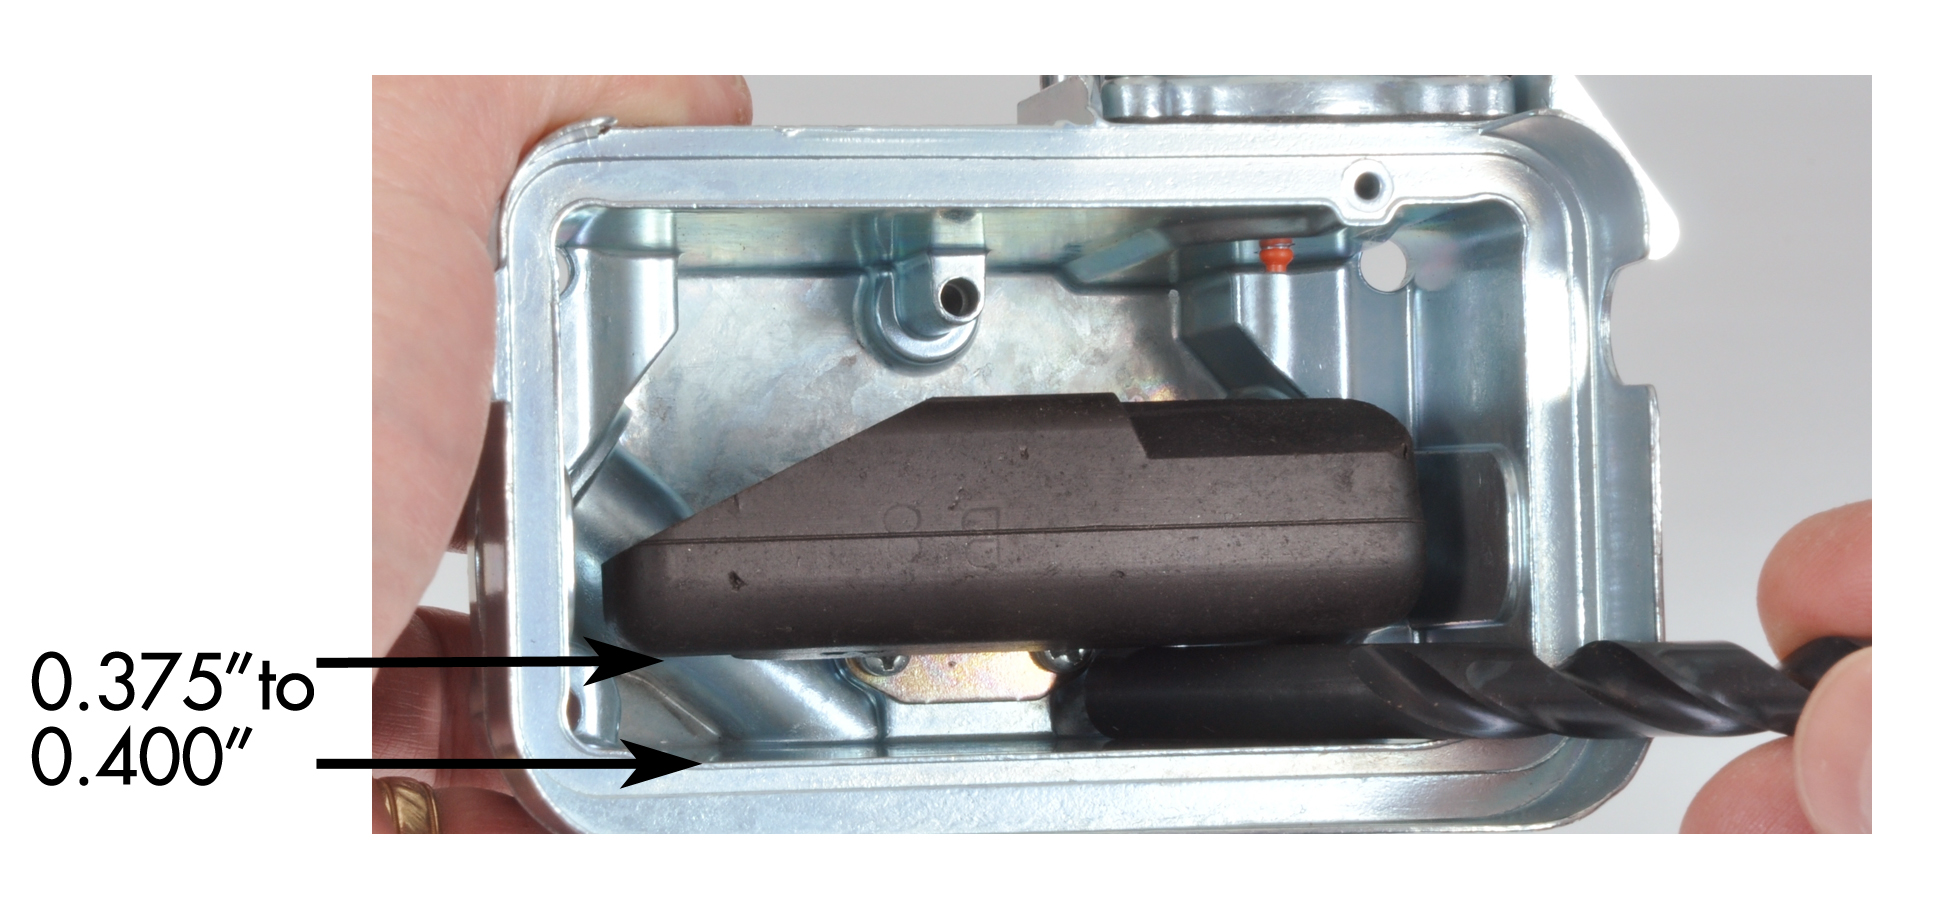 With the motor running, the fuel level should be in the middle of the glass window of the fuel bowl. If it isn�t, loosen the lock screw on top of the bowl and adjust the nut clockwise to lower the float level and counter-clockwise to raise the float level. Make the adjustment by one flat of the nut at a time and wait until the carburetor has had a chance to respond. The �dry setting� is accomplished by removing the fuel bowl, and with it turned upside-down, setting the dimension between the inside top of the bowl and the top of the float at approximately 0.375 in. to 0.0400 in.Float levels are often too high; they should be placed in the middle of the fuel bowl sight glass. The initial float setting when the carburetor is being assembled at the Demon factory (the dry setting) is accomplished by removing the fuel bowl and, with it turned upside-down, setting the dimension between the inside top of the bowl and the top of the float is set at approximately 0.375 in. to 0.0400 in
5.) What are the rules for mounting a fuel pressure regulator?
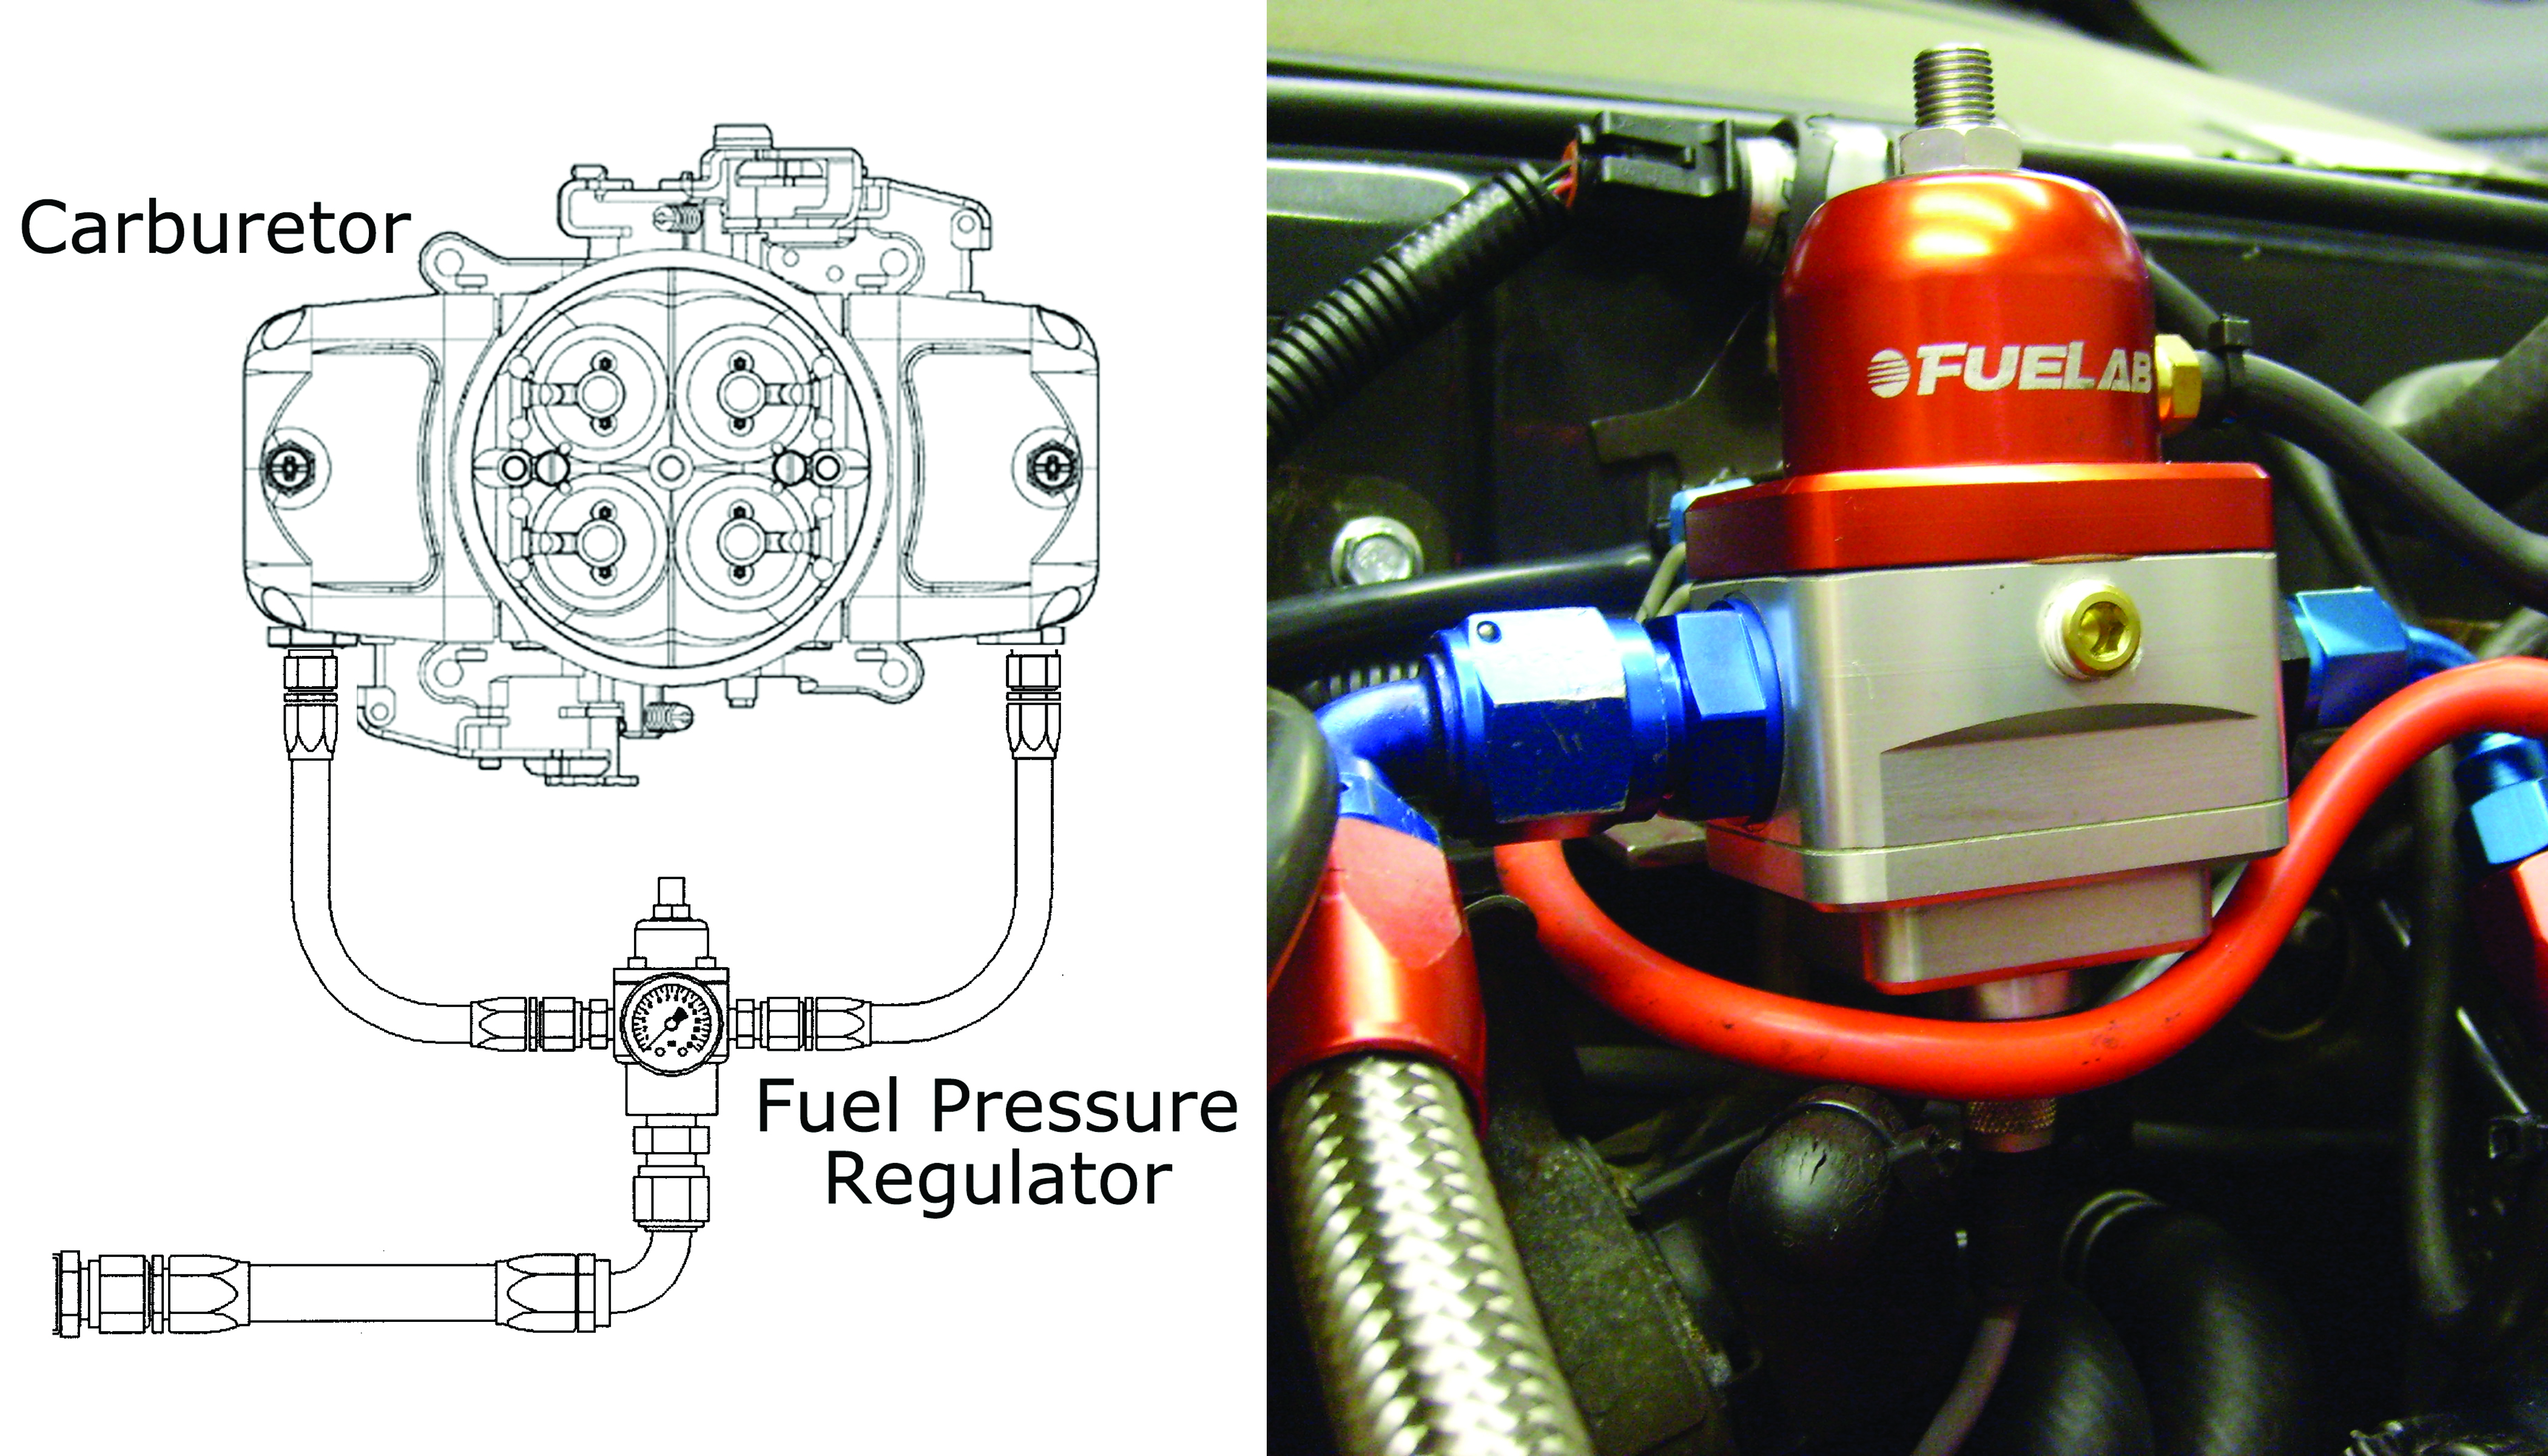 Avoid mounting the fuel pressure regulator on a bulkhead or inner fender well. Instead, position it close to the carburetor. As demonstrated by any data acquisition system, the further distance the fuel pressure regulator is mounted from the carburetor, the slower its reaction time.
6.) After carburetor tuning, what final steps should be made before hitting the road?
Always start the engine and check for leaks before closing the hood. Better to repair a leaking fuel line fitting or a malfunctioning float level than to witness the paint being burned off an immaculate hood.
__________________
Keystone Motor Club (Founded 2012)... Free car show Every 3rd Saturday, newsletter is
https://www.tamparacing.com/forums/e...-car-club.html
Keystone picture gallery is here:
https://carstoshow.com/eventdetails.aspx?eventid=93202
Veterans and Friends on First Saturday...Some pictures....
https://carstoshow.com/registerevent...eventid=102331
Port Richey Rod Run at Coast Buick GMC
https://carstoshow.com/registerevent.aspx?eventid=99114
50's Diner US19.... A Florida Attraction.
1730 US-19, Holiday Fl 34691 click: https://www.tamparacing.com/forums/t...-racing.html CHRA sanctioned cruise-in.
Cruise-In; Free; Every Saturday 5-8PM plus 10% off the whole menu to cruisers
50's Diner pictures are here: https://carstoshow.com/eventdetails.aspx?eventid=93194
All Cars Every 2nd Saturday Free Breakfast: Since 2015 and more. click: https://www.tamparacing.com/forums/e...ast-tampa.html
Tampa Racing.com covers the Tampa car scene and supports many fund raisers, worthy causes and events that enrich our community. We hope you enjoy them all.
What do I do? ---- on-site *Aftermarket* spring/suspension installations --- on-site impact wrenching---street lowering with your own stock springs...........True Bi-xenon HID projector headlight conversions........ Much more at Bob's Garage!
https://www.tamparacing.com/forums/b...ontact-us.html
https://www.tamparacing.com/forums/b...e-senor-honda/
Keystone Motor Club (Founded 2012)... Free car show Every 3rd Saturday, newsletter is
https://www.tamparacing.com/forums/e...-car-club.html
Keystone picture gallery is here:
https://carstoshow.com/eventdetails.aspx?eventid=93202
Veterans and Friends on First Saturday...Some pictures....
https://carstoshow.com/registerevent...eventid=102331
Port Richey Rod Run at Coast Buick GMC
https://carstoshow.com/registerevent.aspx?eventid=99114
50's Diner US19.... A Florida Attraction.
1730 US-19, Holiday Fl 34691 click: https://www.tamparacing.com/forums/t...-racing.html CHRA sanctioned cruise-in.
Cruise-In; Free; Every Saturday 5-8PM plus 10% off the whole menu to cruisers
50's Diner pictures are here: https://carstoshow.com/eventdetails.aspx?eventid=93194
All Cars Every 2nd Saturday Free Breakfast: Since 2015 and more. click: https://www.tamparacing.com/forums/e...ast-tampa.html
Tampa Racing.com covers the Tampa car scene and supports many fund raisers, worthy causes and events that enrich our community. We hope you enjoy them all.
What do I do? ---- on-site *Aftermarket* spring/suspension installations --- on-site impact wrenching---street lowering with your own stock springs...........True Bi-xenon HID projector headlight conversions........ Much more at Bob's Garage!
https://www.tamparacing.com/forums/b...ontact-us.html
https://www.tamparacing.com/forums/b...e-senor-honda/
Registered
Thread Starter
Port Richey Fall Rod Run #4
Event Details

- Start: Sunday October 13, 2024 10:00 am
- End: Sunday October 13, 2024 2:00 pm
- Venue: Coast Buick GMC
- Address: 10133 US-19, Port Richey, Florida
- Categories: Sunday, West Coast of Florida
- Registration Fee: Free
- Phone: (813) 839-4281 Bob
- Email: Bobfixesitup@yahoo.com
- Website: https://www.tamparacing.com/forums/e...r-club-16.html
- Facebook Page: https://carstoshow.com/EventDetails.aspx?eventid=99114
Roll in together to park together. Gates open at 9am for those who want a spot under the shade trees or circus tents.
Show cars may Email pre-register with Bobfixesitup@yahoo.com for confirmation numbers at no cost and have an express line 30 second check-in at left side of table.
Send 1. Name, 2. Car year, 3. Type car... and we do the rest. NO COST TO ENTER SHOW
Car show entrance is through the big gate to the north of the showroom. Spectators free entrance is south of the main building at Graphic Drive Collision Center.
Additional Show Car OVERFLOW PARKING is behind the Northern-Most building.
__________________
Keystone Motor Club (Founded 2012)... Free car show Every 3rd Saturday, newsletter is
https://www.tamparacing.com/forums/e...-car-club.html
Keystone picture gallery is here:
https://carstoshow.com/eventdetails.aspx?eventid=93202
Veterans and Friends on First Saturday...Some pictures....
https://carstoshow.com/registerevent...eventid=102331
Port Richey Rod Run at Coast Buick GMC
https://carstoshow.com/registerevent.aspx?eventid=99114
50's Diner US19.... A Florida Attraction.
1730 US-19, Holiday Fl 34691 click: https://www.tamparacing.com/forums/t...-racing.html CHRA sanctioned cruise-in.
Cruise-In; Free; Every Saturday 5-8PM plus 10% off the whole menu to cruisers
50's Diner pictures are here: https://carstoshow.com/eventdetails.aspx?eventid=93194
All Cars Every 2nd Saturday Free Breakfast: Since 2015 and more. click: https://www.tamparacing.com/forums/e...ast-tampa.html
Tampa Racing.com covers the Tampa car scene and supports many fund raisers, worthy causes and events that enrich our community. We hope you enjoy them all.
What do I do? ---- on-site *Aftermarket* spring/suspension installations --- on-site impact wrenching---street lowering with your own stock springs...........True Bi-xenon HID projector headlight conversions........ Much more at Bob's Garage!
https://www.tamparacing.com/forums/b...ontact-us.html
https://www.tamparacing.com/forums/b...e-senor-honda/
Keystone Motor Club (Founded 2012)... Free car show Every 3rd Saturday, newsletter is
https://www.tamparacing.com/forums/e...-car-club.html
Keystone picture gallery is here:
https://carstoshow.com/eventdetails.aspx?eventid=93202
Veterans and Friends on First Saturday...Some pictures....
https://carstoshow.com/registerevent...eventid=102331
Port Richey Rod Run at Coast Buick GMC
https://carstoshow.com/registerevent.aspx?eventid=99114
50's Diner US19.... A Florida Attraction.
1730 US-19, Holiday Fl 34691 click: https://www.tamparacing.com/forums/t...-racing.html CHRA sanctioned cruise-in.
Cruise-In; Free; Every Saturday 5-8PM plus 10% off the whole menu to cruisers
50's Diner pictures are here: https://carstoshow.com/eventdetails.aspx?eventid=93194
All Cars Every 2nd Saturday Free Breakfast: Since 2015 and more. click: https://www.tamparacing.com/forums/e...ast-tampa.html
Tampa Racing.com covers the Tampa car scene and supports many fund raisers, worthy causes and events that enrich our community. We hope you enjoy them all.
What do I do? ---- on-site *Aftermarket* spring/suspension installations --- on-site impact wrenching---street lowering with your own stock springs...........True Bi-xenon HID projector headlight conversions........ Much more at Bob's Garage!
https://www.tamparacing.com/forums/b...ontact-us.html
https://www.tamparacing.com/forums/b...e-senor-honda/
Last edited by senor honda; 07-17-2024 at 08:57 AM.
Registered
Thread Starter
How to upgrade a classic car to a modern alternator
 By Carl Heideman
Jul 10, 2024 | Restoration, alternator | Posted in Shop Work , Restoration & Renovation | From the March 2016 issue | Never miss an article
Alternator changes and upgrades are among the most common underbonnet modifications performed on British cars. We�ve seen hundreds of these swaps performed through the years. While some are appropriate and effective, we�ve witnessed�and fixed�too many that have ultimately caused some sort of expensive problem: an electrical meltdown, a spinning part thrown from the car, or maybe just something sticking itself into the radiator.
Bottom line: We think most alternator conversions are a waste of time. In fact, they�re often dangerous.
We know, them�s fightin� words. Everyone wants a reliable alternator, and those Lucas contraptions don�t seem to hold up or generate enough current. To put it simply, they just aren�t the kind of outdated technology we want to see when we raise our hoods. However, anyone who took debate�or made fun of the debate kids�in high school knows that you can�t come out with fightin� words without backing them up. So, allow us to state our case.
It�s clear that many modern alternators put out more current than their old Lucas counterparts. You could also argue that the newer units hold up longer. However, the alternator itself isn�t the problem in most alternator swaps; it�s the wiring and the mounting that get people every time, making smoke and nasty sounds almost inevitable.
Think about this: If you install a modern, 80-amp alternator and use the stock wiring that was designed for a 36-amp alternator, what�s the inevitable outcome? Many people reason that if the accessories will still require the same amount of current from the new alternator as they did from the original, then it�s safe to use the stock wiring.
This logic fails to take two words into account: current potential. If a component ever fails or a dead short accidentally occurs, something will attempt to draw the full current capacity of the new alternator. What does this mean for a big portion of the wiring harness? Melting, smoking and burning.
Here�s something else to consider: Slapping on that alternator with some hardware store bolts and getting the alignment �pretty close� will work for a while. Eventually, however, something�s going to break, let loose or fly off, and that alternator will be flopping around, waiting to short out or preparing to hit something.
__________________
Keystone Motor Club (Founded 2012)... Free car show Every 3rd Saturday, newsletter is
https://www.tamparacing.com/forums/e...-car-club.html
Keystone picture gallery is here:
https://carstoshow.com/eventdetails.aspx?eventid=93202
Veterans and Friends on First Saturday...Some pictures....
https://carstoshow.com/registerevent...eventid=102331
Port Richey Rod Run at Coast Buick GMC
https://carstoshow.com/registerevent.aspx?eventid=99114
50's Diner US19.... A Florida Attraction.
1730 US-19, Holiday Fl 34691 click: https://www.tamparacing.com/forums/t...-racing.html CHRA sanctioned cruise-in.
Cruise-In; Free; Every Saturday 5-8PM plus 10% off the whole menu to cruisers
50's Diner pictures are here: https://carstoshow.com/eventdetails.aspx?eventid=93194
All Cars Every 2nd Saturday Free Breakfast: Since 2015 and more. click: https://www.tamparacing.com/forums/e...ast-tampa.html
Tampa Racing.com covers the Tampa car scene and supports many fund raisers, worthy causes and events that enrich our community. We hope you enjoy them all.
What do I do? ---- on-site *Aftermarket* spring/suspension installations --- on-site impact wrenching---street lowering with your own stock springs...........True Bi-xenon HID projector headlight conversions........ Much more at Bob's Garage!
https://www.tamparacing.com/forums/b...ontact-us.html
https://www.tamparacing.com/forums/b...e-senor-honda/
Keystone Motor Club (Founded 2012)... Free car show Every 3rd Saturday, newsletter is
https://www.tamparacing.com/forums/e...-car-club.html
Keystone picture gallery is here:
https://carstoshow.com/eventdetails.aspx?eventid=93202
Veterans and Friends on First Saturday...Some pictures....
https://carstoshow.com/registerevent...eventid=102331
Port Richey Rod Run at Coast Buick GMC
https://carstoshow.com/registerevent.aspx?eventid=99114
50's Diner US19.... A Florida Attraction.
1730 US-19, Holiday Fl 34691 click: https://www.tamparacing.com/forums/t...-racing.html CHRA sanctioned cruise-in.
Cruise-In; Free; Every Saturday 5-8PM plus 10% off the whole menu to cruisers
50's Diner pictures are here: https://carstoshow.com/eventdetails.aspx?eventid=93194
All Cars Every 2nd Saturday Free Breakfast: Since 2015 and more. click: https://www.tamparacing.com/forums/e...ast-tampa.html
Tampa Racing.com covers the Tampa car scene and supports many fund raisers, worthy causes and events that enrich our community. We hope you enjoy them all.
What do I do? ---- on-site *Aftermarket* spring/suspension installations --- on-site impact wrenching---street lowering with your own stock springs...........True Bi-xenon HID projector headlight conversions........ Much more at Bob's Garage!
https://www.tamparacing.com/forums/b...ontact-us.html
https://www.tamparacing.com/forums/b...e-senor-honda/
Registered
Thread Starter
Now that we�ve laid out our case and made our point, let�s set things right and talk about the correct way to upgrade to a modern alternator. A good conversion consists of three important elements:
From left to right: A Lucas Generator, a Lucas 16ACR 32-amp alternator, and a modern Denso 55-amp alternator
Some alternator conversions make more sense than others. For example, some of the early alternators with external regulators aren�t available anymore, so your only choice is to convert to something else.
Swapping a generator for an alternator is another advantageous move. Many generators can barely keep up with the charging demands of the headlights and starter, so they probably won�t cut it if you�ve added a stereo or a big ignition system. Most generators also use bushings instead of bearings; an alternator with a bearing-equipped rotating mass is a better option.
When it comes to generators and outdated alternators, we feel that it�s usually best to do what the factory eventually did: Upgrade to a good alternator.
If you have an MGA or early MGB, install the factory alternator from a later MGB. For a Triumph TR or a Jaguar E-type, do the same thing: Look toward a later model for a solution. You can source the stock mounting hardware and alternator instead of engineering them yourself, saving a good deal of time and effort. You�ll still have to modify the wiring, but having two out of three jobs done up front ain�t bad.
If you want more output than an OEM alternator, then it�s time to do some careful shopping. Many people use mid- to late-1970s GM alternators because they�re common, inexpensive and rather durable. Late-1970s Bosch alternators show up quite often, too�especially on MGBs, since the conversion is nearly a bolt-in proposition.
For our money, however, we would pick a compact Japanese alternator and do things right. While it�s a bit hard to find quality data and specifications on alternators, we try to match the unit to our particular application.
First, we find an alternator that will physically fit; usually, the more compact it is, the better. Then we consider the pulleys; while many modern alternators feature pulleys for multi-groove serpentine belts, we want one that has�or can at least accept�a pulley that uses a conventional V-belt. Ideally, our alternator will work with the stock belt; this way, we can grab a replacement at any auto parts store.
Next, we make sure we�re not going to spin the alternator too quickly or too slowly. We also try to find a multiple-wire alternator, as the one-wire pieces don�t have provisions for a dashboard warning indicator�also known as the idiot light.
Most Lucas alternators produce less than 40 amps of current, but modern alternators typically produce much more�often starting around 60 amps. As we�ve already hinted, most of our classics don�t need tons of juice, so we like to stick with a lower-output, compact alternator. We�ve found that the Denso alternators used on Japanese cars fit the bill very well. Our favorites are the ones that came on �90s-era Geos and the ones that Gustafson Specialty sells.
From left to right are poor, better and best options for mounting brackets
This is where conversions often fall apart. Many swappers choose the right alternator, but then they blow the deal by mounting it poorly. The alternator must be mounted so that it�s perfectly lined up with the other pulleys in the system. The mount must also be strong and capable of properly distributing stresses.
Go Double: We always mount our alternators on double ears or in double shear; too often we see single-ear mounts that eventually overstress a fastener or mounting ear. While many swaps rely on the ear of the water pump as a sole mounting point, we always use a second point for reinforcement, usually using 3/16- or 1/4-inch steel for our brackets.
Use the Right Fasteners: We also insist on close tolerances with all fasteners as well as hardware that properly matches with the holes. People often make the mistake of using metric bolts in American unit-sized holes and vice versa. This can quickly result in flopping, rattling, shaking, shifting and breaking.
Once we�ve sourced the right alternator and correctly mounted it, we can tackle the wiring. Our modern alternator has more current potential than the original wiring can handle, so we need to rewire the system. Since we start this new wiring from scratch, we also like to incorporate some additional safety into the system.
Our method goes like this: We find the maximum current output capacity for our alternator, then pick an appropriate master charging wire size. We usually use the factory color for this wire, which is brown in Lucas systems.
Here�s where the extra safety comes in: We add a fusible link to this master charging wire. A fusible link, as the name implies, works as a fuse. If anything goes dramatically wrong, the fusible link will sacrifice itself and melt away, effectively saving the more expensive components. Once we have selected our main charging wire and fusible link, we use the original wiring setup as a guide to install them�usually from the alternator to the starter solenoid.
Assuming we can get our hands on a multiple-wire alternator, the next part of our wiring job is to make the dashboard�s idiot light work properly. This usually takes a little research, but most multiplewire units work by becoming �excited� with external voltage.
One side of the idiot light is linked to the alternator, while the other side is linked to positive 12 volts. (Technically, the voltage is closer to 13.5-13.8, but we�re sticking to the nomenclature of our nominal 12-volt systems.) When the key is in the On position and the alternator is not working properly, a ground condition occurs and illuminates the idiot light to indicate a problem. When the key is on and the alternator is operating properly, the alternator sends positive 12 volts back to the light, extinguishing it.
To deliver the necessary volts, we run an exciter wire between the alternator and the idiot light; on Lucas systems, this is usually a brown wire with a yellow tracer. If a car features a voltmeter or ammeter, however, no wiring modification is required to get the idiot light working; these gauges can usually pick up their signals downstream of the alternator wiring.
Our last step is to deal with the now-abandoned OEM wiring. When it comes to this task, there are two good choices and one bad one. The bad one is to let the wiring hang and potentially short out. A better choice is to disconnect the wires, then tape and hide them. We do this if we think there is a chance the car might return to the OEM configuration. After all, we wouldn�t want to complicate the process by cutting off the wiring components.
The other good choice is to completely remove the wiring from the loom so it doesn�t create any risk or confusion for anyone in the future. This usually requires cutting apart the loom�s outside wrapping and then rewrapping it, which is no trivial task. It does make things neater, however, so we often take this route.
---------------------------------------------------------------------------------------------------------------------
- Picking the right alternator.
- Making a very solid mount and adjuster.
- Wiring the alternator correctly.
Pick the Right Alternator
From left to right: A Lucas Generator, a Lucas 16ACR 32-amp alternator, and a modern Denso 55-amp alternator
Some alternator conversions make more sense than others. For example, some of the early alternators with external regulators aren�t available anymore, so your only choice is to convert to something else.
Swapping a generator for an alternator is another advantageous move. Many generators can barely keep up with the charging demands of the headlights and starter, so they probably won�t cut it if you�ve added a stereo or a big ignition system. Most generators also use bushings instead of bearings; an alternator with a bearing-equipped rotating mass is a better option.
When it comes to generators and outdated alternators, we feel that it�s usually best to do what the factory eventually did: Upgrade to a good alternator.
If you have an MGA or early MGB, install the factory alternator from a later MGB. For a Triumph TR or a Jaguar E-type, do the same thing: Look toward a later model for a solution. You can source the stock mounting hardware and alternator instead of engineering them yourself, saving a good deal of time and effort. You�ll still have to modify the wiring, but having two out of three jobs done up front ain�t bad.
If you want more output than an OEM alternator, then it�s time to do some careful shopping. Many people use mid- to late-1970s GM alternators because they�re common, inexpensive and rather durable. Late-1970s Bosch alternators show up quite often, too�especially on MGBs, since the conversion is nearly a bolt-in proposition.
For our money, however, we would pick a compact Japanese alternator and do things right. While it�s a bit hard to find quality data and specifications on alternators, we try to match the unit to our particular application.
First, we find an alternator that will physically fit; usually, the more compact it is, the better. Then we consider the pulleys; while many modern alternators feature pulleys for multi-groove serpentine belts, we want one that has�or can at least accept�a pulley that uses a conventional V-belt. Ideally, our alternator will work with the stock belt; this way, we can grab a replacement at any auto parts store.
Next, we make sure we�re not going to spin the alternator too quickly or too slowly. We also try to find a multiple-wire alternator, as the one-wire pieces don�t have provisions for a dashboard warning indicator�also known as the idiot light.
Most Lucas alternators produce less than 40 amps of current, but modern alternators typically produce much more�often starting around 60 amps. As we�ve already hinted, most of our classics don�t need tons of juice, so we like to stick with a lower-output, compact alternator. We�ve found that the Denso alternators used on Japanese cars fit the bill very well. Our favorites are the ones that came on �90s-era Geos and the ones that Gustafson Specialty sells.
How-To: Solidly mount your alternator
From left to right are poor, better and best options for mounting brackets
This is where conversions often fall apart. Many swappers choose the right alternator, but then they blow the deal by mounting it poorly. The alternator must be mounted so that it�s perfectly lined up with the other pulleys in the system. The mount must also be strong and capable of properly distributing stresses.
Go Double: We always mount our alternators on double ears or in double shear; too often we see single-ear mounts that eventually overstress a fastener or mounting ear. While many swaps rely on the ear of the water pump as a sole mounting point, we always use a second point for reinforcement, usually using 3/16- or 1/4-inch steel for our brackets.
Use the Right Fasteners: We also insist on close tolerances with all fasteners as well as hardware that properly matches with the holes. People often make the mistake of using metric bolts in American unit-sized holes and vice versa. This can quickly result in flopping, rattling, shaking, shifting and breaking.
Wire It Right
Once we�ve sourced the right alternator and correctly mounted it, we can tackle the wiring. Our modern alternator has more current potential than the original wiring can handle, so we need to rewire the system. Since we start this new wiring from scratch, we also like to incorporate some additional safety into the system.
Our method goes like this: We find the maximum current output capacity for our alternator, then pick an appropriate master charging wire size. We usually use the factory color for this wire, which is brown in Lucas systems.
Here�s where the extra safety comes in: We add a fusible link to this master charging wire. A fusible link, as the name implies, works as a fuse. If anything goes dramatically wrong, the fusible link will sacrifice itself and melt away, effectively saving the more expensive components. Once we have selected our main charging wire and fusible link, we use the original wiring setup as a guide to install them�usually from the alternator to the starter solenoid.
Assuming we can get our hands on a multiple-wire alternator, the next part of our wiring job is to make the dashboard�s idiot light work properly. This usually takes a little research, but most multiplewire units work by becoming �excited� with external voltage.
One side of the idiot light is linked to the alternator, while the other side is linked to positive 12 volts. (Technically, the voltage is closer to 13.5-13.8, but we�re sticking to the nomenclature of our nominal 12-volt systems.) When the key is in the On position and the alternator is not working properly, a ground condition occurs and illuminates the idiot light to indicate a problem. When the key is on and the alternator is operating properly, the alternator sends positive 12 volts back to the light, extinguishing it.
To deliver the necessary volts, we run an exciter wire between the alternator and the idiot light; on Lucas systems, this is usually a brown wire with a yellow tracer. If a car features a voltmeter or ammeter, however, no wiring modification is required to get the idiot light working; these gauges can usually pick up their signals downstream of the alternator wiring.
Our last step is to deal with the now-abandoned OEM wiring. When it comes to this task, there are two good choices and one bad one. The bad one is to let the wiring hang and potentially short out. A better choice is to disconnect the wires, then tape and hide them. We do this if we think there is a chance the car might return to the OEM configuration. After all, we wouldn�t want to complicate the process by cutting off the wiring components.
The other good choice is to completely remove the wiring from the loom so it doesn�t create any risk or confusion for anyone in the future. This usually requires cutting apart the loom�s outside wrapping and then rewrapping it, which is no trivial task. It does make things neater, however, so we often take this route.
---------------------------------------------------------------------------------------------------------------------
__________________
Keystone Motor Club (Founded 2012)... Free car show Every 3rd Saturday, newsletter is
https://www.tamparacing.com/forums/e...-car-club.html
Keystone picture gallery is here:
https://carstoshow.com/eventdetails.aspx?eventid=93202
Veterans and Friends on First Saturday...Some pictures....
https://carstoshow.com/registerevent...eventid=102331
Port Richey Rod Run at Coast Buick GMC
https://carstoshow.com/registerevent.aspx?eventid=99114
50's Diner US19.... A Florida Attraction.
1730 US-19, Holiday Fl 34691 click: https://www.tamparacing.com/forums/t...-racing.html CHRA sanctioned cruise-in.
Cruise-In; Free; Every Saturday 5-8PM plus 10% off the whole menu to cruisers
50's Diner pictures are here: https://carstoshow.com/eventdetails.aspx?eventid=93194
All Cars Every 2nd Saturday Free Breakfast: Since 2015 and more. click: https://www.tamparacing.com/forums/e...ast-tampa.html
Tampa Racing.com covers the Tampa car scene and supports many fund raisers, worthy causes and events that enrich our community. We hope you enjoy them all.
What do I do? ---- on-site *Aftermarket* spring/suspension installations --- on-site impact wrenching---street lowering with your own stock springs...........True Bi-xenon HID projector headlight conversions........ Much more at Bob's Garage!
https://www.tamparacing.com/forums/b...ontact-us.html
https://www.tamparacing.com/forums/b...e-senor-honda/
Keystone Motor Club (Founded 2012)... Free car show Every 3rd Saturday, newsletter is
https://www.tamparacing.com/forums/e...-car-club.html
Keystone picture gallery is here:
https://carstoshow.com/eventdetails.aspx?eventid=93202
Veterans and Friends on First Saturday...Some pictures....
https://carstoshow.com/registerevent...eventid=102331
Port Richey Rod Run at Coast Buick GMC
https://carstoshow.com/registerevent.aspx?eventid=99114
50's Diner US19.... A Florida Attraction.
1730 US-19, Holiday Fl 34691 click: https://www.tamparacing.com/forums/t...-racing.html CHRA sanctioned cruise-in.
Cruise-In; Free; Every Saturday 5-8PM plus 10% off the whole menu to cruisers
50's Diner pictures are here: https://carstoshow.com/eventdetails.aspx?eventid=93194
All Cars Every 2nd Saturday Free Breakfast: Since 2015 and more. click: https://www.tamparacing.com/forums/e...ast-tampa.html
Tampa Racing.com covers the Tampa car scene and supports many fund raisers, worthy causes and events that enrich our community. We hope you enjoy them all.
What do I do? ---- on-site *Aftermarket* spring/suspension installations --- on-site impact wrenching---street lowering with your own stock springs...........True Bi-xenon HID projector headlight conversions........ Much more at Bob's Garage!
https://www.tamparacing.com/forums/b...ontact-us.html
https://www.tamparacing.com/forums/b...e-senor-honda/
Registered
Thread Starter
All Good Things Take Time
We originally stated that most alternator conversions are bad news. However, we also showed you the proper approach to making your swap the exception. Doing things correctly will take additional fabrication, wiring and time, but the results will be worth it: You�ll end up with a safe, long-lasting and easy-to-service conversion.Step 1

Alternators require a solid mount to prevent vibration-related damage. After making some quick measurements, we roughed out a mount from some 1/4-inch cold rolled steel.
Step 2

After some more measuring, cutting, welding, drilling and test fittings, our new beefy mount was starting to take shape. We just needed to give it a clean look with some grinding and painting.
Step 3

Once we cleaned up the edges and applied a fresh coat of paint, the mount was ready for installation.
Step 4

Instead of using an OEM sliderstyle adjuster, we fabricated a nicer component using a pair of rod ends and coupler sourced from McMaster-Carr.
__________________
Keystone Motor Club (Founded 2012)... Free car show Every 3rd Saturday, newsletter is
https://www.tamparacing.com/forums/e...-car-club.html
Keystone picture gallery is here:
https://carstoshow.com/eventdetails.aspx?eventid=93202
Veterans and Friends on First Saturday...Some pictures....
https://carstoshow.com/registerevent...eventid=102331
Port Richey Rod Run at Coast Buick GMC
https://carstoshow.com/registerevent.aspx?eventid=99114
50's Diner US19.... A Florida Attraction.
1730 US-19, Holiday Fl 34691 click: https://www.tamparacing.com/forums/t...-racing.html CHRA sanctioned cruise-in.
Cruise-In; Free; Every Saturday 5-8PM plus 10% off the whole menu to cruisers
50's Diner pictures are here: https://carstoshow.com/eventdetails.aspx?eventid=93194
All Cars Every 2nd Saturday Free Breakfast: Since 2015 and more. click: https://www.tamparacing.com/forums/e...ast-tampa.html
Tampa Racing.com covers the Tampa car scene and supports many fund raisers, worthy causes and events that enrich our community. We hope you enjoy them all.
What do I do? ---- on-site *Aftermarket* spring/suspension installations --- on-site impact wrenching---street lowering with your own stock springs...........True Bi-xenon HID projector headlight conversions........ Much more at Bob's Garage!
https://www.tamparacing.com/forums/b...ontact-us.html
https://www.tamparacing.com/forums/b...e-senor-honda/
Keystone Motor Club (Founded 2012)... Free car show Every 3rd Saturday, newsletter is
https://www.tamparacing.com/forums/e...-car-club.html
Keystone picture gallery is here:
https://carstoshow.com/eventdetails.aspx?eventid=93202
Veterans and Friends on First Saturday...Some pictures....
https://carstoshow.com/registerevent...eventid=102331
Port Richey Rod Run at Coast Buick GMC
https://carstoshow.com/registerevent.aspx?eventid=99114
50's Diner US19.... A Florida Attraction.
1730 US-19, Holiday Fl 34691 click: https://www.tamparacing.com/forums/t...-racing.html CHRA sanctioned cruise-in.
Cruise-In; Free; Every Saturday 5-8PM plus 10% off the whole menu to cruisers
50's Diner pictures are here: https://carstoshow.com/eventdetails.aspx?eventid=93194
All Cars Every 2nd Saturday Free Breakfast: Since 2015 and more. click: https://www.tamparacing.com/forums/e...ast-tampa.html
Tampa Racing.com covers the Tampa car scene and supports many fund raisers, worthy causes and events that enrich our community. We hope you enjoy them all.
What do I do? ---- on-site *Aftermarket* spring/suspension installations --- on-site impact wrenching---street lowering with your own stock springs...........True Bi-xenon HID projector headlight conversions........ Much more at Bob's Garage!
https://www.tamparacing.com/forums/b...ontact-us.html
https://www.tamparacing.com/forums/b...e-senor-honda/
Registered
Thread Starter
Step 5

Now it was time to address the wiring. Since our 60-amp alternator could potentially melt the OEM 12-gauge alternator wiring, we made up a new main charging wire using 10-gauge wire along with a 14-gauge fusible link. As a rule of thumb, a fusible link should be four gauge numbers smaller than the wiring it is protecting. We stuck to the factory color code�brown in this case.
Step 6

We also made up a subharness for the exciter circuit and the charging light. These subharnesses vary from alternator to alternator, so it�s important to do your research. In our case, we used a schematic provided by Gustafson Specialty. We made up the 16-gauge wiring using the Lucas color code�brown with a yellow tracer.
Step 7

We connected the OEM charging wires to the externally mounted starter solenoid, which is the main wiring junction from the battery. We then removed the OEM wiring from this junction and wired in our new main charging wire.
Step 8

The final installation looks stock. Since we took the time to tackle each step correctly, we now have a safe, long-lasting solution that uses the factory belt.
Sources
Eclectic Motorworkseclecticmotorworks.com
Gustafson Specialty Products
gustafsonspecialty.com
Moss Motors
mossmotors.com
__________________
Keystone Motor Club (Founded 2012)... Free car show Every 3rd Saturday, newsletter is
https://www.tamparacing.com/forums/e...-car-club.html
Keystone picture gallery is here:
https://carstoshow.com/eventdetails.aspx?eventid=93202
Veterans and Friends on First Saturday...Some pictures....
https://carstoshow.com/registerevent...eventid=102331
Port Richey Rod Run at Coast Buick GMC
https://carstoshow.com/registerevent.aspx?eventid=99114
50's Diner US19.... A Florida Attraction.
1730 US-19, Holiday Fl 34691 click: https://www.tamparacing.com/forums/t...-racing.html CHRA sanctioned cruise-in.
Cruise-In; Free; Every Saturday 5-8PM plus 10% off the whole menu to cruisers
50's Diner pictures are here: https://carstoshow.com/eventdetails.aspx?eventid=93194
All Cars Every 2nd Saturday Free Breakfast: Since 2015 and more. click: https://www.tamparacing.com/forums/e...ast-tampa.html
Tampa Racing.com covers the Tampa car scene and supports many fund raisers, worthy causes and events that enrich our community. We hope you enjoy them all.
What do I do? ---- on-site *Aftermarket* spring/suspension installations --- on-site impact wrenching---street lowering with your own stock springs...........True Bi-xenon HID projector headlight conversions........ Much more at Bob's Garage!
https://www.tamparacing.com/forums/b...ontact-us.html
https://www.tamparacing.com/forums/b...e-senor-honda/
Keystone Motor Club (Founded 2012)... Free car show Every 3rd Saturday, newsletter is
https://www.tamparacing.com/forums/e...-car-club.html
Keystone picture gallery is here:
https://carstoshow.com/eventdetails.aspx?eventid=93202
Veterans and Friends on First Saturday...Some pictures....
https://carstoshow.com/registerevent...eventid=102331
Port Richey Rod Run at Coast Buick GMC
https://carstoshow.com/registerevent.aspx?eventid=99114
50's Diner US19.... A Florida Attraction.
1730 US-19, Holiday Fl 34691 click: https://www.tamparacing.com/forums/t...-racing.html CHRA sanctioned cruise-in.
Cruise-In; Free; Every Saturday 5-8PM plus 10% off the whole menu to cruisers
50's Diner pictures are here: https://carstoshow.com/eventdetails.aspx?eventid=93194
All Cars Every 2nd Saturday Free Breakfast: Since 2015 and more. click: https://www.tamparacing.com/forums/e...ast-tampa.html
Tampa Racing.com covers the Tampa car scene and supports many fund raisers, worthy causes and events that enrich our community. We hope you enjoy them all.
What do I do? ---- on-site *Aftermarket* spring/suspension installations --- on-site impact wrenching---street lowering with your own stock springs...........True Bi-xenon HID projector headlight conversions........ Much more at Bob's Garage!
https://www.tamparacing.com/forums/b...ontact-us.html
https://www.tamparacing.com/forums/b...e-senor-honda/


