
*** Photoshop Help Thread ***

Registered User
Thread Starter

Join Date: Jan 2007
Posts: 2,801
Likes: 0
Received 0 Likes
on
0 Posts
New Rules
This thread is for if you need help in Photoshop. It is also made for if you would like to make a detailed summary about how to do something. Please, do not post any comments such as "hey thanks for that!!!", if you feel the need to thank them just send some rep their way. Thanks and enjoy.
- Hoosier Daddy
Effective as of: 11/21/07
Last edited by HoosierDaddy; 11-21-2007 at 08:17 PM.

Registered User
Thread Starter
Join Date: Jan 2007
Posts: 2,801
Likes: 0
Received 0 Likes
on
0 Posts
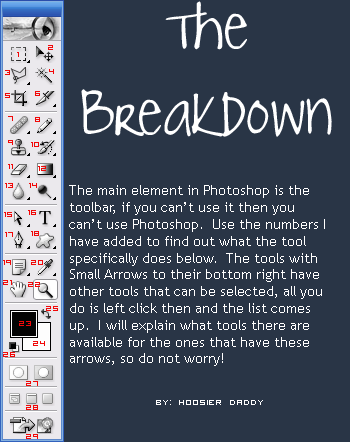
Note: Some of these descriptions can be confusing. If you need any clarification, just post your question. Also note that whatever tool is selected, that is the first description in that #. Example: If the pen tool is selected in the above toolbar image, it will be described first. Toolbar taken from Photoshop 7.0
1). Rectangular Marquee Tool - This is your bestfriend when it comes to Photoshop. This tool has a wide variety of uses, the main one is being able to select specific things. As an example, I used it to cutout the toolbar image above in a screenshot. All you do is select the tool, and drag around the item you want selected, then copy it. If you would like to be more detailed you can zoom in like I did and cut out any not needed colors. (see #22 for zoom)
1A). Elliptical Marquee Tool - Thiis is the same as the rectangular marquee tool except it isn't squared, its a circle. I use this mainly to make a shape and fill it with color.
1B). Single Row Marquee Tool - This is for making 1px straight lines on a image. Make sure to make a new layer before doing this, this allows you to move it around afterwards.
1C). Single Column Marquee Tool - Same as above except its columns.
2). Move Tool - This will allow you to move things around. Such as text, any images on their own layers, etc... This is another highly-used tool in Photoshop.
3). Polygonal Lasso Tool - Allows for more precise selections than the normal lasso tool.
3A). Lasso Tool - Is used to draw a selection around the part of the image that you want to isolate.
3B). Magnetic Lasso Tool - Is especially useful for quickly selecting objects with complex edges set against high-contrast backgrounds.
4). Magic Wand Tool - Lets you make a selection based on the consistency of colors in an area of the image. For example, you could use this tool to select the blue sky of an outdoor image without having to trace the outline of the sky.
5). Crop Tool - Draws a rectangle around a portion of your image. After the box is drawn you can execute the command and the area outside of the box will be discarded.
6). Slice Tool - Allows you to carve up a large image into smaller pieces to be used on the web. Each slice can be given it's own URL, rollover effect and alt image information.
6A). Slice Select Tool - Allows you to select any slice in the image. Example: You can slice up a image into smaller images. This is how websites are setup.
7). Healing Brush Tool - Is a brush used to remove inperfections from images. It is similar to the Clone Stamp tool in that you must sample and area of the image before you apply the brush to the blemished area.
7A). Patch Tool - Lets you repair a selected area with pixels from another area or a pattern.
8.). Pencil Tool - Allows you to draw a line in the pixel size that you specify. The tool has a crisper edge than the paint brush.
8A). Brush Tool - Allows you paint with the current foreground color. By default, the brush tool creates soft strokes of color.
9). Clone Stamp Tool - Takes a sample of an image, which you can then apply over another image or part of the same image. Each stroke of the tool paints on more of the sample.
9A). Pattern Stamp Tool - Lets you paint with a pattern. You can select a pattern from the pattern libraries or create your own patterns.
10). History Brush Tool - Lets you paint a copy of one state or snapshot of an image into the current image window. This tool makes a copy, or sample, of the image and then paints with it.
10A). Art History Brush - Lets you paint with stylized strokes, using the source data from a specified history state or snapshot. By experimenting with different paint style, size, and tolerance options, you can simulate the texture of painting with different colors and artistic styles.
11). Eraser Tool - Erases anything you drag across.
11A). Background Eraser Tool - Lets you erase pixels on a layer to transparency as you drag; this allows you to erase the background while maintaining the edges of an object in the foreground.
11B). Magic Eraser Tool - The tool automatically changes all similar pixels. If you're working in the background, or in a layer with locked transparency, the pixels change to the background color; otherwise, the pixels are erased to transparency.
12). Gradient Tool - Creates a fade effect. The starting point (where the mouse is pressed) and ending point (where the mouse is released) affect the gradient appearance, depending on the gradient tool used.
12A). Paint Bucket Tool - Fills the layer with the foreground color. If an area is selected, only that area will be filled with the foreground color.
13). Blur Tool - Softens hard edges or areas in an image to reduce detail.
13A). Sharpen Tool - Focuses soft edges to increase clarity or focus.
13B). Smudge Tool - Simulates the actions of dragging a finger through wet paint. The tool picks up color where the stroke begins and pushes it in the direction you drag.
14). Dodge Tool - Used to lighten or darken areas of the image.
14A). Burn Tool - Used to lighten or darken areas of the image.
14B). Sponge Tool - Subtly changes the color saturation of an area. In Grayscale mode, the tool increases or decreases contrast by moving gray levels away from or toward the middle gray.
15). Direct Selection Tool - Selects an anchor point in the path.
15A). Path Selection Tool - Allows you to merge overlapping components into a single component.
16). Horizontal Type Tool - Allows you to add text to your image. Select the tool then drag it on the image. Type your text and it will come out horizontally
16A). Vertical Type Tool - Same as above except Vertical
16B). Horizontal Type Mask Tool - Creates a selection in the shape of the type.
16C). Vertical Type Mask Tool - Creates a selection in the shape of the type.
17). Pen Tool - Lets you create straight lines and smooth flowing curves with greater precision than is possible with the freeform pen tool.
17A). Freeform Pen Tool - Lets you draw as if you were drawing with a pencil on paper. Anchor points are added automatically as you draw.
17B). Add Anchor Point Tool - Lets you add anchor points on a shape
17C). Delete Anchor Point Tool - Lets you delete anchor points on a shape
17D). Convert Pen Tool - To convert a smooth point to a corner point without direction lines.
18.). Custom Shape Tool - Choose from a list of predefined shapes.
18A). Rectangle Tool - Allows you to create rectangles.
18B). Rounded Rectangle Tool - Create round rectangles..... ovals
18C). Ellipse Tool - Allows you to create ellipses..... circles
18D). Polygon Tool - Create a polygon. You can also change how many sides you want in the option bar at the top.
18E). Line Tool - Allows you to create lines. It is easier to just use the Row and Column Marquee Tool in my opinion.
19). Notes Tool - A resizable window appears for entering text. Allows you to add notes without them being on finished product.
19A). Audio Annotation Tool - Allows you to make a audio note. You must have a microphone to use this.
20). Eyedropper Tool - Samples color to designate a new foreground or background color. You can sample from the active image or from anywhere else on the screen.
20A). Color Sampler Tool - Samples color to designate a new foreground or background color. You can sample from the active image or from anywhere else on the screen.
20B). Measure Tool - Calculates the distance between any two points in the work area. When you measure from one point to another, a nonprinting line is drawn
21). Hand Tool - Is used to navigate to another area of an image when all of the pixels won't fit on the screen.
22). Zoom Tool - The image is taken to a higher or lower magnification. Select the zoom tool by clicking it's icon or pressing z on your keyboard. When the tool is selected, the cursor becomes a small magnifier with a plus sign in the center. The plus indicates that clicking on the image will bring you closer to the image. Hold the Alt/Option key on the keyboard and the plus changes to a minus to zoom out.
23). Foreground Color - The main color you are using. Double click the square to change the color.
24). Background Color - This is your secondary color. Double click the square to change the color.
25). Switch Foreground Color and Background Color
26). Reset the Foreground Color and Background Color to default.
27). Allows you to switch between Standard and Quick Edit Mode. Just use Standard mode all the time.
28.). Different views modes. Choose between Standard Screen Mode, Full Screen Mode with Menu Bar, and Full Screen Mode.
29). Switch to Imageready. This will only work if you have Imageready installed.
Registered User
Thread Starter
Join Date: Jan 2007
Posts: 2,801
Likes: 0
Received 0 Likes
on
0 Posts
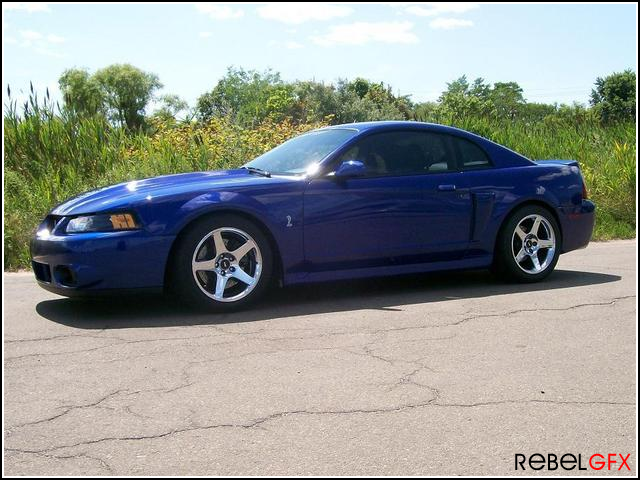
Borders - RebelGFX
Many of you have seen my photography, and I have a signature border. It is the only border I use because it really makes the photo 'pop'. It is very simple to add to any image and heres how to:
First, open the image you would like to add a border to. Duplicate the image (Click the Layer Menu and go to Duplicate Layer...), then delete the original background layer. You need to do this because the original layer is locked -- which means you cannot do anything to it.
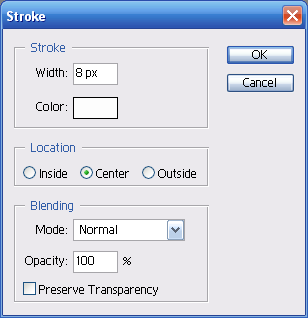
Second, Go to Edit >> Stroke. A dialog box comes up like below. Apply the settings shown:
Click Ok
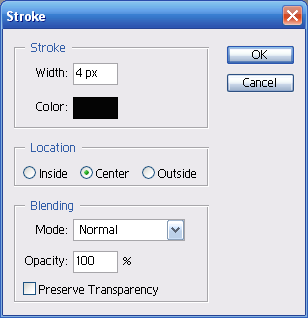
Third, Go to Edit >> Stroke once again. The dialog box will come back up, now apply these settings:
Click Ok
And voila! My signature border.

Many of you have seen my photography, and I have a signature border. It is the only border I use because it really makes the photo 'pop'. It is very simple to add to any image and heres how to:
First, open the image you would like to add a border to. Duplicate the image (Click the Layer Menu and go to Duplicate Layer...), then delete the original background layer. You need to do this because the original layer is locked -- which means you cannot do anything to it.
Second, Go to Edit >> Stroke. A dialog box comes up like below. Apply the settings shown:
Click Ok
Third, Go to Edit >> Stroke once again. The dialog box will come back up, now apply these settings:
Click Ok
And voila! My signature border.
Last edited by HoosierDaddy; 11-21-2007 at 05:52 PM.
Registered User
Thread Starter
Join Date: Jan 2007
Posts: 2,801
Likes: 0
Received 0 Likes
on
0 Posts
I added new rules, make sure to check them out.
--------------------------------------------------------------
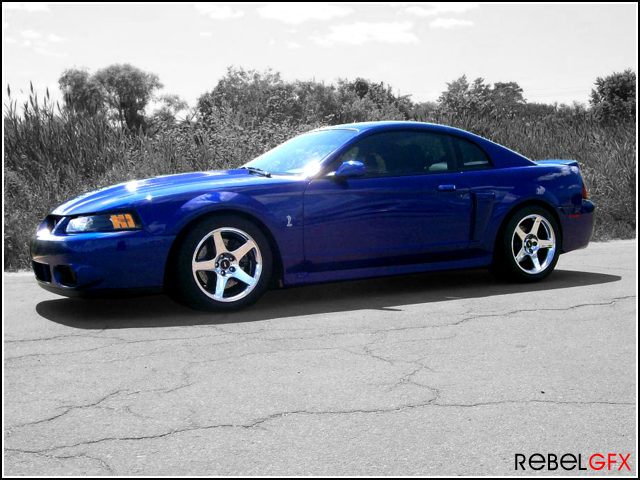
Desaturation
Some photos look good with a black and white background, or in black and white all together. In Photoshop terms this is called Desaturation or Grayscale. In this summary I am going to show you how to desaturate the background out of a photo and make a certain item the main focus.
1). Open the image it is that you would like to edit.
2). Duplicate the image layer once. You will end up with 2layers total. After you do this, delete the original background layer that is locked (Right Click the layer >> Delete Layer) It will say 'Background' and have a lock appear next to it.
3). With the layer (the one you duplicated) selected, select the Polygonal Lasso Tool. With this tool you are going to trace around the item you want to be in color. To make this easier, you will want to zoom in. Simply click the Zoom Tool and click anywhere on the image. Everytime you click, it zooms in more. Once you get to a desired zoom and is easy for you to trace with, click a starting point with the Polygonal Lasso Tool.
4). Trace your way around the image, make sure to include any colored parts of the item that you are keeping colorized. If it has a shadow or dark spots, it is ok to not be as precise around these. Since the background will be desaturated the shadows and dark spots will basically blend in. Remember -- I did not worry about the cars shadow.
5). With the car traced and selected, go to Edit >> Copy. Now go to Edit >> Paste to paste the traced out image onto a new layer. You will now have two layers.
6). Finally, select the bottom layer, the original picture. Go to Image >> Adjustments >> Desaturate. Don't worry if you have some color left! We will fix this.
7). Now, if you have a little bit of unwanted color here and there, simply click the layer that the pasted item is on. Click the Eraser Tool and use a small brush stroke size to erase the unwanted color. Basically you are erasing the car and the original photo will show through.
Before:
After:
--------------------------------------------------------------
Desaturation
Some photos look good with a black and white background, or in black and white all together. In Photoshop terms this is called Desaturation or Grayscale. In this summary I am going to show you how to desaturate the background out of a photo and make a certain item the main focus.
1). Open the image it is that you would like to edit.
2). Duplicate the image layer once. You will end up with 2layers total. After you do this, delete the original background layer that is locked (Right Click the layer >> Delete Layer) It will say 'Background' and have a lock appear next to it.
3). With the layer (the one you duplicated) selected, select the Polygonal Lasso Tool. With this tool you are going to trace around the item you want to be in color. To make this easier, you will want to zoom in. Simply click the Zoom Tool and click anywhere on the image. Everytime you click, it zooms in more. Once you get to a desired zoom and is easy for you to trace with, click a starting point with the Polygonal Lasso Tool.
4). Trace your way around the image, make sure to include any colored parts of the item that you are keeping colorized. If it has a shadow or dark spots, it is ok to not be as precise around these. Since the background will be desaturated the shadows and dark spots will basically blend in. Remember -- I did not worry about the cars shadow.
5). With the car traced and selected, go to Edit >> Copy. Now go to Edit >> Paste to paste the traced out image onto a new layer. You will now have two layers.
6). Finally, select the bottom layer, the original picture. Go to Image >> Adjustments >> Desaturate. Don't worry if you have some color left! We will fix this.
7). Now, if you have a little bit of unwanted color here and there, simply click the layer that the pasted item is on. Click the Eraser Tool and use a small brush stroke size to erase the unwanted color. Basically you are erasing the car and the original photo will show through.
Before:
After:
Registered User
Thread Starter
Join Date: Jan 2007
Posts: 2,801
Likes: 0
Received 0 Likes
on
0 Posts

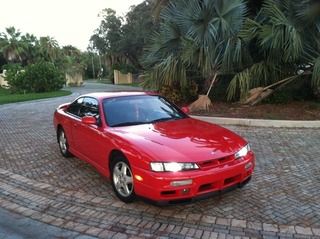
Taken by CivicFrk1
Super Dooooty
Join Date: Aug 2006
Posts: 1,133
Likes: 0
Received 0 Likes
on
0 Posts
for that border above..
i do Select>all
then Select>modify>border
then pick a number that fits the size , play with it a bit.
then go to image>adjustments>brightness/contrast.
just lower the brightness once, press OK , and repeat the same step , and itll give you a nice black border that fades out.
or atleast thats how I do it (thats my pic)
__________________
07 Mazdaspeed3-DD
SR'd Sil-Front 240 Coupe--Drift Toy

|------------------------------| ||
|....Overnight Parts From Japan....||'|";,__
|_..._...______________======| |_|_|...,]
"(@)'(@)''''''''''''''''''''''' '''''''''*|(@)(@)** **"(@)
07 Mazdaspeed3-DD
SR'd Sil-Front 240 Coupe--Drift Toy
|------------------------------| ||
|....Overnight Parts From Japan....||'|";,__
|_..._...______________======| |_|_|...,]
"(@)'(@)''''''''''''''''''''''' '''''''''*|(@)(@)** **"(@)
hey you guuuuuuyssss
Join Date: Feb 2005
Posts: 478
Likes: 0
Received 0 Likes
on
0 Posts
here is a wealth of information about how to photoshop cars, extremely useful for beginners.
THE PHOTOSHOP BIBLE
THE PHOTOSHOP BIBLE


